
These are pages containing technical documentation intended only for SOAR Support Staff.
Users are asked not to carry out any of these procedures. If in doubt, always consult with the SOAR Support Scientist.

(Updated: Aug 29, 2017; C. Briceño)
ON-SITE STAFF IS NECESSARY TO PROCEED WITH A GOODMAN COLD START UP.
PDF version of this document [11]
1. Make sure that all of the lens covers are off.
2. Make sure that the Goodman Camera Electronics are on. This can be checked from the ECS VNC Viewer and Remote Power sub-panel. If the camera electronics are not on, turn them on. If this is successful, you should hear three rapid beeps over the dome microphone You should also see the Remote Power sub-panel indicator for the camera electronics switch from "off" to "on".
3. Go to Room 109 and log the balance pressure of the CryoTiger. It should be at about 190 psi if the cooling has been turned off. The balance pressure should be around 0 psi if the cooling is on. Log this number and the date on the sheet provided.
4. Power up soaric2 (139.229.15.132).
If this does not work, somebody will have to go up to the Nasmyth and manually cycle the power on soaric2 in the electronics box.
5. Log on to soaric2 using the vncviewer from some other computer. The linux example is: vncviewer 139.229.15.132 -Shared & (the password can be obtained from the TelOps staff: soaropsATctioDOTnoaoDOTedu, or the Instrument Scientist: spointsATctioDOTnoaoDOTedu).
Soaric2 should boot directly into the Desktop, there is only one user.
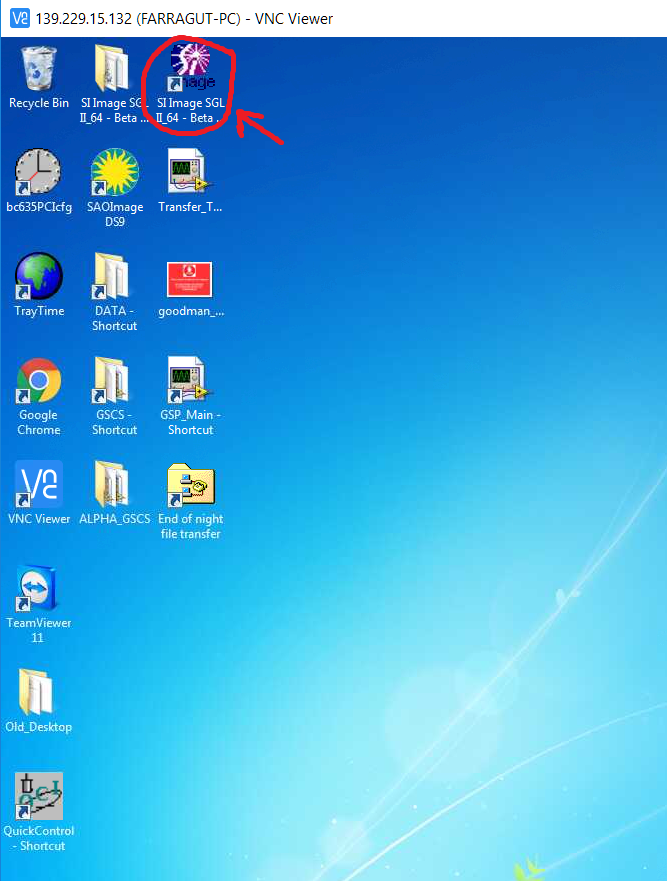
6. Starting SI Image SGL D:
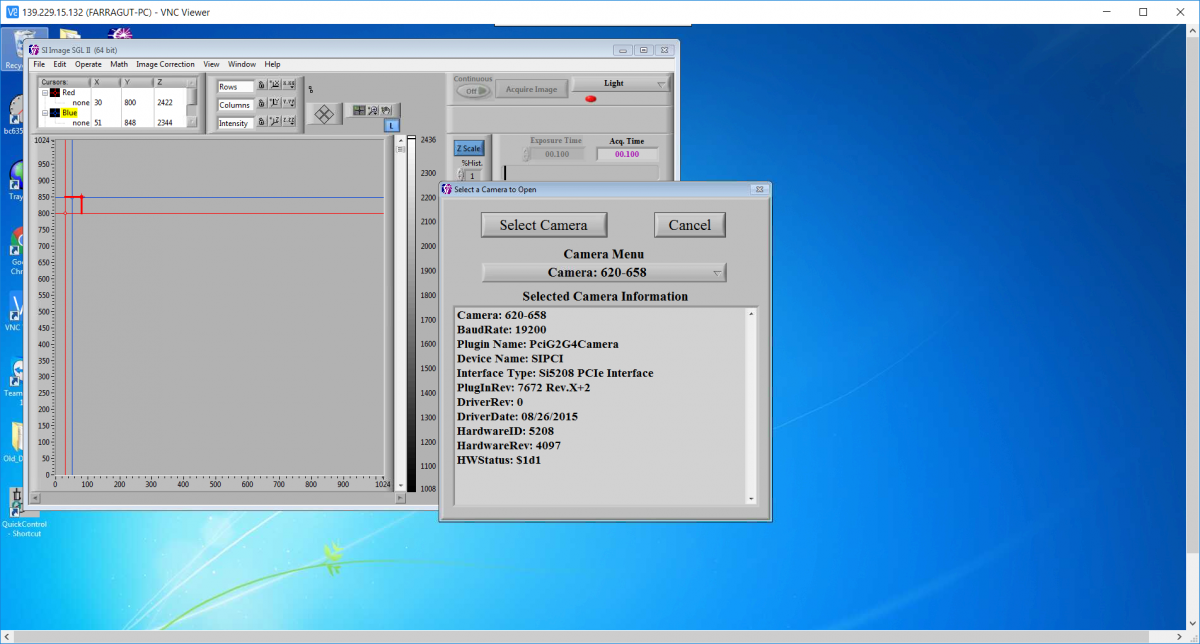
Start the SI Image SGL II software by double-clicking on the appropriate icon in the Windows desktop of Soaric2. You will immediately be prompted with the pop-up “Do you want to open a camera now?”. Select “OK”. After a few seconds, the Blue Camera should appear as “Camera: 620-658”. Choose “Select Camera”. If “Camera 620-658” cannot be found, return to step 1 and verify the camera is on. If it is, and the camera cannot be found, contact the Instrument Scientist.

7.
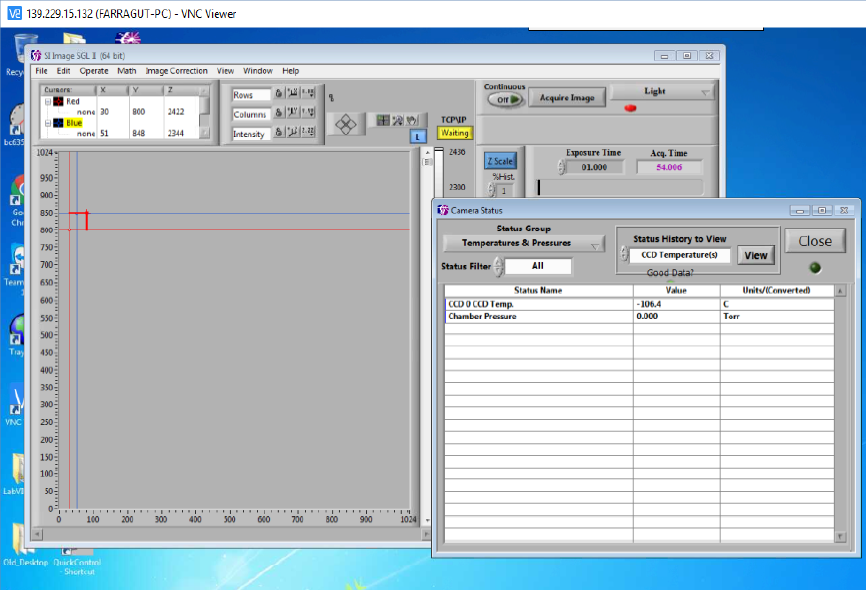
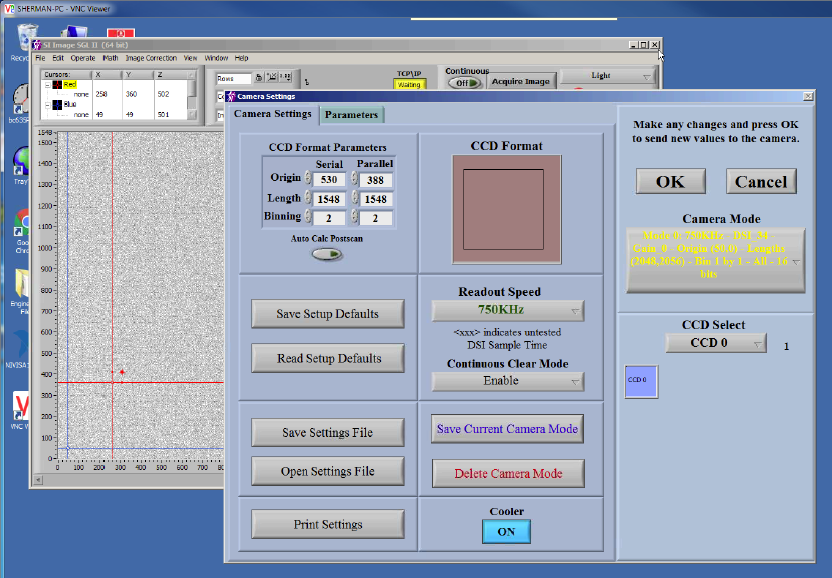
Check that the Cooler is ON as indicated in the image below. If it is OFF, Click OK and open the Camera Status Panel. The pressure should be 0 or ~<0.001 Torr (~< 10^-3 Torr or 1 mTorr), see image below. If not, the Goodman cryostat (camera) needs pumping, which is done by the SOAR day crew, and usually requires a full day or so. WARNING: DO NOT START COOLING THE CAMERA IF THE VACUUM HAS NOT BEEN REACHED.
8.Click the “Open Settings File” button and select “Goodman_blue_new.SET” to load in the Blue Camera Set file.
9. Disable the “Auto Calc Postscan” by clicking on the button. Once disabled, the arrow within the button should be greyed out and not illuminated as shown below. Click “OK” in the top right corner of the panel to load in the changes.
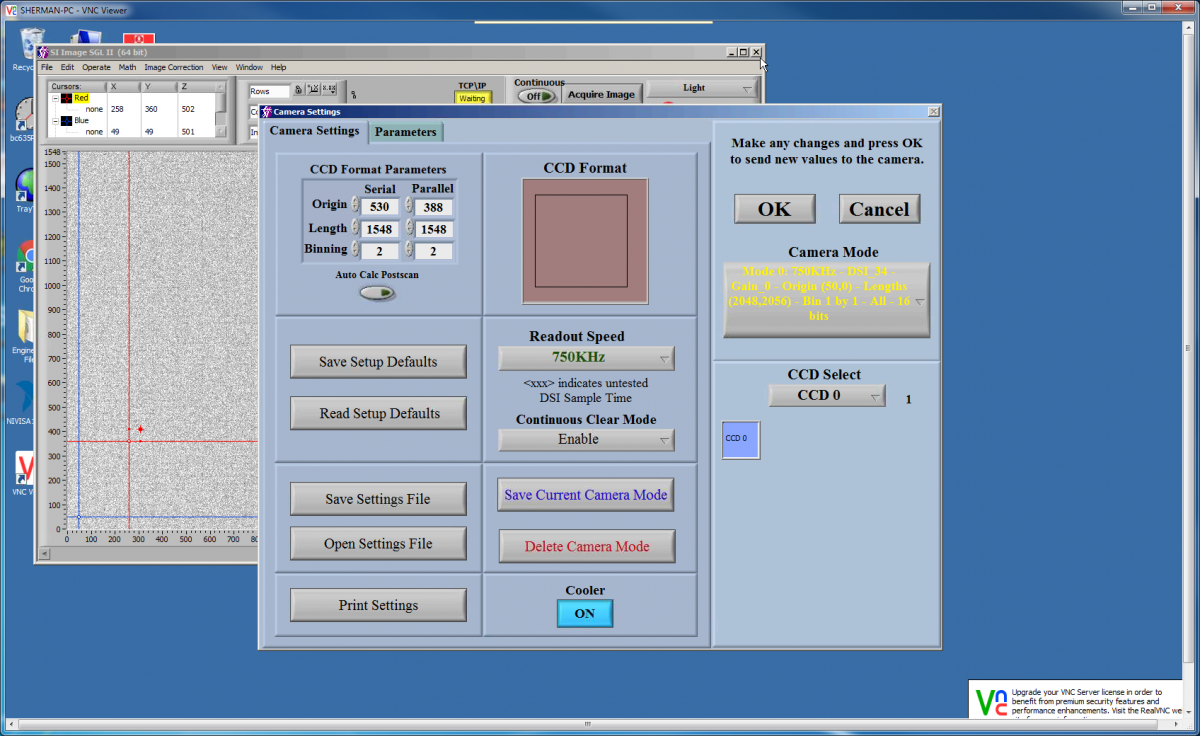
10. From the SI Image front panel, open the Camera Status window to display the current CCD Temperature and Pressure. The operating Temperature and Pressure of the Blue Camera are -106.5 C and 0.000 Torr. Log the Temperature and Pressure
11. If the Chamber pressure is above 1.000 Torr, the camera head will need pumping which can only be done by the SOAR day crew. Do not proceed to step 12 until the chamber pressure is below 1.000 Torr.
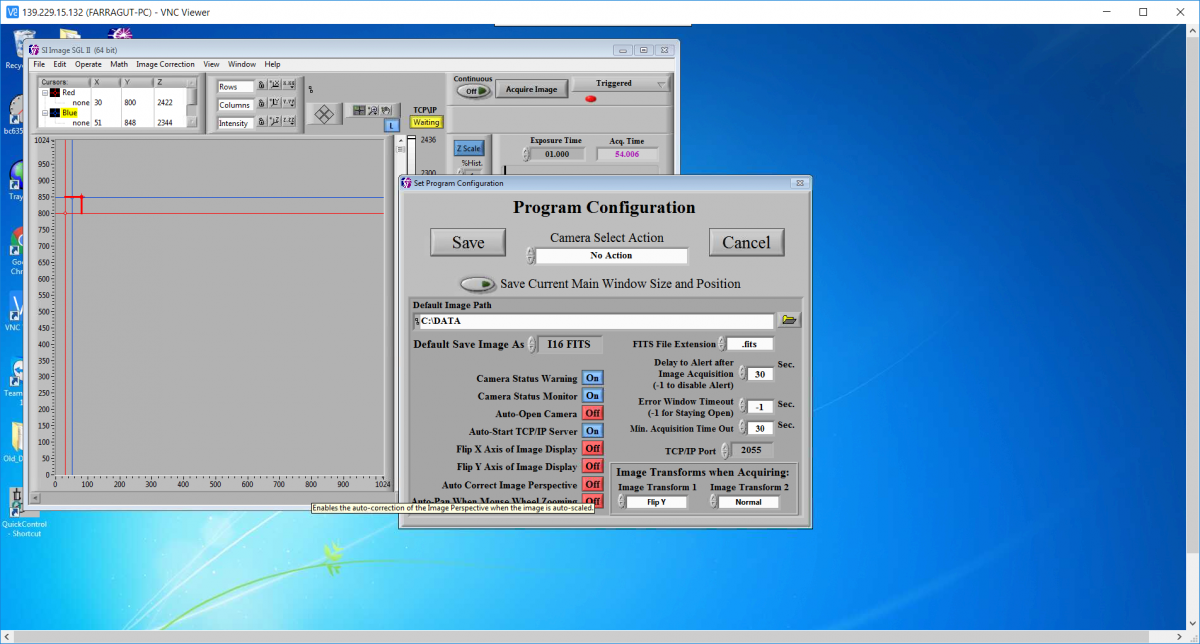
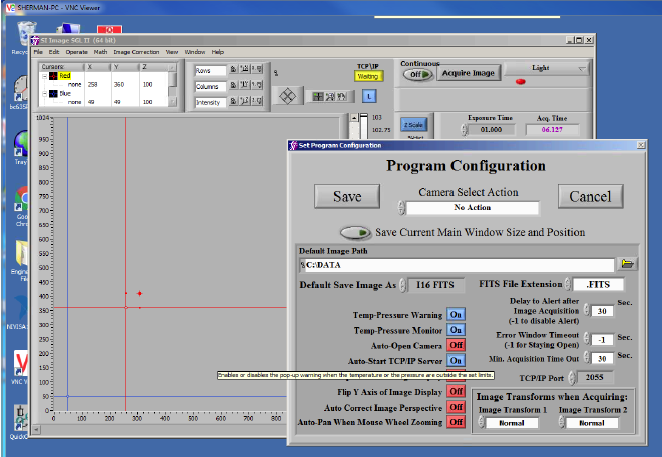
12. Under the “Operate” Menu , enable the TCP/IP server so that it shows up as a yellow box with the status “Waiting”. Also under the “Operate” Menu open the “Configure” panel. Check that the “Min. Acquisition Time Out” is set to 30 seconds as shown below. Check that Image Transform 1 is set to “Flip Y”. Save the settings. Finally, change the acquisition mode in the top right corner of SI Image from “Light” to “Triggered”.
13. Minimize the SI Image SGL GUI. DO NOT CLICK ON THE RED "X" BUTTON since this will exit the GUI. SI Image SGL II is now configured and should continue to run in the background.
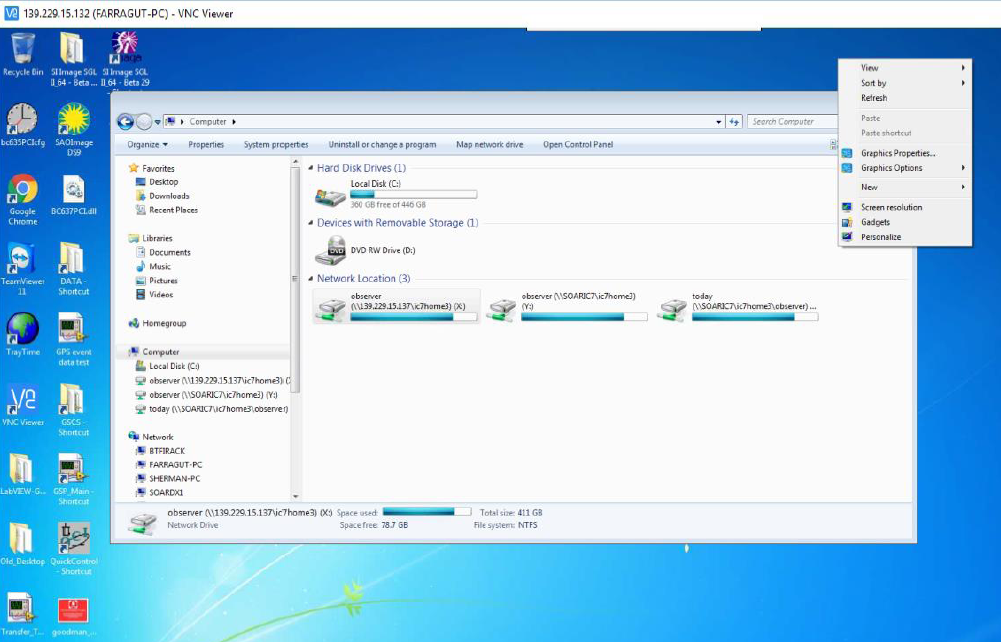
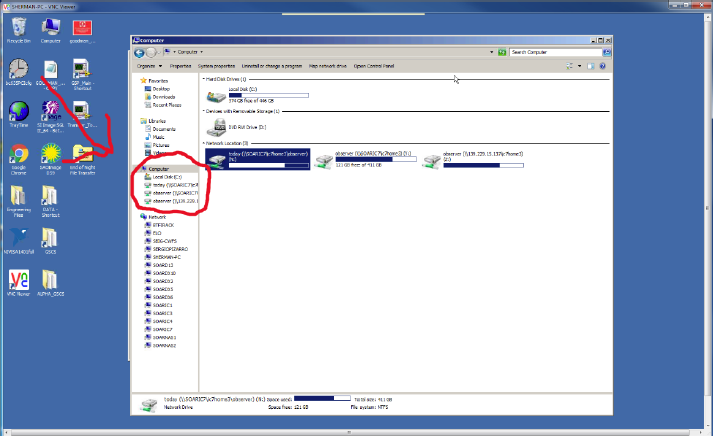
14. Check the SAMBA server connection between soaric2 and soaric7: Open Computer on the Desktop. Under “Network Locations” you should find the three soarci7 folders cross-mounted. If the network drives show Red X’s, click on each drive on the left panel the window to ensure connection until they are all green.
15. Start the automatic file transfer program: click on the "Transfer_To_ic7" icon in the soaric2 desktop:
![]()
![]()
16. Check whether the files from the latest observation night were transfered to soaric7. If they are still in soaric2 you should see them in the c:\DATA folder. If so, run the End-of-Night-Transfer DOS program on soaric2:
![]()
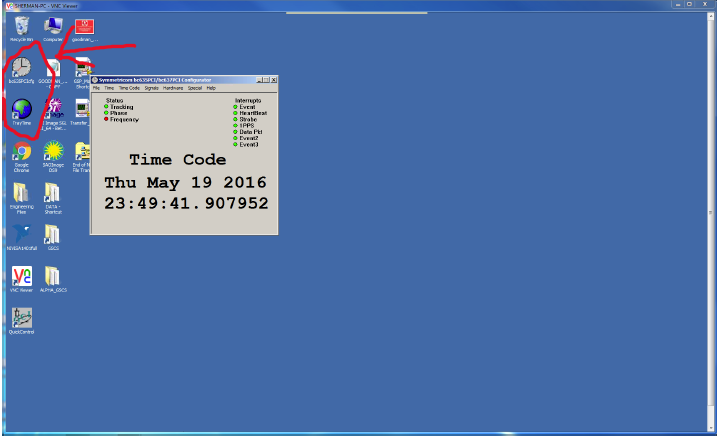
17. Start the Symmetricon GPS Real Time clock and Tray Time program. Symmetricom should be minimized and left running. The Tray Time program will run in the background and appear as a small globe in the tray in the bottom right of the desktop. These programs will ensure the GPS time signal will be recorded in the Goodman FITS image headers.

18. Double check with the Telescope Operator or day crew that:
a) The vacuum lines have been removed from Goodman (if pumping the instrument took place)
b) Instrument covers have been replaced (if applicable)
c) The Nazmyth rotator angle is ok and that nobody is working inside the instrument. After these checks, ask the Telescope Operator to turn on the Goodman electronics, and start the Goodman GUI:
![]()
19. Log on to soaric7 using the vncviewer that is appropriate for your program. The linux example is: vncviewer 139.229.15.137:<n> -Shared & .The display number <n> and password can be obtained from the TelOps staff (soaropsATctioDOTnoaoDOTedu) or the Instrument Scientist (spointsATctioDOTnoaoDOTedu).
20. Check the disk space on soaric2 by double-clicking on the "My Computer" icon. Highlight "Local Disk (C:)". Right-click and select "Properties". If the disk is almost full, please contact TelOps (soaropsATctioDOTnoaoDOTedu) or the Instrument Scientist (spointsATctio.DOTnoaoDOTedu) so they can delete older data.
21. Check the disk space on soaric7 by issuing the command "df -h" from a terminal prompt. If the /home3/observer disk is close to full, contact TelOps staff (soaropsATctioDOTnoaoDOTedu) or the Instrument Scientist (spointsATctioDOTnoaoDOTedu).
(Updated: Aug 29, 2017; C. Briceño)
ON-SITE STAFF IS NECESSARY TO PROCEED WITH A GOODMAN COLD START UP.
PDF version of this document [12]
1. Go to Room 109 and verify that the Service Cabinet is powered on. The LCD display should read “Power On”. If the LCD display does not read “Power On”, open the cabinet door and verify that the switch is in the on position.
2. Once the power is on, log the pressure values on the Supply and Return lines. If cooling is not turned on (default state after complete power loss but not after computer loss), the pressures should be equal. If cooling is already enabled, typical operating pressures are approximately between 240-280 PSI for the Supply line and 30-50 PSI for the Return line.
3. Power up soaric6 (139.229.15.136). If this does not work, somebody will have to go up to the Nasmyth and manually cycle the power on soaric6 in the electronics box.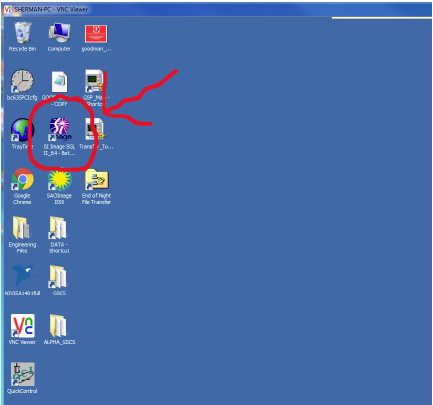
4. Log on to soaric6 using the vncviewer from some other computer. The linux example is : vncviewer 139.229.15.136 –Shared & (the password can be obtained from the TelOps staff: soaropsATctioDOTnoaoDOTedu, or the Instrument Scientist: spointsATctioDOTnoaoDOTedu).
Soaric6 should boot directly into the Desktop, there is only one user.
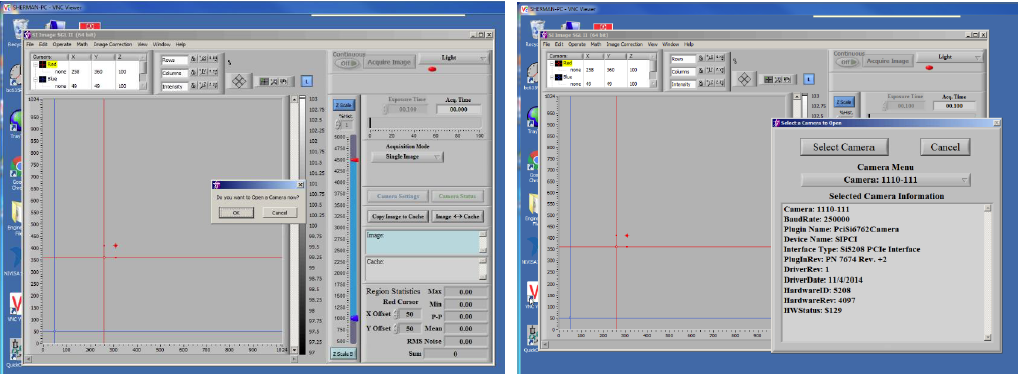
5. Starting SI Image SGL II: Start the SI Image SGL II software by double-clicking on the appropriate icon in the Windows desktop of soaric6. You will immediately be prompted with the pop-up “Do you want to open a camera now?”. Select “OK”. After a few seconds, the Red Camera should appear as “Camera: 1110-111”. Choose “Select Camera”. If “Camera 1110-111” cannot be found, return to step 1 and verify the camera is on. If it is, and the camera cannot be found, contact the Instrument Scientist.
6. Check that the Cooler is ON as indicated in the image below. If it is OFF, click the OFF button to turn cooling ON. DO NOT TURN ON COOLING IF THE CHAMBER PRESSURE IS ABOVE 1.000 Torr. If the camera has been allowed to warm up to ambient temperature it will take between 4-6 hours to reach operating temperature and pressure. During the initial cooling phase, significant condensation can form on the cryo-lines. Be sure the Nasmyth rotator angle is positioned at 90 degrees to avoid condensation dripping onto the camera head.
7. Click the “Open Settings File” button and select “GOODMAN_RED.SET” to load in the Red Camera Set file.
8. Disable the “Auto Calc Postscan” by clicking on the button. Once disabled, the arrow within the button should be greyed out and not illuminated as shown below. Click “OK” in the top right corner of the panel to load in the changes.
9. From the SI Image front panel, open the Camera Status window to display the current CCD Temperature and Pressure. The operating Temperature and Pressure of the Red Camera are -100.0 C and 0.000 Torr. The pressure sensor is known to bounce between 0.000 Torr and 0.050 Torr on minute timescales so refresh as needed. Log the Temperature and Pressure.
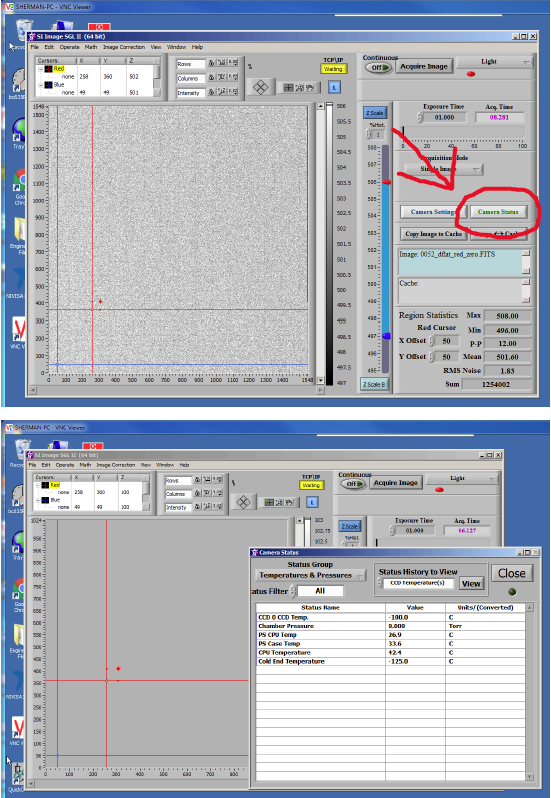
10. If the Chamber pressure is above 1.000 Torr, the camera head will need pumping which can only be done by the SOAR day crew. Do not proceed to step 9 until the chamber pressure is below 1.000 Torr.
11. Close the Camera Status panel and open the Camera Settings panel.
12. Under the “Operate” Menu , enable the TCP/IP server so that it shows up as a yellow box with the status “Waiting”. Also under the “Operate” Menu open the “Configure” panel. Check that the “Min. Acquisition Time Out” is set to 30 seconds as shown below. Save the settings.
13. Minimize the SI Image SGL GUI. DO NOT CLICK ON THE RED “X” Button since this will exit the GUI. SI Image SGL II is now configured and should continue to be run in the background.
14. Check the SAMBA server connection between soaric6 and soaric7: Open Computer on the Desktop. Under “Network Locations” you should find the three soarci7 folders cross-mounted. If the network drives show Red X’s, click on each drive on the left panel the window to ensure connection until they are all green.
15. Start the automatic file transfer program: click on the “Transfer_To_ic7” icon on the soaric6 desktop.
![]()
16. Check whether the files from the latest observation night were transferred to soaric7. If they are still in soaric6 you should see them in the C:\DATA folder. If so, run the End-of-Night-Transfer DOS program on soaric6.
![]()
17. Start the Symmetricom GPS Real Time clock and Tray Time program. Symmetricom should be minimized and left running. The Tray Time program will run in the background and appear as a small globe in the tray in the bottom right of the desktop. These programs will ensure the GPS time signal will be recorded in the Goodman FITS image headers.
18. Double check with the Telescope Operator or day crew that nobody is working inside the instrument and the Nasmyth rotator angle is ok. After these checks, ask the Telescope Operator to turn on the Goodman electronics, and start the Goodman GUI.

19. Log on to soaric7 using the vncviewer that is appropriate for your program. The linux example is: vncviewer 139.229.15.137:<n> -Shared & .The display number <n> and password can be obtained from the TelOps staff (soaropsATctioDOTnoaoDOTedu) or the Instrument Scientist (spointsATctioDOTnoaoDOTedu).
20. Check the disk space on soaric6 by double-clicking on the "My Computer" icon. Highlight "Local Disk (C:)". Right-click and select "Properties". If the disk is almost full, please contact TelOps (soaropsATctioDOTnoaoDOTedu) or the Instrument Scientist (spointsATctio.DOTnoaoDOTedu) so they can delete older data.
21. Check the disk space on soaric7 by issuing the command "df -h" from a terminal prompt. If the /home3/observer disk is close to full, contact TelOps staff (soaropsATctioDOTnoaoDOTedu) or the Instrument Scientist (spointsATctioDOTnoaoDOTedu).
Updated Feb 10, 2016. C. Briceño
This page is intended to provide guidance on various error messages and problems that may be encountered when working with Goodman. It is aimed mostly for the Goodman support staff. Please note that by its very nature, this page is constantly under construction and will be updated as new issues arise, procedures change or updates in the instrument hardware/software take place.
3) VNC to soaric7: suddenly the up/down left/right arrow keys in the keyboard stop working correctly -> e.g., up/down arrows change to anoher desktop workspace instead of scrolling up/down in the IRAF command window, or left/right change to another desktop workspace instead of allowing one to move the cursor on the ds9 window.
Solution: type either one of the Alt, CRTL or Shift keys in your keyboard.
4) RED light on the Goodman Camera/Grating LED
Solution: Shutdown and exit the Goodman GUI, power cycle the Goodman electronics, and restart GUI.
Procedure: 4.1) Telescope Operator should set the optical ISB to Rotator Angle=0 and instrument to PA=0.
4.2) In the Goodman GUI click in the User menu and select Shutdown
4.3) Go to File menu and click Exit to completely exit the application.
4.4) Telescope Operator should TURN OFF the Goodman Electronics
4.5) After some 15 sec Telescope Operator can TURN ON again the Goodman Electronics
4.6) Restart the Goodman GUI (see the Goodman Startup Guide [15])
4.7) Restart the "Transfer to soaric7" LabView application. Resume observing.
5) GACAM fails to update the instrument position angle (IPA) in the GACAM GUI "Offsets" sub-window.
GACAM communicates with the TCS through sockets that are opened only when the "Calculate" button is clicked, hence when communication problems like this one arise, the culprit is likely on the server side.
Solution: The Telescope Operator should reboot the TCSAPP application (TCS kernel machine: 132.229.15.2)
This page contains documents on technical issues related to the Cryo-Tiger closed circuit cooling system.
In our path towards increased automation with Goodman and SOAR, we have developed the SOAR Queue Manager software (SQM), which allows scripted, external control of Goodman and the telescope. The SQM is the basis for the incorporation of SOAR into the Astronomical Event Observatory Network (AEON [17]) which starts operations Tue Aug 6, 2019 [18]).
In order to have the SQM interact with Goodman in a reliable way, we need to adopt and keep strict observance of certain naming standards. Therefore, we have implemented the following naming conventions for gratings, slits, modes and filters in the Goodman configuration files. It is specially important that when configuration changes are made, the names are always input in the same way, as indicated below.
GRATINGS:
***********
Gratings names will always start with the grating lines/mm number, followed by the manufacturer letters, all in capital, and type e.g. (for the 2019B semester, only the 400_SYZY and the 2100_SYZY gratings are being offered for AEON nights:
400_SYZY
600_SYZY_BLUE
600_SYZY_OLD
600_SYZY_RED
930_SYZY
1200_RALC_RED
1200_RALC_BLUE
1800_SYZY
2100_SYZY
2400_SYZY
FILTERS: are described with the following designations, which should always be the same. For the 2019B semester, only the g-SDSS, r-SDSS, i-SDSS and VR filters are being offered for AEON nights.
********
u-SDSS
g-SDSS
r-SDSS
i-SDSS
z-SDSS
VR
U
B
V
Rc
U-Bessel
B-Bessel
V-Bessel
R-Bessel
I-Bessel
u-Stromgren
v-Stromgren
b-Stromgren
y-Stromgren
MODES:
********
All modes are as written in the current masterconfig. The rule is that no white spaces are allowed (therefore there is no need to use " in a name), the only separator allowed is underscore (_), and all names are capitalized. Examples are:
mode1=CUSTOM
mode2=IMAGING
mode3=300_ALL
mode4=600_UV
mode5=600_BLUE
mode6=600_MID
mode7=600_RED
mode8=1200_M0
mode9=1200_M1
mode10=1200_M2
mode11=1200_M3
mode12=1200_M4
mode13=1200_M5
mode14=1200_M6
mode15=1200_M7
mode16=1200_RESOLVE
mode17=400_M1
mode18=400_M2
mode19=930_M1
mode20=930_M2
mode21=930_M3
mode22=930_M4
mode23=930_M5
mode24=930_M6
mode25=400_WD
mode26=930_TP
mode27=400_FERMI
LONG SLITS:
************
Names for long slits also follow similar rules: all names are capitalized, the only separator allowed is underscore (_), so no need for ". The adopted names are the following and should not be changed (naming of multi-object slit masks is flexible):
slot1=0.45_LONG_SLIT
slot2=N/A
slot3=N/A
slot4=SLICER B.3
slot5=0.6_LONG_SLIT
slot6=0.8_LONG_SLIT
slot7=1.0_LONG_SLIT
slot8=OUT_OF_SERVICE
slot9=OUT_OF_SERVICE
slot10=1.2_LONG_SLIT
slot11=1.5_LONG_SLIT
slot12=OUT_OF_SERVICE
slot13=3.2_LONG_SLIT
slot14=4.0_LONG_SLIT
slot15=10.2_LONG_SLIT
slot16=0.95_LONG_SLIT
slot17=N/A
slot18=N/A
slot19=SLICER B.4
slot20=PINHOLES
slot21=1.9_LONG_SLIT
Links
[1] http://www.ctio.noirlab.edu/soar/content/goodman-blue-camera-cold-start-procedure-soar-support-staff
[2] http://www.ctio.noirlab.edu/soar/content/goodman-red-camera-cold-start-procedure-soar-support-staff
[3] http://www.ctio.noirlab.edu/soar/content/goodman-troubleshooting
[4] http://www.ctio.noirlab.edu/soar/content/cryotiger-help-page
[5] http://www.ctio.noirlab.edu/soar/sites/default/files/SOAR_ADC_Nasmyth_Optic-1.3.pdf
[6] http://www.ctio.noirlab.edu/soar/sites/default/files/GOODMAN/Instruction.pdf
[7] http://www.ctio.noirlab.edu/soar/sites/default/files/GOODMAN/acam-integration.pdf
[8] http://www.ctio.noirlab.edu/soar/sites/default/files/GOODMAN/installing_and_removing_slit_masks.pdf
[9] http://www.ctio.noirlab.edu/soar/sites/default/files/CAMBIO%20DE%20MASCARAS%20EN%20CARRUSEL%20GOODMAN.pdf
[10] http://www.ctio.noirlab.edu/soar/sites/default/files/GOODMAN/Goodman_Maintenance_Manual.pdf
[11] http://www.ctio.noirlab.edu/soar/sites/default/files/GOODMAN/Images/ColdStart/BlueColdStart/Goodman_New_Blue_Cold_Start_rev1.pdf
[12] http://www.ctio.noirlab.edu/soar/sites/default/files/GOODMAN/Images/ColdStart/Goodman_Red_Camera_Cold_Start.pdf
[13] http://www.ctio.noirlab.edu/soar/content/ghts-troubleshooting-1
[14] http://www.ctio.noirlab.edu/soar/content/ghts-troubleshooting-2
[15] http://www.ctio.noirlab.edu/soar/content/goodman-user-startupshutdown-guide
[16] http://www.ctio.noirlab.edu/soar/sites/default/files/GOODMAN/Fwd_%20CCD-world_%20Cryotiger%20lost%20of%20cooling%20power.eml
[17] https://lco.global/aeon/)
[18] http://www.ctio.noirlab.edu/soar/content/start-soar-aeon-observations-2019b-semester-0