The DECam User Guide
(Last Update: Aug 2018)
A few weeks prior to your DECam observing run you will be contacted by e-mail by your support astronomer. He/she will recommend you to read this Guide before your run. If you have any questions you can contact your support astronomer or write to the DECam help service available using the email address:
A new version of the Exposure Time Calculator (v7) is available (March 2016).
Follow instructions written at the beginning of the spreadsheet.
New in v7:
ETC Ver 6 (incorrect): S/N, u,g,r,i,x,Y = 17, 43, 32, 23, 12, 3.7
ETC Ver 7 (correct): S/N u,g,r,i,z,Y = 9, 38, 31,23,12,3.6
Several minor descriptive (non-code) corrections.
New in v6:
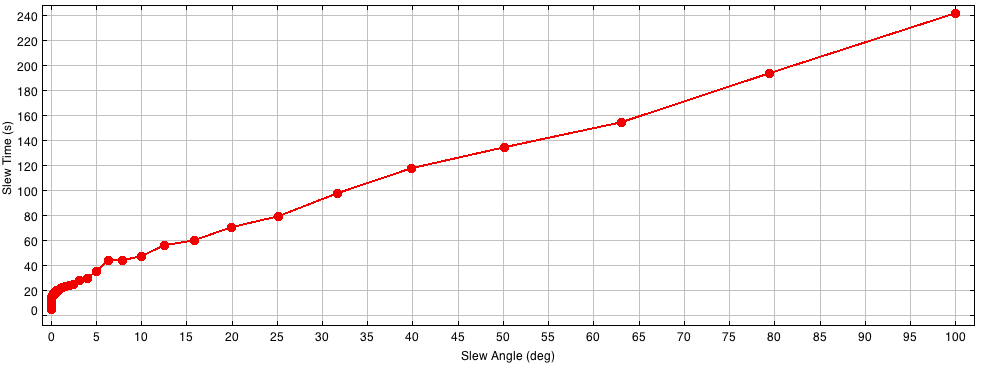
Overheads:
One of the nicest features of observing with DECam is that overhead times are kept to a minimum. The telescope starts slewing to a new position while reading out the CCDs. Overhead estimates are as follow:
No overhead is produced by the acquisition of guide stars since that is automatically done within the first 30s of each exposure.
Observing with DECam is quite simple, straightforward and very efficient. Every exposure sequence will perform every step in the process automatically, from moving the telescope and dome, setting up the filter, focusing, finding suitable guiding stars and start the guiding, taking the exposure, building the images and finally, storing of the data. The preparation of observing scripts will make a night with DECam efficient, and hence, more relaxed.
For preparing the scripts there is a convenient, stand-alone software (python based) which can be downloaded and installed in any computer. The tarball of the ScriptsEditor software and full documentation can be downloaded here [5].
Are you sharing your nights with other projects? Read This about Prop-ID!
ScriptsEditor is also available at the computers in the control room (observer2) in case that modification or creation of scripts during the night is needed.
Depending on your python distribution, you may need to install the modules TKinter, json and pyephem to make ScriptsEditor work on your computer.
Note: ScriptsEditor runs under python 2. If you get an error of the type "SyntaxError: invalid syntax", you may be using python 3.
ScriptEditor allows to easily plan observations with different dithering patterns or centering objects on a particular CCD, among other features.
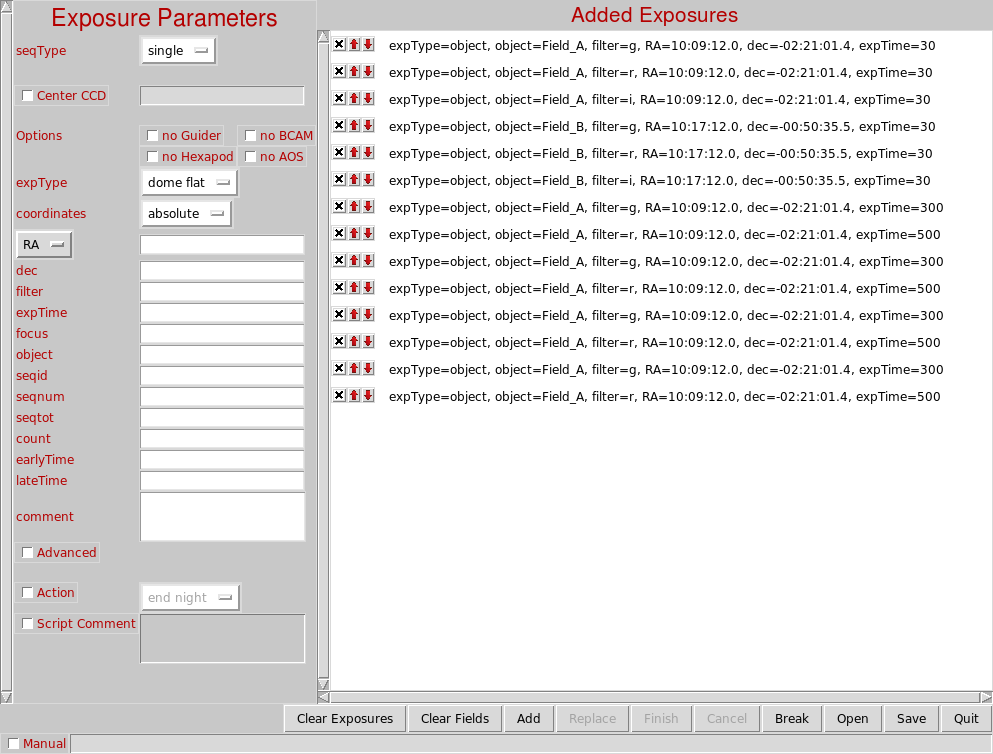
The DECam observing system expects scripts to be written in .json format (a text file with special formatting). ScriptsEditor takes care of that. However, some people feel more comfortable working on simple text scripts. Scripts in .txt format are possible but they will need to be loaded anyway to the ScriptsEditor and saved in .json format. A .txt script is made of a set of exposures, each exposure in a single line, with the observing parameters separated by a comma.
This is an example of a .txt script which makes sets of 3x60s exposures in bands g, r and i, with no dithering:
ExpType = object, ra= 281.0, dec=-29.866, filter = g, expTime = 60, object = Sgr, count = 3
ExpType = object, ra= 281.0, dec=-29.866, filter = r, expTime = 60, object = Sgr, count = 3
ExpType = object, ra= 281.0, dec=-29.866, filter = i, expTime = 60, object = Sgr, count = 3
The same script will look this way in .json format:
[
{
"count": 3,
"expType": "object",
"object": "Sgr",
"filter": "g",
"RA": 281.0,
"dec": -29.866,
"expTime": 60
},
{
"count": 3,
"expType": "object",
"object": "Sgr",
"filter": "r",
"RA": 281.0,
"dec": -29.866,
"expTime": 60
},
{
"count": 3,
"expType": "object",
"object": "Sgr",
"filter": "i",
"RA": 281.0,
"dec": -29.866,
"expTime": 60
}
]
The possible parameters for defining an exposure are the following:
Parameters related with the Exposures
|
Keyword |
Sample value |
Explanation |
|
expTime |
12.54 |
Exposure time in seconds |
|
object |
Moon |
Observer selected identifier for the object/field |
|
filter |
r |
Allowed names include: u, g, r, i, z, Y, VR, N964, block, pinhole |
|
|
2 |
or the cassette number: 1, 2, 3, ...8 |
|
|
|
you can choose more than one (is allowed by FCM mechanic): |
|
|
[1, 3, 5] |
or [u,Y] or [r,pinhole] |
|
count |
25 |
Instruct SISPI to repeat the same exposure N times |
|
focus |
-23.5 |
Force hexapod position. A single float is the z axis (all others remain unchanged) |
|
|
[1.0, 1.4, 2.0, 1.0, 0.8, 0.0] |
Or a list of 6 floats (6th value will be forced to 0.0) |
|
|
[1.0, None, None, 2.3, 4.3, 0.0] |
Use None for hexapod coordinates you do not want to adjust |
|
comment |
Last exposure of night |
User comment (will be copied to FITS header) |
|
earlyTime |
<YYYY-MM-DD HH:MM:SS> |
Don't take exposure before this time. Wait if too early |
|
lateTime |
<YYYY-MM-DD HH:MM:SS> |
Don't take exposure after this time. Discard if too late |
|
epoch |
2000.0 |
Specify an epoch |
|
exclude |
[bcam, aos, guider] |
Exclude selected DECam components from this exposure |
|
calmode |
|
Calibration mode (DECal use) |
Parameters related with the Input Coordinates
|
Keyword |
Sample value |
Explanation |
|
ra |
17:32:12.032 |
Right ascension in HH:MM:SS.xxx or |
|
|
123.54 |
float degrees format |
|
dec |
-54:43:5.22 |
Declination in DD:MM:SS.xxx or |
|
|
-30.221 |
float degrees format |
|
deltaRA |
-3.9 |
RA offset (float arcsec) |
|
|
W3.9 |
Use of E/W instead of +/- is allowed |
|
deltaDEC |
8.2 |
DEC offset (float arcsec) |
|
|
N8.2 |
Use of N/S instead of +/- is allowed |
|
ha |
8:12:43.21 |
Hour angle in HH:MM:SS.xxx or |
|
|
43.211 |
float degrees format |
|
az |
54.000 |
Azimuth (float degrees) |
|
el |
32.1 |
Elevation (float degrees) |
Parameters related with Sequences
|
Keyword |
Sample value |
Explanation |
|
seqid |
twilight darks |
Exposure sequence identifier |
|
seqtot |
23 |
Total number of exposures in sequence |
|
seqnum |
17 |
Number of current exposure in sequence |
|
multiexposure |
start |
This request starts a multiexposure frame |
|
|
cont |
This request continues the multiexposure frame |
|
|
end |
This request ends the multiexposure frame |
|
multiid |
focus |
Name of multiexposure frame |
|
multitot |
10 |
Number of exposures in frame |
You can specify the requested telescope position in a number of different systems: ra and dec, ha and dec, az and el. You can also specify an offset relative to the current telescope pointing using the deltaRA and deltaDEC keywords. In most cases both sexagesimal and float degrees formats are supported. If you do not specify coordinates in your exposure request the image will be take at the current telescope position.
Additional explanations on the exposure parameters can be found in the ScriptsEditor documentation included in the tarball.
Special tools to prepare observing scripts for standard stars are described here [6].
Notice that the community pipeline will automatically ignore images with any of these words in the title (i.e. in the parameter object): junk, pointing, focus and donut. These images will still be stored at the NOAO science archive but they won't be processed. More details here [7].
__________________________
Image headers will contain your Prop-ID (your project number, for example 2016A-0343) under keyword "propid". It is very important to setup the right propid since the access to your data through the NOAO Science Archive depends on it. During proprietary time only you and your collaborators will have access to the data taken under your Prop-id.
In normal circumstances (observing only one project in a night) the exposures will take the Prop-ID from the setup [8] information entered every afternoon. However, it has become more and more common to share time with other projects. In those cases, it is convenient to incorporate the keyword "propid" in your observing scripts. Unfortunately, this is something that the ScriptsEditor software is not currently handling, and thus it must be incorporated by hand or using your own script. The extra keywords have to be incorporated as strings, for example:
"propid" : "2016A-9999",
"proposer" : "Smith",
"program" : "The title of my program"
NOAO Data Lab
NSC
DES DR1
DECaLS
DECaPS
Pan-STARRS
SDSS
Southern Standard Stars
Convenient Scripts
Sharing your Standards
Using DES standard star scripts
Photometric Calibration Links
Transformation equations
NOAO Data Lab facilitates the exploration and analysis of the large datasets now being generated by instruments on NOAO and other wide-field telescopes. It allows us the access to high-value catalogs from NOAO (eg. DES, DECaLS, DECaPS, NSC) and external sources (e.g. SDSS, GAIA), and NOAO-based images linked to catalog objects. This makes the NOAO Data Lab a very useful tool in terms of standard star fields that can help DECam observers to calibrate their data. For more information about NOAO Data Lab and its services, visit its webpage NOAO Data Lab [9].
The NOAO Data Lab is operated by the National Optical Astronomy Observatory, the national center for ground-based nighttime astronomy in the United States operated by the Association of Universities for Research in Astronomy (AURA) under cooperative agreement with the National Science Foundation.
The NOAO Source Catalog (NSC) is a catalog of nearly all of the public imaging data in NOAO's archive, almost covering the entire sky. The NSC is a catalog of sources from most of the public data taken on CTIO-4m+DECam as well as KPNO-4m+Mosaic3 and some from the Bok-2.3+90Prime. The first NSC public data release (DR1) contains over 2.9 billion unique objects, 34 billion individual source measurements, covers 30,382 sq. deg. of the sky, has depths of ~23rd magnitude in most broadband filters (u, g, r, i, z, Y, VR) with ~1-2% photometry, and an astrometric accuracy of ~2 mas. The NSC DR1 overview paper (Nidever et al. 2018 [10]) describes the catalog in detail, including the source extraction, calibration, combination, quality assurance, and science use cases. To learn more about the NSC and how to access the data, click here [11].
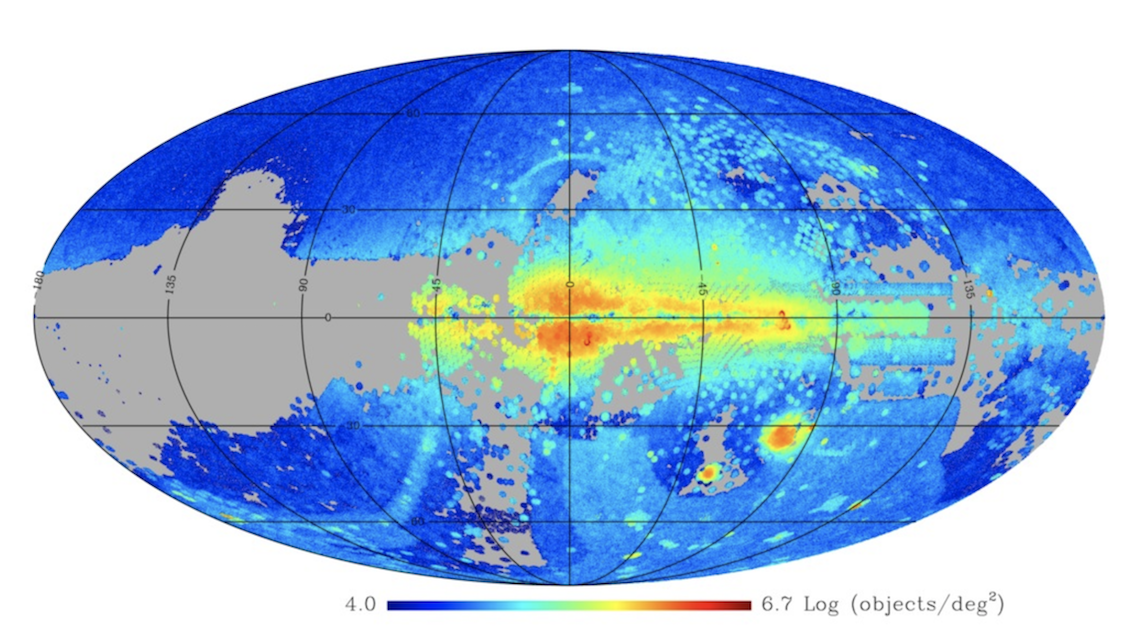
NSC DR1 Object Density Map
Since January 2017, the Dark Energy Survey (DES) made public its first data release (DR1) of reduced images and wide-field coadd source catalogs from the first three years of full science operations with DECam. DES DR1 is based on grizY imaging from 345 distinct nights (August 2013 to February 2016), it has a median delivered point-spread function of g = 1.12, r = 0.96, i = 0.88, z = 0.84, and Y = 0.90 arcsec FWHM, a photometric precision of < 1% in all bands, and an astrometric precision of 151 mas. The median coadded catalog depth for a 1.95" diameter aperture at S/N = 10 is g = 24.33, r = 24.08, i = 23.44, z = 22.69, and Y = 21.44 mag. It covers ~5,000 square degrees of the southern Galactic cap (see Figure below), resulting in nearly 400 million distinct cataloged objects (~310 million of distant galaxies and ~80 million of stars).
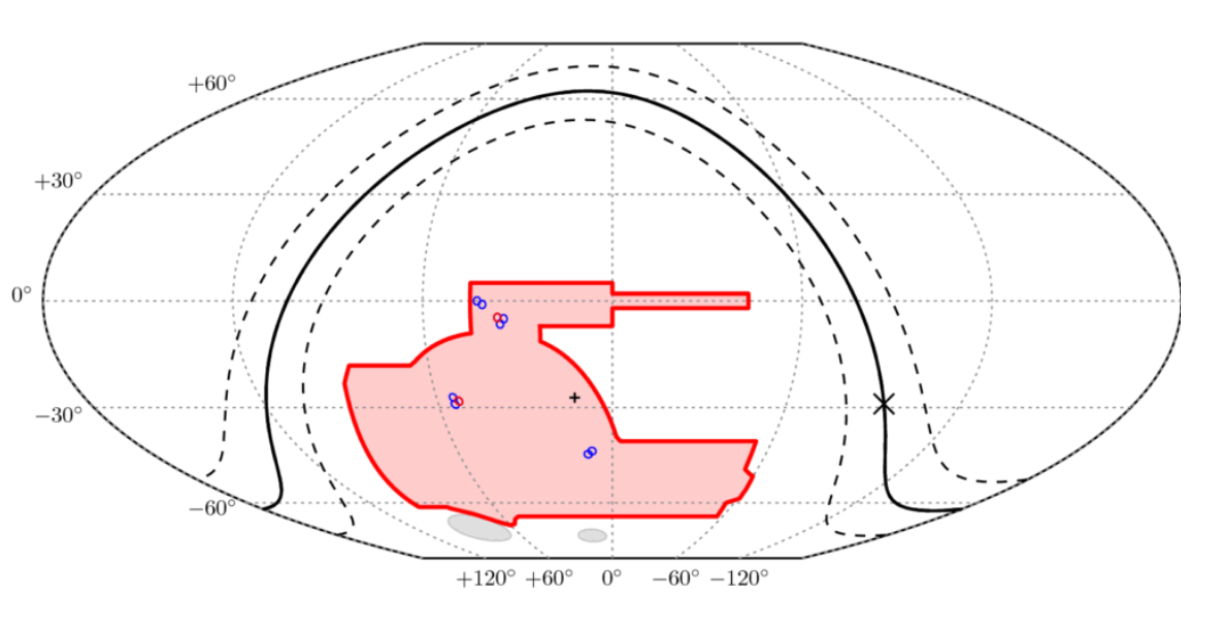
The DES survey area in celestial coordinates. The ∼5000 sq. deg wide-area survey footprint is shown in red. The 8 shallow supernova fields are shown as blue circles, and the 2 deep supernova fields are shown as red circles. The Milky Way plane is shown as a solid line, with dashed lines at b = +/-10 deg. The Galactic center (‘x’) and south Galactic pole (‘+’) are also marked. The Large and Small Magellanic Clouds are indicated in gray. [Credits: DES Collaboration.]
You can find a more detailed information about this survey in the DES webpage [12] and in the DR1 release paper [13].
Online catalogs are freely available to download through the next links:
The DECam Legacy Survey (DECaLS) is part of the NOAO Large Surveys programs. It is a public survey and it was originally proposed to only cover the SDSS-III equatorial footprint but the project was extended to enlarge the footprint to the full Dark Energy Spectroscopic Instrument (DESI) equatorial footprint. DECaLS will provide the optical imaging for targeting for 2/3 of the DESI footprint, covering both the North Galactic Cap region at Dec ≤ 32° and the South Galactic Cap region at Dec ≤ 34° (see Figure below). This survey will end up covering ~9000 deg² in the g, r, z bands to depths of g = 24.7, r = 23.9, z = 23.0 mag. For more information about this survey, read the Overview of the DESI Legacy Imaging Surveys paper by Dey et al. 2018 [16] and/or go to the Legacy Survey webpage [17].
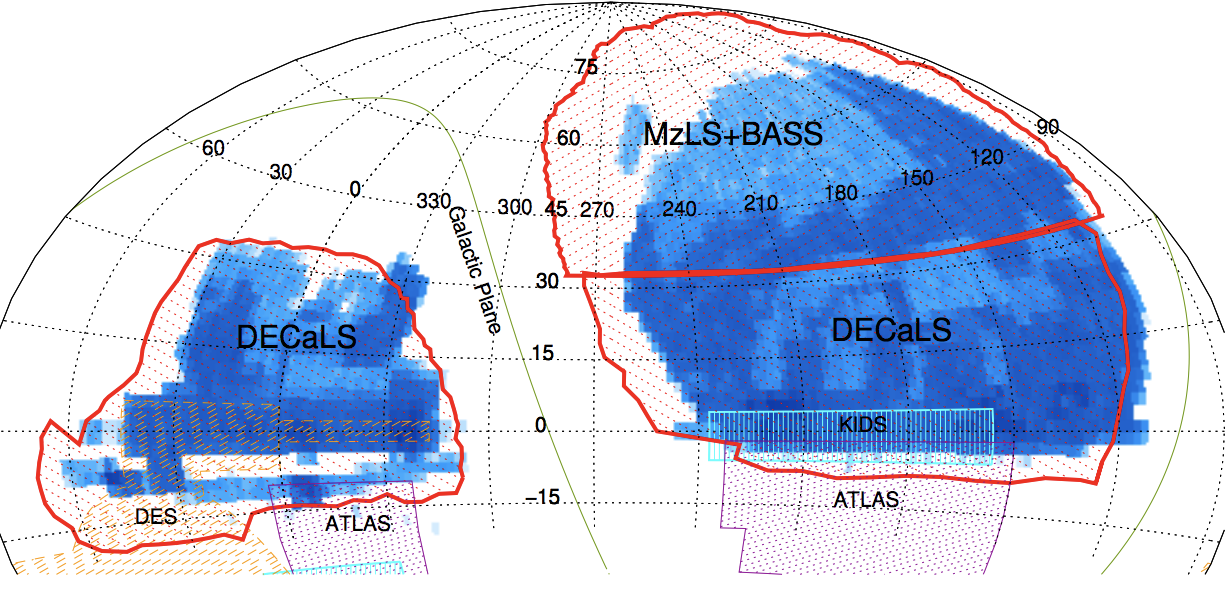
The footprints of the optical imaging surveys contributing to DESI imaging, demarcated by the thick red outlines (BASS, MzLS and DECaLS). Blue area shows the regions covered by existing wide-area spectroscopic redshift surveys (SDSS, BOSS and 2dF). [Credits: Figure 2 from Dey et al. 2018]
Online catalogs are freely available to download through the next links:
The Dark Energy Camera Plane Survey (DECaPS) is a five-band optical and near-infrared (grizY) survey, publicly available, of the southern Galactic plane with DECam. The typical single-exposure depth is of g = 23.7, r = 22.8, i = 22.2, z = 21.8, and Y = 21.0 mag. The footprint covers |b| < 4°, 5° > l > −120° (essentially the low latitude Galactic plane south of Dec < −30°), a total of ~1000 sq. deg (see Figure below). For more information about this survey, read Schlafly et al. 2017 [20] and/or go to the DECaPS webpage [21].
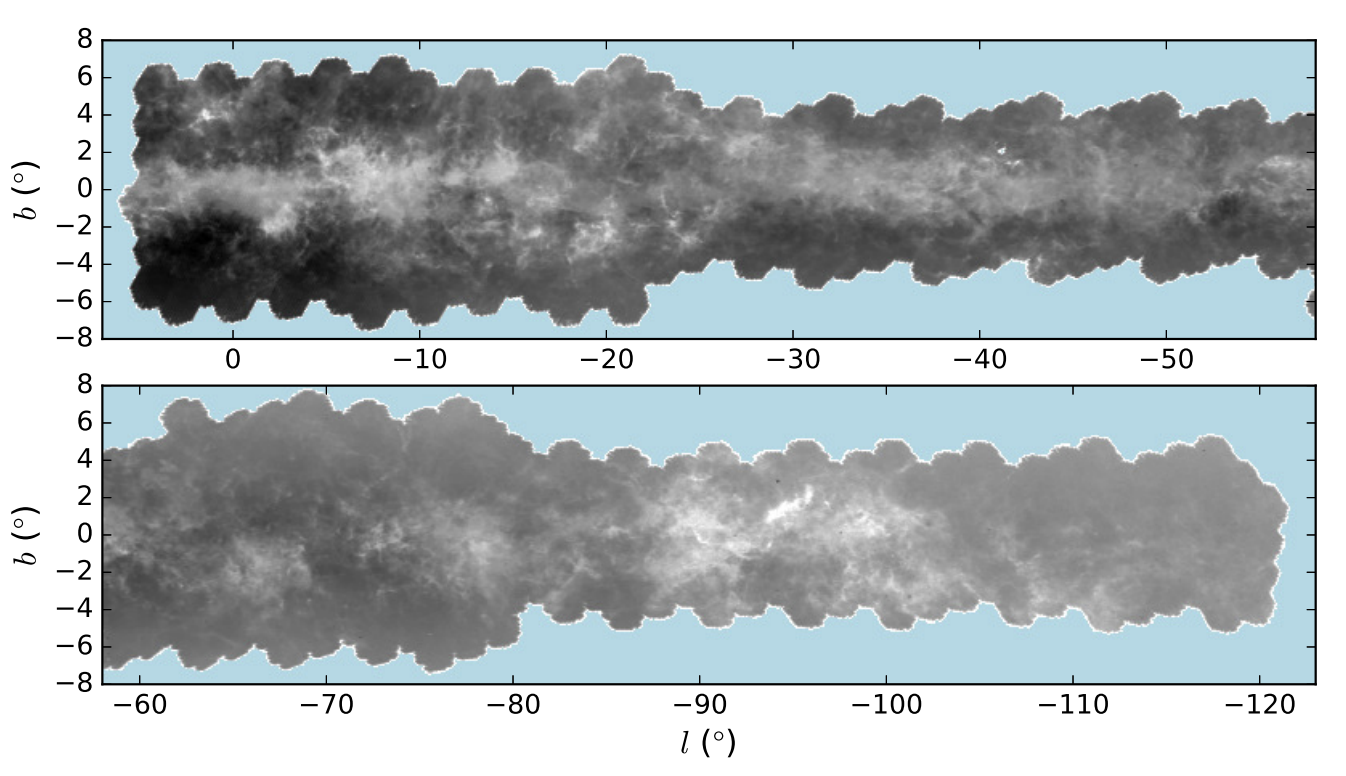
The DECaPS footprint. The figure shows the number density of sources detected in at least three bands, and brighter than 20th magnitude in r. [Credits: Figure 1 from Schlafly et al. 2017]
Online catalogs are freely available to download through the next links:
The Pan-STARRS1 (Panoramic Survey Telescope And Rapid Response System 1), also called PS1, has carried out a set of distinct synoptic imaging sky surveys including the 3pi Steradian Survey and the Medium Deep Survey in grizy filters. Particularly, the 3pi Steradian Survey covers the entire sky north of declination Dec > −30°, a total of 30 000 sq. deg. The 5-sigma depth of the stacked photometry (12 epochs in each filter) of the PS1 3pi Steradian Survey is g = 23.3, r = 23.2, i = 23.1, z = 22.3, and Y = 21.4 mag, while the 5-sigma depth for the single-epoch is g = 22.0, r = 21.8, i = 21.5, z = 20.9, and Y = 19.7 mag. More detailed information about PS1 surveys can be found in Chambers et al. 2016 [24] or in the Pan-STARRS home page [25].
Color image constructed from 16x16 binned g, r, and i versions of the 3pi stack images by Daniel Farrow. [Credits: Figure 14 from Chambers et al. 2016]
Online access to the PS1 public data page is available to the community from the Mikulski Archive for Space Telescopes (MAST) at STScI through the next link:
Caveats:
SDSS fields are the best choice for photometric standard stars since they will cover the whole DECam focal plane. In particular, Stripe 82, which was observed repeatedly by SDSS, is an excellent catalog for calibration containing more than 1 million stars down to magnitudes 19.5, 20.5, 20.5, 20.0, and 18.5 in ugriz, respectively (Ivezic et al. 2007 [27]). Stripe 82 is an equatorial stripe covering from RA = 20h34m to RA = 4h00m. Thus, portions of Stripe 82 are available during most of the night from June to December. The catalog is available here [28].
Caveats:
This catalog contains photometry in the five SDSS bands ugriz. SDSS has no photometry in the Y band.
Since most of the SDSS data was taken in the Northern hemisphere, none of the SDSS fields will be close to the zenith from Cerro Tololo.
The following SDSS fields (courtesy of Douglas Tucker) are observable between January and August and have been matched with UKIDSS to include Y photometry (Y-band data from Vega mags to AB mags via YAB = YVega + 0.634).
SDSSJ0843+0000 [29]
SDSSJ0933-0005 [30]
SDSSJ0958-0010 [31]
SDSSJ1048+0000 [32]
SDSSJ1227+0000 [33]
SOUTHERN STANDARD STARS FOR THE u' g' r' i' z' SYSTEM
Smith, Allan, Tucker et al. (in preparation) kindly provide access to a pre-publication catalog of standard stars in the southern hemisphere [35].
For users with observational programs in the south, these standard fields will be located much closer in the sky to the program fields. However, they are small fields (a few arcminutes wide) that will be covered by just one of the DECam CCDs. Thus, they are useful for first order extinction determination but not for zero point differences among chips.
Notice that for these fields it is advisable to offset the coordinates given in the catalog to make the whole field to lie within one of the CCDs (and not in the gap between the two central CCDs). A shift of 5 arcmin in declination will place the field entirely on CCD N4.
At the telescope computers, there is a set of useful scripts kindly provided by Douglas Tucker which allows to:
To run the scripts from the computers at the control room (observer3 or observer2):
> source ~/dtucker/bin/setup_StdStarFieldPicker.csh
The script to choose an observable standard field (decamStdFieldTimeDate.py) may get invoked in this way:
decamStdFieldsTimeDate.py --help (for detailed help)
decamStdFieldsTimeDate.py --UT=now (for standard stars accessible right now)
decamStdFieldsTimeDate.py --UT='2013/01/07 00:43' (for standard stars accessible at 00:43UT on Jan 7, 2013)
Output example:
> decamStdFieldsTimeDate.py --UT=now
Timestamp and Moon Information:
MJD: 56699.26513
UT: 2014/2/11 06:21:47
LST: 11:03:29
Moon: RA=06:46:28.821 DEC=+18:43:16.633 Phase=0.88 Up=Yes
SDSS Stripe82/Stripe10 and Other High-Priority Fields:
======================================================
Telescope Coordinates Recommended Exposure Times (sec)
fieldname RA(2000) DEC(2000) u g r i z Y MoonSep(Deg) HA ZD(Deg) Airmass
--------- -------- --------- -------- -------- -------- -------- -------- -------- ------------ --------- ------ ---------------
SDSSJ1048-0000 10:48:00 +00:00:00 30.00 15.00 15.00 15.00 15.00 20.00 62.29 00:14:44 30.28 1.16 (low)
SDSSJ0958-0010 09:58:00 -00:10:00 30.00 15.00 15.00 15.00 15.00 20.00 50.84 01:04:44 33.65 1.20 (low)
SDSSJ1227-0000 12:27:00 +00:00:00 30.00 15.00 15.00 15.00 15.00 20.00 85.59 -01:24:14 36.13 1.24 (low)
SDSSJ0933-0005 09:33:00 -00:05:00 30.00 15.00 15.00 15.00 15.00 20.00 45.17 01:29:44 36.82 1.25 (low)
SDSSJ0843-0000 08:43:00 +00:00:00 30.00 15.00 15.00 15.00 15.00 20.00 34.36 02:19:44 44.81 1.41 (medium)
SDSSJ1442-0005 14:42:00 -00:05:00 30.00 15.00 15.00 15.00 15.00 20.00 117.44 -03:39:14 60.00 1.99 (high)
Lower-Priority Fields:
======================
Telescope Coordinates Recommended Exposure Times (sec)
fieldname RA(2000) DEC(2000) u g r i z Y MoonSep(Deg) HA ZD(Deg) Airmass
--------- -------- --------- -------- -------- -------- -------- -------- -------- ------------ --------- ------ ---------------
E5-A 12:04:11 -45:24:03 10.00 3.00 3.00 3.00 3.00 5.00 96.27 -01:01:27 19.46 1.06 (low)
E4-A 09:23:44 -45:21:02 10.00 3.00 3.00 3.00 3.00 5.00 73.46 01:39:11 24.65 1.10 (low)
E6-A 14:45:33 -45:15:34 10.00 3.00 3.00 3.00 3.00 5.00 124.14 -03:43:00 45.60 1.43 (medium)
E3-A 06:42:54 -45:05:06 10.00 3.00 3.00 3.00 3.00 5.00 63.83 04:20:09 52.14 1.63 (medium)
To create .json scripts for standard fields use:
decamStdFieldsPickOneByName.py --help (for detailed help)
decamStdFieldsPickOneByName.py -v --stdFieldName="E6-A" --filterList="g,r,i" --outputFile=./std_E6-A_gri.json (for a .json file containing the exposure script for standard field E6-A for filters g,r,i)
The README [36] file contains the full list of the scripts in the StdStarPicker.
An additional tool to find standard fields at a given time is available within Kent's Tools. To use Kent's Tools open a terminal in observer2 and type:
> observer
Then, type:
> standards
This will give a list of 3 standard fields available at that moment (at low, medium and high airmass). You can also type standards UT (ex. standards 4:00).
Sometimes it is useful to share standard star fields among different projects/observers. This is specially true during nights shared by more than one project. The best way to do this is to set the observing keyword expType = standard in your observing scripts (instead of object). Exposures with this keyword do not have proprietary period and thus, they can be downloaded by anyone from the NOAO archive.
USING DES STANDAR STAR SCRIPTS
You are welcome to use the scripts already created by the DES collaboration, which include fields from SDSS Stripe 82, the Southern Standard Stars and others (these are fields that will be suggested by Kent's tools as described above). The scripts are located in the directory: ~/ExposureScripts/User_Standards/DES/ There are 4 sub-directories to choose (grizY/, Yzrig/, ugrizY/, Yzirgu/) depending on if you want to use or not the u filters and the order of observation (starting with Y is recommended if observing standards in the evening twilight, while starting with g is prefered during the morning twilight). These scripts have the keywork expType set to "standard" (see above).
These are links to previous results on zeropoint and extinction calibrations:
Zeropoint and airmass results per CCD (courtesy Douglas Tucker) [37]
Zeropoint results (Nov 3, 2012 courtesy Paul Martini) [38]
First order Extinction results from Nov 3, 2012 [39]
Historical CTIO Extinction [40] results (for SDSS u'g'r'i'z' -- end of Table 4 of Smith, Tucker, Allam, et al. [41])
Zeropoint trends [42]
*SDSS to DES
These transformation equations are based on SDSS DR13 and DES Y3 single-epoch data (thanks to Douglas Tucker and Sahar Allam, DES Collaboration).
u_DES = u_SDSS - 0.479 + 0.466 (g_SDSS - r_SDSS) - 0.350 (g_SDSS - r_SDSS)^2
(RMS=0.055 mag per star)
g_DES = g_SDSS + 0.001 - 0.075 (g_SDSS - r_SDSS)
(RMS=0.021 mag per star)
r_DES = r_SDSS - 0.009 - 0.069 (g_SDSS - r_SDSS)
(RMS=0.021 mag per star)
i_DES = i_SDSS + 0.014 - 0.214 (i_SDSS - z_SDSS) - 0.096 (i_SDSS - z_SDSS)^2
(RMS=0.023 mag per star)
z_DES = z_SDSS + 0.022 - 0.068 (i_SDSS - z_SDSS)
(RMS=0.025 mag per star)
Y_DES = z_SDSS + 0.045 - 0.306 (i_SDSS - z_SDSS)
(RMS=0.030 mag per star)
Notes:
- The u, g, r transformations apply for stars with 0.2 ≤ (g_SDSS - r_SDSS) < 1.2
- The i, z, Y transformations apply for stars with 0.0 ≤ (i_SDSS - z_SDSS) < 0.8
Observing Stations
Login In
GUIs
Seeting Up your Project
The Importance of Vsub
Loading your Exposure Scripts
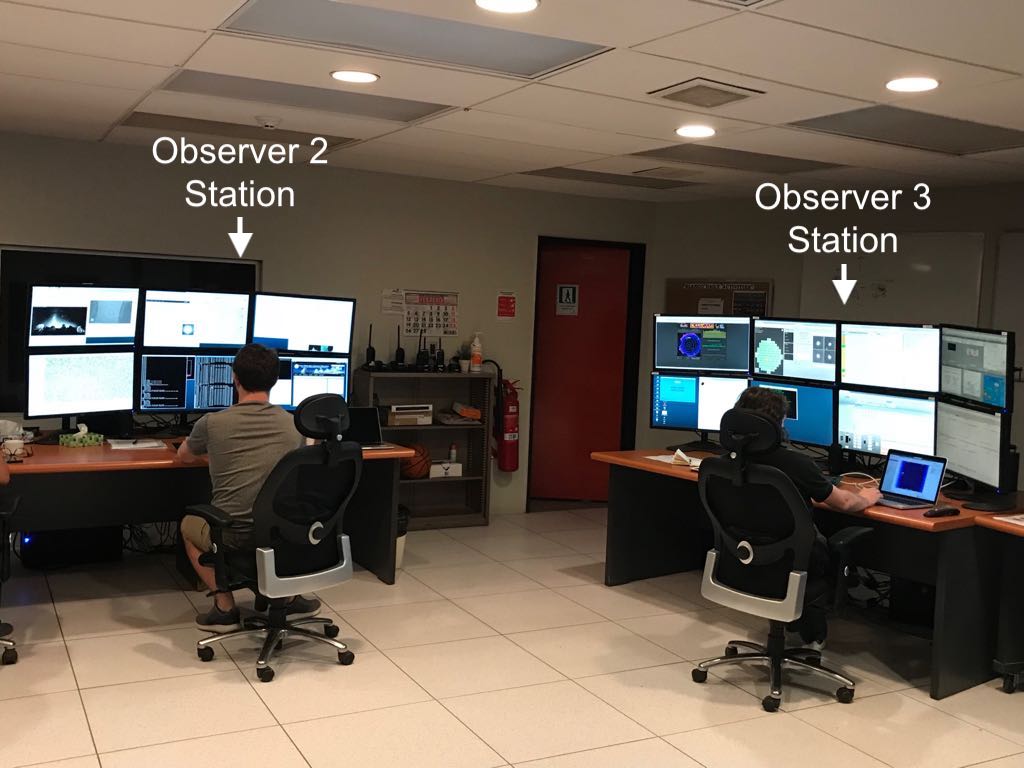
Your support astronomer will meet you up in the control room of the 4m telescope on the afternoon of your first night and will show you the different components of the observing system.
There are three stations in the control room, one for the telescope operator and two for the observer(s). The later are called observer3 and observer2. Observations are made from observer3 (the station with 8 monitors) while observer2 is mostly for data analysis.

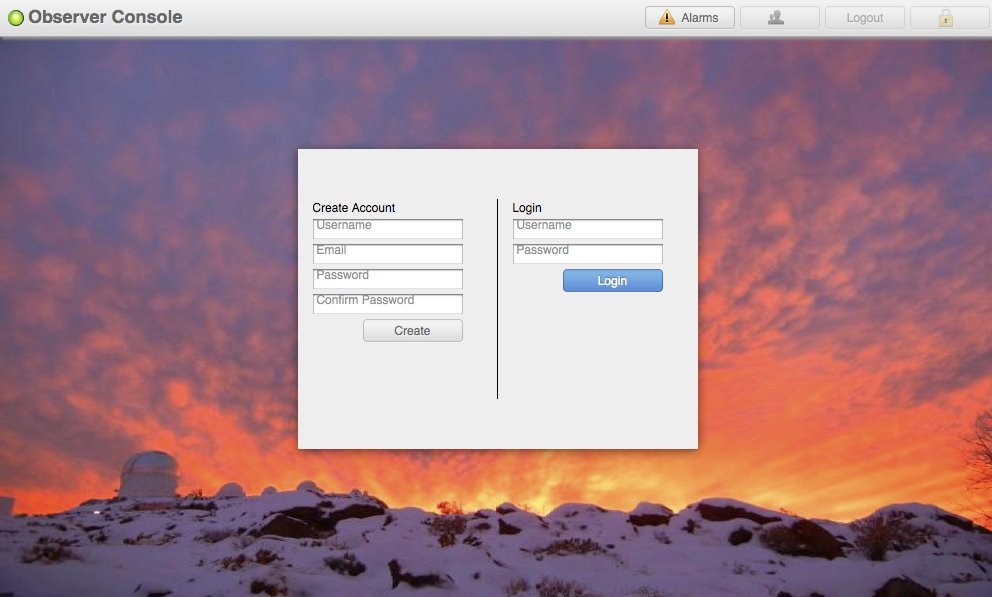
At the beginning of your run, you will see in observer3 the DECam login prompt shown in the picture. The user name is DECamObserver and the password is the proposal ID of the observations taking place (for example 2014A-0245). This password is valid only during the days of the run and will expire automatically afterwards. Most likely the Observer Support Team will do the login for you early on your first night of observation. However, if for some reason SISPI (the observing control system) needs to be restarted during the night, you will need to login again.
Once you login a number of different windows will pop-up in observer3. The one that the observer really needs to know is the Observer Console which will be described in the next section. Here we provide a brief description of the information provided by each GUI. The interested reader may want to follow the links provided below.
Some GUIs may freeze during the night (they suddenly get black). There is no need for panicking since no processes are affected by this. Just reload the windows to get them back. If no reload button is available, use the key F5.
In the System Control tab of the Observers Console you provide information on your observing program. This information will be reflected in the headers of the FITS images. Most likely this will be already setup for you by the Observer Support Team, but if SISPI has to be re-started during the night, you will need to enter the information again.
To setup a project:
Click on the Edit button to edit the values in the text fields. Enter the first two fields: Observer (name(s) of the observer(s)) and Prop-ID (your proposal ID, for example, 2014A-0270). Click Save and the other two fields (Description and PI) will be filled up automatically.

Now, configure SISPI by clicking the Configure button. Configuration might take 30 seconds to a minute. Check these indicators (in System Status):
If you are starting your program in the second part of the night you will need to change the setup information. This is of the most importance since images will be available at the NOAO archive only to the owner of the project ID reflected in the header of the images.
To change the setup information go to the System Control tab, clear the information and fill the two first fields. Click on Save and the two other fields will be filled out automatically. You do not need to hit the Configure button. After that, loaded observations will have the new setup information independently of previous queued scripts (i.e., the queue doesn't need to be empty).
It is very important to enter first the program information before doing any observation or loading scripts to the queue. Things in the queue will produce images with headers having the information available at the moment the script was loaded.
The Vsub button controls the CCD substrate voltages. Vsub must be Turn on ONLY when you are ready to take observations. ALWAYS check with the telescope operator that you can turn on Vsub. He will be sure that all lights are off in the dome and it is safe to turn on Vsub. The button to turn Vsub on/off is on the top right side of the Observer Console (under tab System Control).
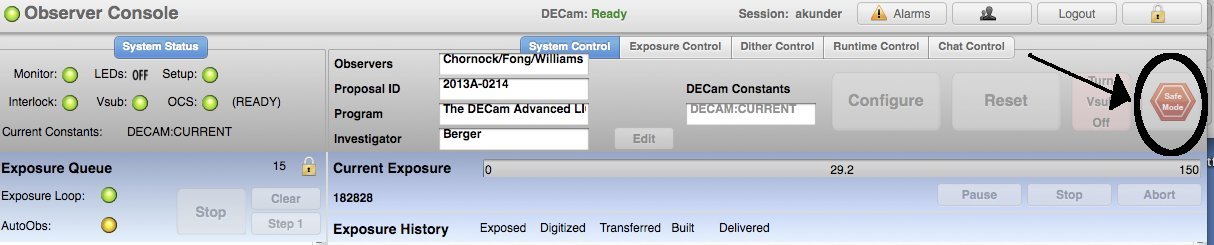
Vsub must be turn off after you finish your observations. This is done by clicking on the button Safe Mode at the top right extreme of the Observers Console (System Control Tab). This button will not only turn off the voltages but also put a blocking filter in the beam.
LOADING YOUR OBSERVING SCRIPTS
Observing scripts (in .json format) must be uploaded to this sub-directory in observer3:
/usr/remote/user/DECamObserver/ExposureScripts/User_scripts/
Open a terminal in observer3 and create a new folder in the above directory. It is convenient if you use your program name for that folder (for example, 2014A-001).
You can then copy the scripts to that directory. For example, from your laptop you can type:
scp *.json DECamObserver@observer3.ctio.noao.edu [51]:/path/.
where /path/. is the full path of the folder you created for your project.
Your support astronomer will supply the appropriate password.
Observer Console
Loading Scripts
Single Exposures
The Queue
The Guider
This is the GUI used to make observations:
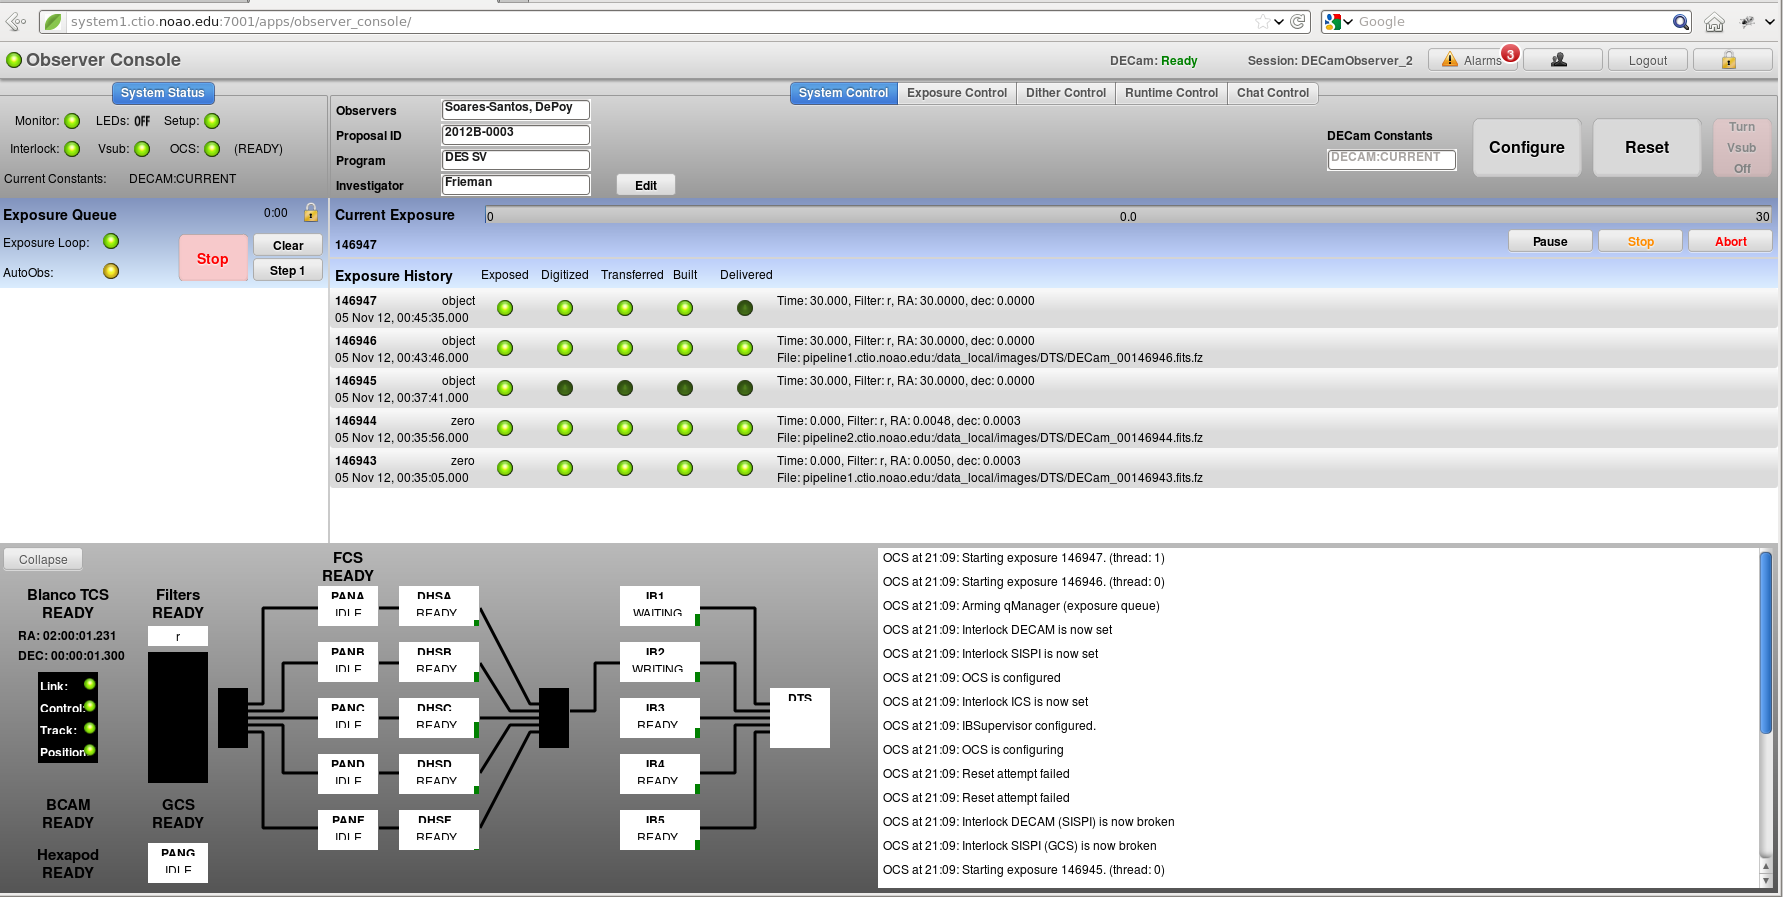
The status display in the upper left corner informs about the system status and if SISPI is ready to take an exposure. All lights green means the system is ready to take observations. If not observing, Vsub must be off (red).
The middle part of the page is reserved for information about the exposure queue on the left and current and past exposures on the right. The GUI elements on the bottom of the page can be collapsed to have more space for the exposure information. When visible the section in the bottom left corner show an animated view of the image data flow through SISPI.
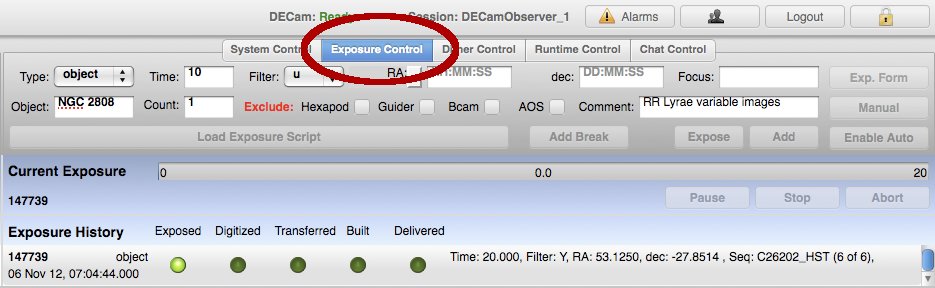
The top part of the GUI changes depending on the selected Tab. Most likely the observer will only use the System Control (to setup your project and configuring/reseting the system) and the Exposure Control Tabs (to make observations).
To take exposures you will need to Click on the Exposure Control Tab at the Observers Console. From here you can make observations in two different ways:
You can provide the information for a single exposure by filling out the appropriate fields in the top part of the console or,
The first method is ideal for test images while the second is more efficient for you science program.
Click on the “Load Exposure Scripts” button and find your folder. Select the script you want to observe and hit “submit”. All the exposures will be added to the queue. You can load several scripts to the queue. The exposures of each script will show in different colors in the queue (left part of the Observers Console). You need to hit “Go” to start executing the queue.
Fill the exposure information in the appropriate boxes (exposure type, time, and filter). Other fields are optional. If no RA and DEC are provided the telescope won't slew and exposure will be taken at the current position. This is a description of all possible fields:
Filter - Select the filter from the pull down menu. Block is the solid metal plate that blocks all light. Pin hole is the metal plate with a single, small hole. When using the exposure form you can not select multiple filters.
Time - requested exposure time in seconds
Type - Select the exposure type from the pull down menu (e.g. "object").
RA - Select the RA type coordinate from the pull down menu. Options include:
(Dec) Coordinate - Enter the coordinate in DD:MM or degree format (dec option) or degrees (delta DEC, EL options)
(RA) Coordinate - Enter the coordinate in HH:MM or degree format (RA, HA options) or degrees (delta RA, AZ options).
AZ (Azimuth). The dec label will change to EL.
HA (hour angle)
delta RA - choose this for relative coordinates. The dec label will change to delta dec.
Count - If set to n the same exposure request will be submitted n times.
Object - Name or identifier of the field to be observed.
Focus - Enter either a single value to set the focus (hexapod z parameter) or a sequence of six floats separated by commas for the 6 hexapod degrees of freedom (x, y, z, theta, phi, 0) [The last value has to be 0]
Exclude - Explicitly disable a DECam component from participating in the exposure. For normal observations, leave unchecked. Use carefully!
Hexapod - If checked do not adjust the hexapod (excludes both the look up table and the AOS tweaks)
Guider - If checked do use the guider. No corrections will be sent to the TCS.
Bcam - If checked do not fire the Bcam. No Bcam information will be sent to the AOS.
AOS - If checked the AOS is not used and no tweaks are sent to the hexapod.
Comment - Comment to be added to the exposure FITS header.
To make the observation you can hit either the button “Expose” or “Add”. The difference between them is that “Expose” will put the observation at the top of the queue (i.e. it will be the next observation to be done), while “Add” will put the observation at the bottom of the queue (it will be executed after all observations in the queue are taken). If the queue is empty, both option give the same result. Either way, you need to press the button “Go” to execute the queue and take your exposure.
The left part of the Observer Console shows the individual exposures to be executed. The top part (next to the lock) has a display that cycles between the number of exposures currently in the queue and the remaining time (in minutes) to execute it.
If the lock is closed no changes can be done in the queue. Click to unlock. If unlocked you can make modification to the queue:
At any time during the execution of the queue you can hit the Stop button. Images already in the process of being executed will finish. To re-start observations, press “Go” again.
Right below the time bar (to the right) there are buttons to Stop, Abort and Pause the current exposure. At the present time, the use of those buttons is unreliable and may on occasions hang the system. For the time being, we recommend not to use them.
When observations are executed you can see the progress of each one by the appearing green buttons in the central part of the Observer Console. During exposure a time bar will show the remaining time the observation. Once it is finished the Exposed button will turn bright green. Image will then be Digitized, Transferred, Built and finally Delivered. After the image is Digitized, the following exposure in the queues will start being executed. An image which has been delivered is both at the observer2 station and at the NOAO Archive in Tucson.
The guider will start automatically after ~30s of each exposure. The standard configuration of the guider has proven to work very well in most circumstances. That means that in general the user does not need to interact with the guider. There are, however, a few cases in which the guider may fail (an alarm will be produced announcing that there are no active guide CCDs; observations will continue with no guiding). Some examples of guide failure situations include observations of very crowded fields, observing under cloudy conditions, and u observations of sparse fields.
There has been a recent update in the Guider GUI that allows the user to change some of the configuration parameters to help the guider find suitable stars under conditions like the ones described above. The following picture shows the guider GUI with the standard parameters (Normal, Clear, 600ms exposure):
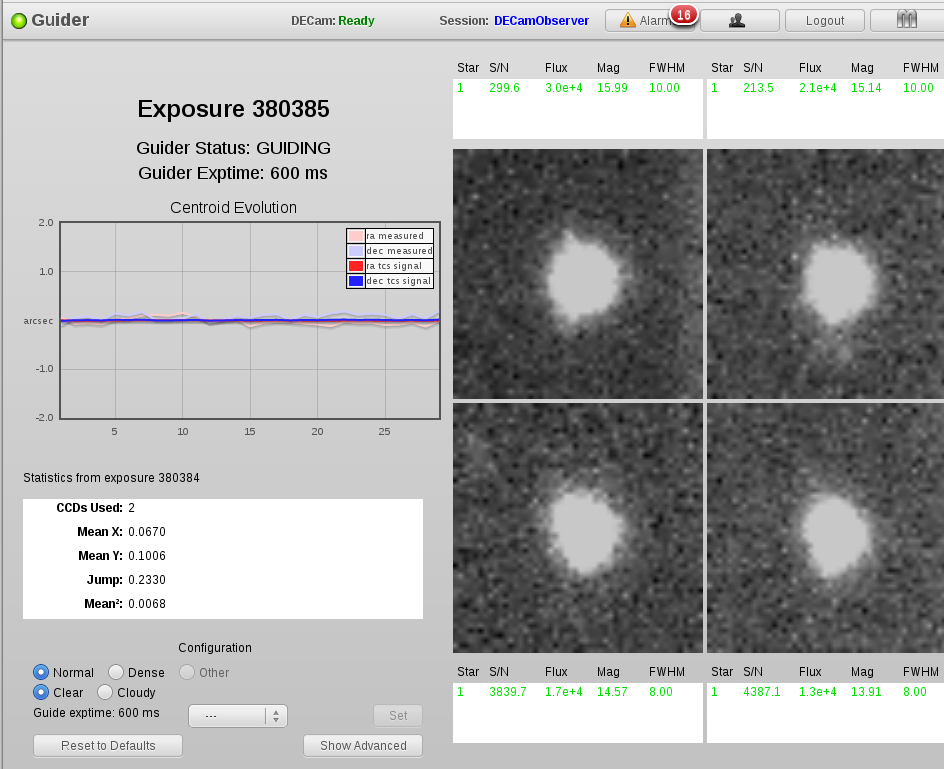
If the guider fails using the standard configuration, try the following:
In crowded fields, decrease the exposure times to 300ms or 100ms.
u observations at high galactic latitudes (sparse fields) may require to increase 1200, 1800 or 2400ms.
Currently, the option "Dense" is not working (but see Troubleshooting [52] for an explanation of how to change the search and isolation range of potential guide stars)
Afternoon calibrations will normally be started around 4pm. This is usually done by the Observer Support Team. A standard script is used for these calibrations which will take 22 bias images (11 before the flats and 11 after the flats) and 11 dome flats with each filter ugrizY and VR. To find the standard script for daytime calibration use the button Load Exposure Script and find the directory /ExposureScripts/. Choose the file Daily-DomeFlats.json
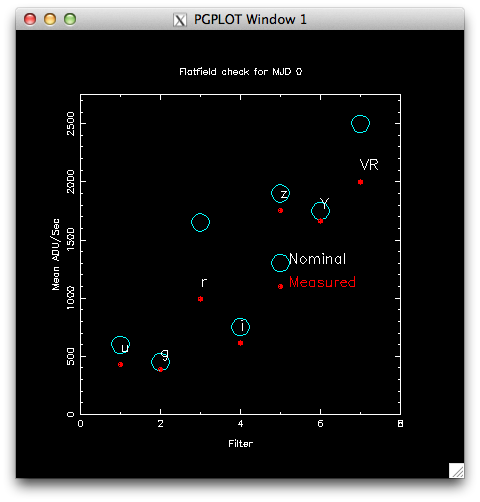
The exposure times for the dome flats are 40, 40, 15, 30, 12, 12 and 12 for ugrizY and VR, respectively. These exposure times will produce flat images with 15,000 – 20,000 counts. The total time for the daily calibrations (for all filters) take about 1 hour.
Counts for the dome flats can be checked with the command flatCheck, within Kent's Tools, which will produce a plot like this:
Be sure Vsub is off after calibrations are finished. This should be done automatically by the calibration script but it is a good practice to check that was indeed the case.
Sky flats are not allowed with DECam.
You can start observations when the Sun is 10 degrees below the horizon (you can check the Sun altitude in the Tololo Environment Page [53]). The telescope operator will let you know when you can start.
The first thing to do is to turn on Vsub (within the System Control Tab at the Observer Console). All buttons in the System Status should be green. If that is the case, you are ready to go.
It is always recommended to take a bias or test image after turning Vsub on. The general procedure is to take 2 zero images. This can be done simply by taking a zero image from the Exposure Control Tab.
To correct the pointing of the telescope, take a short exposure at the position of the telescope using the Exposure Control Tab in the Observers Console (for example, 5s in the r filter). In observer2, find a terminal an load Kent's Tools (more details in the next section) by typing:
> observer
Once the image is delivered, type:
> center
This command will perform the astrometry of the field just observed and it will calculate the offsets in RA and DEC from the coordinates of the telescope. Give these offsets to the telescope operator. He will apply the corrections. After that it is recommended to take again another exposure of 30s to recheck the pointing and setup the focus and guider.
An easy way to do all this is to load the script start.json (which is in the directory ~/ExposuresScripts/User_scripts/) that will do the following exposures:
Now you are ready to start your science program. Load your scripts and go.
Focusing will be performed automatically for every image and thus there is no need to run any focus sequence.
Tools to Check the Quality of the Data:
- Kent's Tools
- Database Query
- QuickReduce
- IRAF
- Weather Pages
All of your images are copied over to the observer2 computer. They are located in this directory: /home4/images/fits/your_proposal_ID, except for the DES project which has a different location.
Images in this directory are in compressed format (.fz).
TOOLS TO CHECK THE QUALITY OF THE DATA:
A suite of commands to quickly examine DECam images were developed by Steve Kent and are known as the Kent's Tools. To start the program:
| Command | Explantion |
| commands | Lists all available commands |
| inventory [n] |
Lists the observations made during the current night, or n nights ago. This is a useful tool to produce a log of the observations. |
| inv [n] | Short of the above |
| invPrint [n] | Same as above but prints the results to a file (in DECamObserver's home directory; file is named: yyyymmdd.inv) |
| load [exp num] [ccd] | Displays a ccd in DS9 (it stars DS9 if needed). If no arguments are given, it will display chip S4 from the latest image |
| bigload [exp num] | Displays all 62 CCDs after a quick bias sustraction and decimated by a factor of 8 |
| center [exp num] | Performs astrometry to determine the offset of the telescope pointing |
| seeingall [exp num] | Determines the average seeing in the 8 central CCDs |
In the above commands, if [exp num] is omited it will default to the latest delivered images. An exposure can be identified by just the last few digits of the exposure number, without having to specify the sub-directory of the full file name.
Other useful commands are:
| Command | Explantion |
| seeing | Click on a particular star and it will produce a radial plot and delivered the seeing |
| ephem | Gives the ephemerides for the night (sunset, sunrise, twilight, Moon, etc) |
| skyview | Looks up field |
| ned | Looks up galaxy |
| simbad | Looks up star |
| camFbsPlot | This shows: 1. the shape of the stellar ellipticity for every DECam CCD, 2. ellipticity with mean ellipticity subtracted, and 3. the relative fwhm to the mean. This command takes a while to run. |
| flatCheck [n] | Checks the nominal values taken during the current day or n days ago. |
More documentation on kentools is available here [54].
To obtain a summary of the quality of your data you can use the command godb. This command queries the telemetry database and lists data for your exposures, including the seeing.
To run it, open terminal in observer2, type “godb”. There are two commands that you can use “inv” and “qcInv” (or their print-to-file versions, invPrint and qcInvPrint).
“qcInv” is the most interesting command, as it lists both the seeing (consistent with running the “seeing all” command on individual images) and airmass. The command “inv” is similar to the one in Kent's Tools. Other values listed with this command are sky, cloud and teff.
Be aware that sky and cloud have not been calibrated for the u band yet.
Note that if you are doing very short exposures, values may be missing from the table as the database can have missing entries in those conditions. In general it is useful to run “qcInvPrint” at the end of a night and then for the few missing values (if any) just run “seeingall” (Kent´s tools) and add those values to the table.
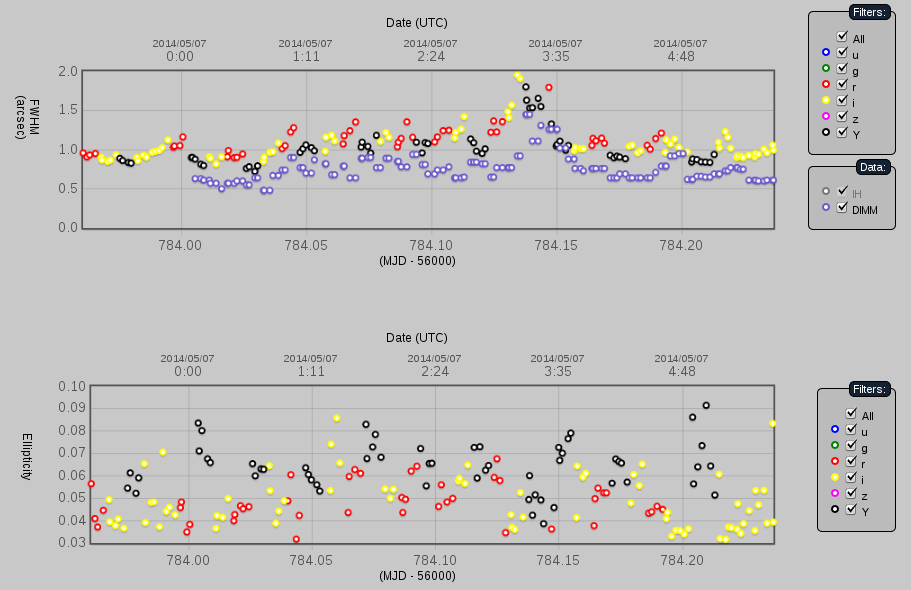
QuickReduce is an automatic pipeline which is designed to monitor in real time the quality of the data as it comes from the telescope. The reduction pipeline performs bias subtraction, flatfielding and source extraction for each science CCD. The graphical interface of QR is usually running in observer2. There you can see the evolution during the night of the FWHM, ellipticity, sky background and others. Be sure that you have selected the date(s) of interest (in UT).
IRAF can be used in observer2 for image inspection and analysis. In order to be able to display and/or examine an image in IRAF you need to decompressed it first. In a terminal:
> funpack image.fits.fz
Some useful comands in IRAF:
To display a CCD:
> !ds9 (to open a ds9 window)
> display image[XX] (displays the CCD XX, where XX is a number from 1 to 62).
You can then use imexam to examine the image.
To find out which is the CCD of a given extension:
> imhead image[XX] l+ | grep DETPOS
To extract a single CCD from a DECam image:
> imcopy image[XX] output
The Tololo Environmental page [55] updates automatically every few seconds and contains weather data as well as DIMM seeing measured at the observatory. It also displays the Night Almanac. It is a useful tool monitor the environmental conditions during the night and the altitude of the Sun. Keep an eye on the wind. You may want to close the louver windows around the dome floor if the winds increases above 15 mph.
Clouds can be monitored using the all-sky cameras RASICAM [56] (infrared) and TASCA [57] (optical).
Also useful is to look at this camera [58] (Blanco PF webcam) which is pointing straight up from the telescope prime focus and allows views of the sky as currently observed by the telescope.
For safety reasons of the camera, observations need to be over when the Sun is at -10 degrees from the horizon. The altitude of the Sun can be monitored at the Tololo Environment Page [55].
Please click on the Safe Mode button after your last observation has finished. This will turn off Vsub and put the block filter in the beam. Alternatively, run a script with action “End of night”.
It is VERY important that you fill and submit the Night Report [59] before you leave the dome in the morning. This is the only way to ensure that any problem is addressed by the day crew. The night report is long so you may want to start filling it out during the night. You will need to login into the CTIO webpages in order to be able to create a report.
Login: astronomer
Password will be provided by your support astronomer (it should be written on the white board as well).
Only one report per night can be created so if you are sharing the night with another project, the observer in the first part of the night should create the report and fill in the weather conditions for the first half of the night. He/she should leave the report open so the observer in the second part of the night can finish it. The second observer is responsible for the final submission of the report. Several programs may be added in a single report (click on Add another program).
If you got bad images during the night (for example, bad tracking, clouds, etc) and you do not want them to be processed by the community pipeline, prepare a simple text file with the ID number of the images to be ignored, and send the file as an attachment to pipelines@noao.edu [60]. This can be done on a nightly basis or only once at the end of your run. More details here [7]. If all your images are ok, no action is needed.
At the end of your run, please fill the End of Run report [61]. This is the best way to get feedback from the observers. Thanks!
Most of the time, you don't. Data is transferred automatically to the NOAO archive so you can download the data from there. All raw DECam data is processed by a Community Pipeline managed by NOAO, which delivers reduced images (single and stacked) with astrometric and rough photometric solutions (see more detail in the NOAO Data Handbook [62]). You will be contacted by e-mail by NOAO when your reduced data is ready for downloading. The process may take a few weeks after your observations are finished.
Observers may also plug a USB storage device (disks, flash drives, etc) to observer2 to copy all or part of their data. Be sure the storage device is formatted as FAT32 or VFAT. If you want to transfer only a few images to your laptop, using scp is a a valid option.
Plugging external devices is ONLY allowed in observer2.
A log file for the nights of your observation can be generated by using the command invPrint [n] in Kent's Tools [63]. In addition, you can also download information from QuickReduce [64] about the quality of your data (seeing, ellipticity, sky background, etc).
A publication using DECam data should include the appropriate acknowledgments, which are found on the NOAO Publications Acknowledgments web page [65].
Click on the relevant category of DECam data use below to link to the standard acknowledgment statement and information:
The DECam observer system is quite stable. This section lists several of the most common problems that can appear during a night, and its possible solutions. If a problem appears find help from your Telescope Operator/ Observer Support Person/ TelOps Electronics-Data support person /Support Astronomer.
The best way of getting a diagnosis of a possible problem is to look at the Alarm History GUI. The different levels of alarms are:
These alarms will produce a distinctive sound to make the observer/operator aware of a potential problem.
The following is a list of common errors and its solutions:
Unresponsive GUIs
No Guider Stars Found
Broken Interlock
DTS Stops
DECAL not ready
Shutter Error
Stars with weird shape
It is pretty common that some GUIs stop responding during the night. Sometimes they will turn out black. Before panicking, just reload the GUIs and they will come back to life. If you cannot see the refresh button on the top part of the windows, just press the F5 key to refresh.
In some occasions a message appears about the "Unresponsive Page" providing two options: "Kill page" or "Wait". Use "Kill page".
If the GUIs are still unresponsive, all GUIs can be restarted by pressing the DES icon (in the top bar of the top left screen) and choose close all GUIs (red logo). Using the same DES icon (dark logo), all GUIs can be restarted.
In the case that the users have no control of the SISPI observer control, a releaseMasterConsole command needs to be executed by the observer support or the telescope operator, after shutting down the GUIs and before restarting them using the method described above.
First, check the sky. You may not have guider stars because of clouds.
The default parameters of the guider worked very well in most conditions. However, sometimes it won't find suitable stars for guiding in any of the CCDs. If this is the case, a warning will appear (which you will see in the Alarm History GUI) and it will make a distinctive sound. The exposure will continue without guiding.
You may want to repeat the observation and help the Guider to find guider stars using any (or both) of these options:
1. Increase/Decrease the exposure time of the guider. The default exposure time is 600ms. For example, during twilight the sky is still bright and you may need to increase the exposure time. On the other hand, in very crowded fields you may want to reduce the exposure time. The exposure time may be changed directly in the Guider GUI by choosing a value from the drop-down menu. Another possibility for changing the exposure time is the following:
2. Change the search and isolation range (in arcsec) in the Architect Console: find the GUIDER role and make the following change:
The defaults values are:
A broken interlock will produce and Alert and you will see a red light in the System Status. Observations cannot continue until the failure is solved. These types of failure can be very simple or quite complex. Simple solutions should be tried first. Complex ones will require an expert. This is the protocol to follow in case of a broken interlock:
1. Try Reset (Observer Console, System Control Tab). If successful, continue (takes only a few seconds). Many problems are solved just with this.
2. If you can identify the role with the problem, try to restart (it also takes only a few seconds but some roles depend on others which could cause problems in rare occasions). To identify the role with the problem go to the "Interlock Viewer" page, which is one of the GUIs up on the observer3 console. Click on the SISPI box at the bottom of the upper half of the page. This should fill the lower half of the page with SISPI Interlocks. Make a note of which of the Interlocks is highlighted in red.
2.1. OCS Status -- if the OCS Status is the *only* one that is red, go to the Observer Console GUI, click on the System Control tab, and hit the "Reset" button.
2.2. If the OCS Status + Another Process (eg., FCS_STATUS) shows up in red, go to the "Alarm History" page, which is the other tab in the same GUI. Identify what the specific alarm is (for example, check the time of the alarm to isolate the alarm that caused the interlock to break). In most cases, the Alarm History page will provide more details than the Interlock Viewer page.
Once you have identified the component that has failed, go to the "Architect Console" page, which is one of the GUIs up on the observer3 console, typically next to the interlock viewer page.
Find the component that has failed on the left side of the page, and highlight it. Click on the "Full Log" button on the middle, right part of the page. A terminal will pop up with a log history. Scroll all the way to the bottom of the terminal and verify that there is indeed a problem with the component.
Then, hit the "restart" button under "Role Control" in the top, right part of the Architect Console. Make sure that a red cross appears before the component that was just restarted--this means that the restart worked. Wait a few seconds for the red cross to become a green check mark.
Lastly, go to the Observer Console GUI, click on the System Control tab, and hit the "Configure" button.
3. Try configure (if you restarted a role or not). If successful, continue (takes about 20 seconds)
None of this 3 options above will affect the queue and the setup.
4. If above actions don't fix the problem restart SISPI. If successful, continue. Your telescope operator or support astronomer can help you with this task (takes about 4 min, requires reloading the setup information, configuring and load again the exposure scripts). In a few occasions SISPI has to be restarted 2 or 3 times before the system gets to work again.
5. If restarting SISPI does not work, and expert must be called. One way to do it is by locating people online in the skype account open in observer3.
6. If for some reason the Telescope Control System (TCS) has to be completely restarted then SISPI ought to be restarted afterwards.
Images are built but not delivered (last button never gets green). A Warning will be issued but observations continue. Continue observations and report it in the morning so the people at the NOAO archive recovers your data.
If the Alarm page shows a message about DECAL component not being ready, please tell the telescope operator. He will need to reset the DECAL (calibration) computer which is located in the MZ floor. After that, hit Reset.
A few shutter errors have appeared in the past. If the Alarm page indicates this type of error, tell the operator. He will perform a hardware reset which takes only a few seconds. Then, on the Observer Console, click on Reset.
In rare occasions the telescope mirror may loose the air support. This situation usually sets an alarm for the telescope operator. On the observer side, stars will show a triple-image pattern like the one shown in the figure.
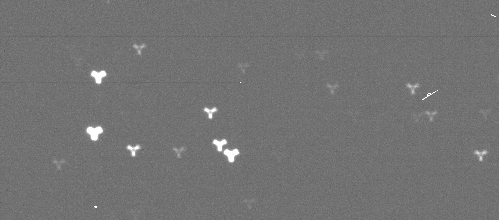
Alert immediately the operator for restoring the air support and stop observations. This procedure involves slewing the telescope to the zenith position. If SISPI also issued an alarm (likely related with a MAMAC failure), you may need to press Reset before resuming observing.
Links
[1] mailto:decam-help@ctio.noao.edu
[2] http://www.ctio.noao.edu/noao/sites/default/files/DECam/DECam_ETC-ARW-RCS7.xls
[3] http://www.ctio.noao.edu/noao/sites/default/files/DECam/DECam_ETC-ARW7.xls
[4] http://www.ctio.noao.edu/noao/content/Horizon-Limits
[5] http://www.ctio.noao.edu/noao/sites/default/files/DECam/ScriptsEditor.tar.gz
[6] http://www.ctio.noao.edu/noao/content/Photometric-Standard-Stars-0#Scripts
[7] http://www.ctio.noao.edu/noao/content/Communicating-DECam-Exposures-Ignore-NOAO-Community-Pipeline
[8] http://www.ctio.noao.edu/noao/content/Setup-1#SettingUp
[9] https://datalab.noao.edu/index.php
[10] https://datalab.noao.edu/nscdr1/nscdr1_overview.pdf
[11] https://datalab.noao.edu/nscdr1/index.php
[12] https://www.darkenergysurvey.org/
[13] https://arxiv.org/abs/1801.03181
[14] https://des.ncsa.illinois.edu/releases/dr1/dr1-access
[15] https://datalab.noao.edu/desdr1/access.php
[16] https://arxiv.org/abs/1804.08657
[17] http://legacysurvey.org/
[18] http://legacysurvey.org/dr6/files/
[19] https://datalab.noao.edu/decals/dataAccess.php
[20] https://arxiv.org/abs/1710.01309
[21] http://decaps.skymaps.info/
[22] http://decaps.skymaps.info/catalogs.html
[23] https://datalab.noao.edu/decaps/access.php
[24] https://arxiv.org/abs/1612.05560
[25] https://www.ifa.hawaii.edu/research/Pan-STARRS.shtml
[26] https://panstarrs.stsci.edu/
[27] http://adsabs.harvard.edu/abs/2007AJ....134..973I
[28] http://www.astro.washington.edu/users/ivezic/sdss/catalogs/stripe82.html
[29] http://www-star.fnal.gov/DECamStds/SDSSJ0843p0000.csv
[30] http://www-star.fnal.gov/DECamStds/SDSSJ0933m0005.csv
[31] http://www-star.fnal.gov/DECamStds/SDSSJ0958m0010.csv
[32] http://www-star.fnal.gov/DECamStds/SDSSJ1048p0000.csv
[33] http://www-star.fnal.gov/DECamStds/SDSSJ1227p0000.csv
[34] http://www-star.fnal.gov/DECamStds/SDSSJ1442m0005.csv
[35] http://www-star.fnal.gov/Southern_ugriz/New/index.html
[36] http://www.ctio.noao.edu/noao/sites/default/files/decam/README.txt
[37] http://www.ctio.noao.edu/noao/content/Mean-Photometric-Standard-Star-Module-PSM-Solutions-mean-zeropoints-color-terms-extinctions
[38] https://cdcvs.fnal.gov/redmine/projects/des-sci-verification/wiki/Photometry
[39] https://cdcvs.fnal.gov/redmine/projects/des-sci-verification/wiki/MJD_56235_%28Evening_of_2012-11-03_to_morning_of_2012-11-04%29
[40] https://cdcvs.fnal.gov/redmine/projects/des-sci-verification/wiki/Historical
[41] http://www-star.fnal.gov/Southern_ugriz/New/publications.html
[42] https://cdcvs.fnal.gov/redmine/projects/des-sci-verification/wiki/Zeropoint_trends_for_Nov_1-19
[43] https://cdcvs.fnal.gov/redmine/projects/sispi/wiki/ICS_GUI_for_Observers
[44] https://cdcvs.fnal.gov/redmine/projects/sispi/wiki/ExpGUI
[45] https://cdcvs.fnal.gov/redmine/projects/sispi/wiki/AlarmGUI
[46] https://cdcvs.fnal.gov/redmine/projects/sispi/wiki/Architect_Console
[47] https://cdcvs.fnal.gov/redmine/projects/sispi/wiki/InterlockGUI
[48] http://www.youtube.com/user/rasicam2
[49] https://cdcvs.fnal.gov/redmine/projects/sispi/wiki/IHGUI
[50] https://cdcvs.fnal.gov/redmine/projects/sispi/wiki/Comfort_Display
[51] mailto:DECamObserver@observer3.ctio.noao.edu
[52] http://www.ctio.noao.edu/noao/content/Troubleshooting-2
[53] http://ctio4l.ctio.noao.edu/web/CTIO/environ.php
[54] https://cdcvs.fnal.gov/redmine/projects/desops/wiki/Introduction_to_kentools
[55] http://ctio4l.ctio.noao.edu/web/CTIO/environ_dimm2.php
[56] http://rasicam.ctio.noao.edu/RASICAMWebService/static/RASICAMwebService.html
[57] http://139.229.115.232/TASCA/
[58] http://www.ctio.noao.edu/noao/content/ctio-external-webcam
[59] http://www.ctio.noao.edu/noao/node/add/night-report
[60] mailto:pipelines@noao.edu
[61] http://www.ctio.noao.edu/new/Tools/Forms/EOR/Form.php?telescope=Blanco%204-m
[62] http://ast.noao.edu/data/docs
[63] http://www.ctio.noao.edu/noao/content/During-Night-0#Kent
[64] http://www.ctio.noao.edu/noao/content/During-Night-0#QR
[65] https://www.noao.edu/noao/library/NOAO_Publications_Acknowledgments.html
[66] https://www.noao.edu/noao/library/NOAO_Publications_Acknowledgments.html#DECam
[67] https://www.noao.edu/noao/library/NOAO_Publications_Acknowledgments.html#DESdatause