This is the GUI used to make observations:
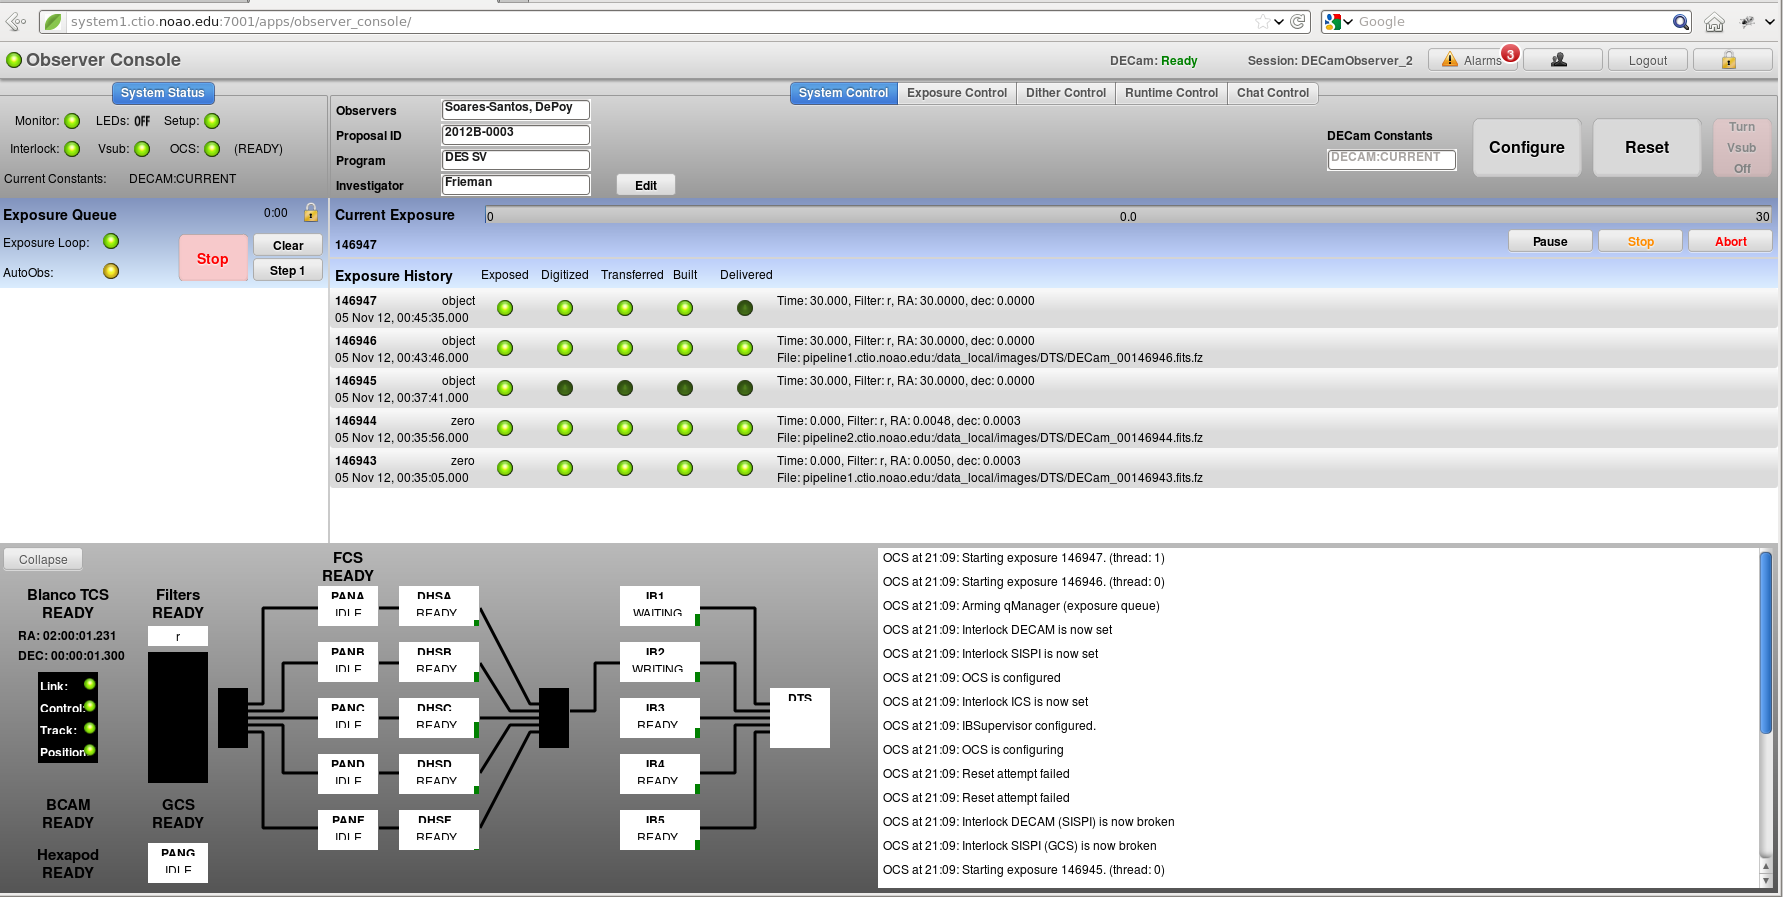
The status display in the upper left corner informs about the system status and if SISPI is ready to take an exposure. All lights green means the system is ready to take observations. If not observing, Vsub must be off (red).
The middle part of the page is reserved for information about the exposure queue on the left and current and past exposures on the right. The GUI elements on the bottom of the page can be collapsed to have more space for the exposure information. When visible the section in the bottom left corner show an animated view of the image data flow through SISPI.
The top part of the GUI changes depending on the selected Tab. Most likely the observer will only use the System Control (to setup your project and configuring/reseting the system) and the Exposure Control Tabs (to make observations).
To take exposures you will need to Click on the Exposure Control Tab at the Observers Console. From here you can make observations in two different ways:
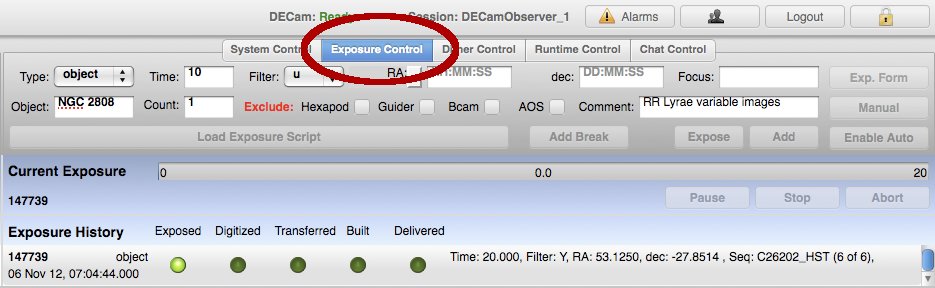
Fill the exposure information in the appropriate boxes (exposure type, time, and filter). Other fields are optional. If no RA and DEC are provided the telescope won't slew and exposure will be taken at the current position. This is a description of all possible fields:
Filter - Select the filter from the pull down menu. Block is the solid metal plate that blocks all light. Pin hole is the metal plate with a single, small hole. When using the exposure form you can not select multiple filters.
Time - requested exposure time in seconds
Type - Select the exposure type from the pull down menu (e.g. "object").
RA - Select the RA type coordinate from the pull down menu. Options include:
Count - If set to n the same exposure request will be submitted n times.
Object - Name or identifier of the field to be observed.
Focus - Enter either a single value to set the focus (hexapod z parameter) or a sequence of six floats separated by commas for the 6 hexapod degrees of freedom (x, y, z, theta, phi, 0) [The last value has to be 0]
Exclude - Explicitly disable a DECam component from participating in the exposure. For normal observations, leave unchecked. Use carefully!
Comment - Comment to be added to the exposure FITS header.
To make the observation you can hit either the buttom “Expose” or “Add”. The difference between them is that “Expose” will put the observation at the top of the queue (i.e. it will be the next observation to be done), while “Add” will put the observation at the bottom of the queue (it will be executed after all observations in the queue are taken). If the queue is empty, both option give the same result. Either way, you nedd to press the buttom Go to execute the queue and take your exposure.
Click on the “Load Exposure Scripts” buttom and find your folder. Select the script you want to observe and hit “submit”. All the exposures will be added to the queue. You can load several scripts to the queue. The exposures of each script will show in different colors in the queue (left part of the Observers Console). You need to hit “Go” to start executing the queue.
The left part of the Observer Console shows the individual exposures to be executed. The top part (next to the lock) has a display that cycles between the number of exposures currently in the queue and the remaining time (in minutes) to execute it.
If the lock is closed no changes can be done in the queue. Click to unlock. If unlocked you can make modification to the queue:
At any time during the execution of the queue you can hit the Stop buttom. Images already in the process of being executed will finish. To re-start observations, press “Go” again.
Right below the time bar (to the right) there are butons to Stop, Abort and Pause the current exposure. At the present time, the use of those buttons is unreliable and may on occasions hang the system. For the time being, we recommend not to use them.
When observations are executed you can see the progress of each one by the appearing green buttons in the central part of the Observer Console. During exposure a time bar will show the remaining time the observation. Once it is finished the Exposed button will turn bright green. Image will then be Digitized, Transferred, Built and finally Delivered. After the image is Digitized, the following exposure in the queues will start being executed. An image which has been delivered is both at the observer2 station and at the NOAO Archive in Tucson.