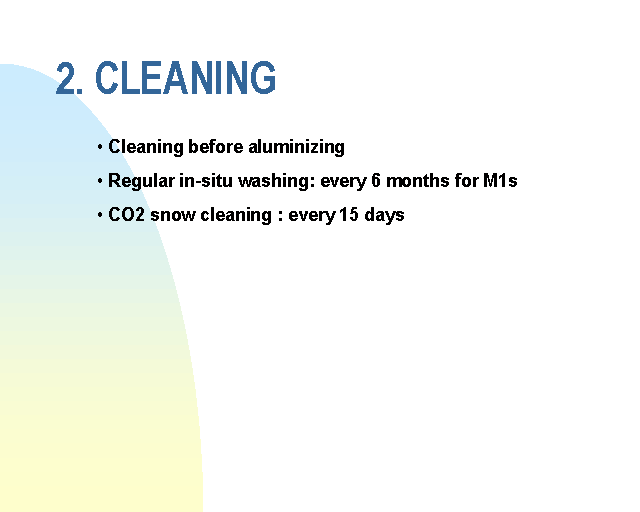
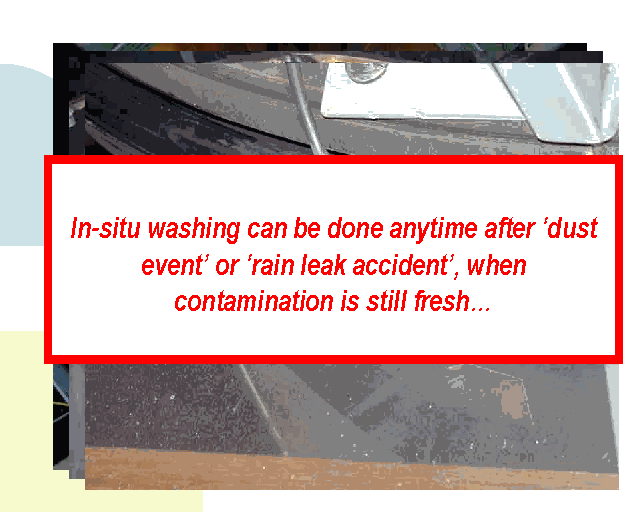
Since the beginning of the year 2000, we have implemented a program of regular washing (every 6 months) of the primary mirrors of the 4.0-m, 1.5-m and 0.9-m telescopes. The results are so good that we are now planning to aluminize these mirrors every 4 years only (instead of every 2 years up to now). The 4.0-m M1 is washed in-situ with a system of inflatable seals. We are able to peform the operation in a minimum amount of time (typically 2-3 hours at the 4.0-m) without specific engineering time scheduled. Since August 2000, we are also using an IRIS 908RS device to measure scattered and reflected light from the mirrors (the IRIS replaces the Minolta instrument). In August 2000, we have also installed a grounding cable for the 4m M1 coating in the hope to minimize the accumulation of dust by electrostatic attraction.
Besides, we perform fortnightly C02 snow cleaning of the 4.0-m and 1.5-m primary mirrors. The secondary mirrors keep clean much longer and are typically cleaned with CO2 twice per year.
This operation is normally conducted every 2 years in average during the winter shut-down of August.
Blanco Aluminization test 2009 summary [1]
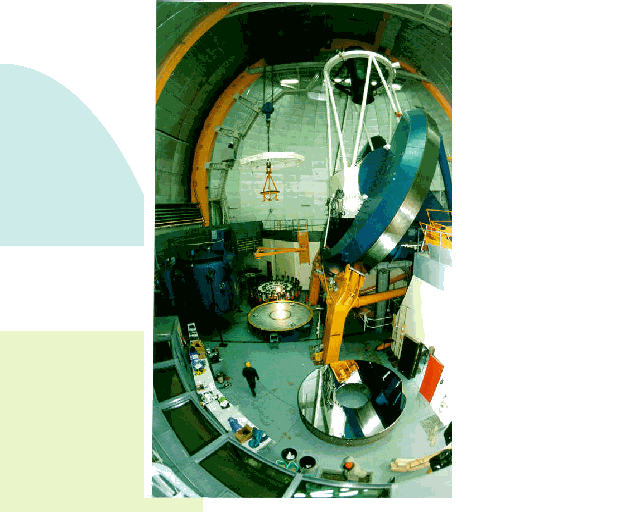
The entire process takes about 6 days (from the moment the mechanics team start until they leave the telescope ready for optical alignment). This is a picture [2] of the 1998 aluminizing team.
Before the aluminizing chamber (start with the mirror set up on its pedestal in the washing area)
Inside the aluminizing chamber
This is done ideally with 6 people: 3 outside the mirror, 2 inside the central hole, 1 preparing materials.
Here is a list of materials [3]. THINK SAFETY! Wear plastic suit all the time. Wear heavy gloves, goggle and respiratory mask when manipulating acids.
Have a plan for what to do in case of acid accident.
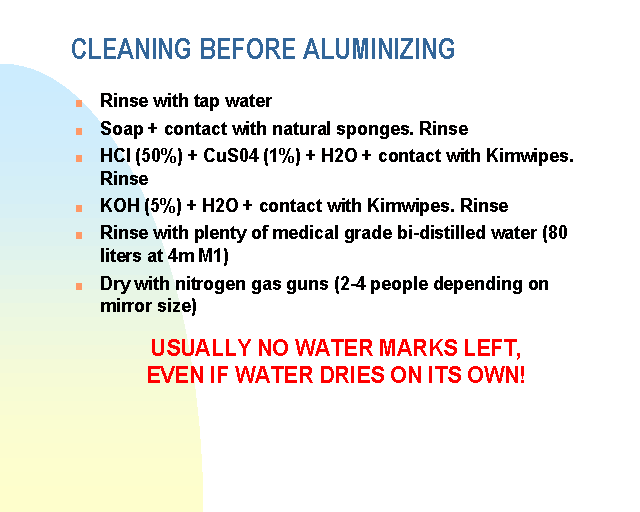
A.0. Pour natural sponges in a bath of HCl+H2O (to disolve any residuals of shells), rinse with water and cycle 5 times in washing machine.
A.1. For rough degrease: 200 gr of soap into 10 liters of filtered water (poured into 3 buckets)
A.2. For removing aluminium : 10 liters HCl + 10 liters filtered water + 200 grams CuSO4. !!CHANGE: a 15% HCl solution is enough (see how to apply it below)!!
A.3. For final degrease: 1 kg KOH into 20 liters of filtered water
A.4. Clean the mirror with CO2 snow, measure reflectivity and photograph mirror
A.5. If necessary, lay lab wipes on oil spots to absorb oil
A.6. Wear surgical gloves
A.7. From now onto the drying phase, ALWAYS keep the mirror wet.
Rinse entire mirror with filtered water (3 hoses) for 5 min. NO contact.
A.8. Pour soap onto entire mirror around the circumference. NO contact. Rinse with filtered water. REPEAT this step twice.
A.9. Blot mirror with soapy sponges using only the weight of the sponge. NO wiping. 3 people on outside of mirror make 2 complete circles. 2 people in the central hole make 3 complete circles.
A.10. Wash sides of mirror with soap and dedicated sponge NOT to be used on mirror optical surface.
A.11. Rinse the entire mirror with filtered water.
A.12. REPEAT step A.9 to A11.
 [4]
[4]
Figure 1: Mirror preparation & washing
B.1. Wear new surgical gloves + heavy gloves + goggle + respirator
B.2. One person pours HCl/CuSO4 around circumference of mirror while the 5 others drag-wipe with balls of cotton. Each cotton ball is used only for a maximum of 3 drag-wipe actions then replaced. Continue until aluminium is removed. !!CHANGE: cover the mirror with Kimwipes and pour HCl solution on them, they will keep the acid longer in contact with the coating and dissolve it without the need for a large quantity of acid!! Residual Al spot can we drag-wiped individually with a Kimwipe ball.
B3. Rinse with filtered water until pH is neutral. Rinse 2 minutes more with filtered water.
B4. Change to clean surgical gloves
B.5. One person pours KOH around circumference of mirror while the 5 others drag-wipe with cotton balls. Each cotton ball is used only for a maximum of 3 drag-wipe actions then replaced.
B.6. Rinse with filtered water until pH is neutral.
B.7. REPEAT steps B.5 to B.6
B.8. Rinse with filtered water 2 minutes more. Rinse carefully the mirror edge and the radial support mounts and holes.
C.1. Change to clean surgical gloves AND dust mask
C.2. Rinse with 50 liters DOUBLE distilled water pouring around the circumference. Check out that water flows uniformly on the surface, not leaving 'holes'that would be signs of broken surface tension of the liquid passing on a still-contaminated area.
C.3. 6 people using nozzle guns blow dry nitrogen from the outer diameter to the inner, making sure the water drops flows uniformly radially inward (look at them against the lights on the other side of the mirror. Dry as fast as possible to avoid water drying on its own. No contact with mirror during that phase. Bidistilled water is clean enough that the process doesn't leave water marks. Perform the breath test to detect any drying or contamination spots in any suspicious areas (breath gently on the mirror -dry your mouth first!- and watch out any pattern on the surface covered with moisture).
C.3. BIS. Old procedure: Have at least large 50 balls of Kimwipes ready and someone preparing more if necessary. They must be thick and wide, bigger than your hand. Rub (for the first time in the entire process) the mirror applying about 1-2 kg force on the Kimwipes balls. Do not overdo it! M he ball slowly to suck the water. Use each ball ONLY FOR ONE drag-wipe action then replace it (this is very important!!!). Work moving regularly around the mirror. As the mirror dries, you will have to work faster. Constantly check the entire mirror surface for areas that need attention. MAKE SURE your (dirty) sleeves are not touching the glass when you dry reaching far with your arm!! DO NOT let the mirror dry on its own! DO NOT wipe dry areas! Use Balzers virgin optical cotton cloth for touch ups. Check any visible stains and streaks with bright light and different viewing angles. It is hard to make the mirror better but easy to make it worse.
C4. Dry sides of the mirror and holes of the radial support mounts with Kimwipes. Use dry nitrogen to CAREFULLY blow out holes. Take care not to spray water on the optical surface.
C5. Hang up mirror in its hook. Clean with acetone the bottom of the mirror especially the 3 pads. Dry bottom of mirror with Kimwipes. DO A THOROUGH cleaning of all the non optical surfaces of the mirror for complete degreasing and drying.
C.6. Setup mirror on aluminizing tank floor. Blow off dust with CO2: MAKE ABSOLUTELY sure the substrate is free of dust (other wise the coating will be full of pinholes). Put 4 clean microscope test plates (coating witness samples) on edge of mirror. Seal tank.
Note: units used are : 1.3x10⁻⁶ atm = 1 micron (Hg) = 1 millitorr (=0.13 Pa)
Vacuum gauge positions: (to be checked)
1 is chamber
2 is holding pump
3 and 4 are the diffusion pumps
5 is roughing pump
Be careful: do not disconnect a vacuum sensor turned ON. Let any pump run for 1 min (listen the noise) before turning ON any vacuum gauge.
We indicate a typical elapsed time.
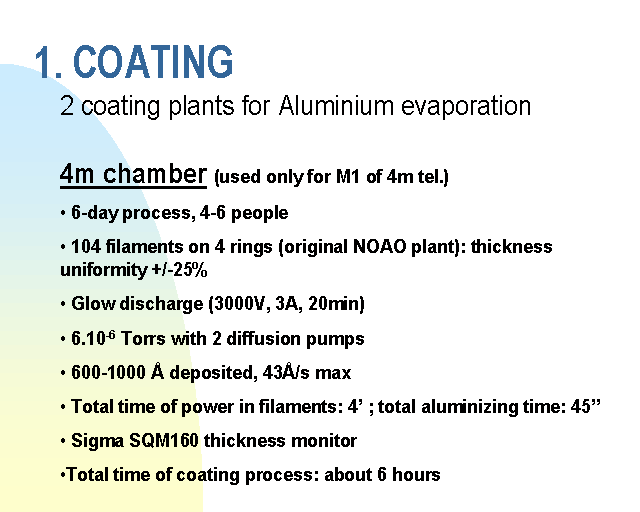
See pictures of the inside of the chamber: (Figure 2) general view of the chamber ceiling where you can recognize : the filaments in the round holes cut in the baffle sheet, the upper window used for checking the evaporation rate of aluminium and the cable feed-though port; (Figure 3) close view showing: the 4 concentric filament annuli (number of filaments per ring, from outermost to innermost: 36, 32, 20, 16 = 104 in total), the glow discharge ring (between annulus 2 and 3), part of the entrance conduit of one diffusion pump, the nitrogen pipe (near the bottom).
|
Figure 2: Inside the chamber |
Figure 3: Inside the chamber |
A.1. Work inside the chamber with clean white suit, gloves and shoes protectors. Wash the internal walls, windows and chamber floor with acetone (DON'T remove the side windows, it is hard to re-seal them). Chase any greasy spots!
A.2. Wash with HCl (strip off the aluminium) the feed-through cables contacts, the holding ring insulator.
 [7]
[7]
Figure 4
A.3. For better thickness uniformity, it is recommended to put filaments only in the outer rings. ±9% uniformity is reached that way (versus ±27% with all the arrays!). Check carefully all the filaments and replace the damaged ones: knock them with the finger to see if they don't break, they must be straight when loose (i.e. unstressed), not covered with blobs of aluminium. The filaments shall not touch the baffle mesh (to avoid short circuits) and be all at the same distance above the baffle (0.25 to 0.5"). IMPORTANT: tighten the filaments with a torque wrench to about 15 in-lbs so that the current that flows in them is uniform.
A.4. Hang 3 aluminium clips at both extremities of each filaments
 [8]
[8]
Figure 5: Filaments
A.5. Clean and lubricate the chamber Orings with high-vacuum grease. Don't lubricate the entire flange (but just the Oring). Don't put grease in excess! Close the chamber and put the C-clamps around the perimetral flange.
A.6. Run a typical vacuum sequence as described in B.1 to B.44 with 30 minutes minimum of glow discharge and eventually filament heating -but NOT LOADED with Aluminium clips!- to outgass them all (especially the new ones).
 [9]
[9]
Figure 6: Control Panel
Most useful schematic diagram of the valves
 [10]
[10]
Figure 7: Diagram of the valves
Install the mirror and the coating monitor [11] in the chamber (check that it works!). Put test plates on the edges of the mirror along the perimeter. Close the chamber and put C-clamps.
B.1. Connect flexible pipe of roughing pump to chamber (clean and lubricate Oring) and loosen the 2 adjusting rods.
 [12]
[12]
Figure 8
B.2. Connect 3 cylinders of liquid nitrogen (N2): one on each diffusion pump, one for the internal circuit (Meisner trap)
B.3. Open air valve in lateral wall (red flexible pipe)
B.4. Connect water lines to the coating monitor. Open water circuit (diffusor cooler): 2 valves -input/output- on pipes in backside wall ; (roughing pump is cooled with oil)
B.5. Check air pressure on diffusion pump: must read 70-75 psi (compressor is 100psi and feeds all valves)
 [13]
[13]
Figure 9
B.6.1. Connect roughing pump to energy on the wall (and unplug the M floor 'helicopter' fan). Turn ON air extractor on P floor (otherwise smoke will come out the roughing pump grey pipes).
B.6.2. Check switches: "manual" (key) and "all valves closed" (black knob). TURN ON power of control panel.
B.7. Test-cycle all valves (open/closed). The holding pump must be ON for the holding valves to work. Throttle valves leds don't shine (just watch the meter). Leave them all CLOSED including the mechanical needle valve for air inlet during glow discharge.
B.8. 0min: TURN ON roughing (mechanical) pump and immediately open foreline valves 1 and 2 (this starts pumping the diffusion pumps).
B.9. When diffusion pumps are below 20 microns (35 at least), TURN ON holding pump.
B.10. When holding pump is below 20 microns, close foreline valves 1 and 2, and open holding valves 1 and 2. Check vacuum in diffusion pumps (should remain the same at 20 microns). TURN OFF roughing pump (the holding pump is now holding the vacuum in the diffusion pumps).
B.11. TURN ON diffusion pumps 1 and 2 (it won't work if the water flow is below 3 GPM or if the diffusion pump pressure is above 25 torrs). TURN ON liquid level controllers (LN2 to diffusion pumps) and open slowly the 2 nitrogen cylinders valves (20 psi) to avoid freezing the controllers. Leave them open.
B.12. When the roughing line is at atmosphere, TURN ON the roughing pump and immediately open upper and lower roughing valves if not already opened (the roughing pump is now pumping the chamber). Check no excessive heat of diffusors.
B.13. Fan of roughing pump will power off (NOISE) automatically after 25 minutes, sign that vacuum is getting better.
B.14. 45min: When chamber pressure is around 20 microns, close upper and lower roughing valves. If vacuum in chamber doesn't seem to progress below 25 microns after some time, turn on the more reliable high vacuum gauge (cold cathode).
B.15. When the roughing line reads 10 microns, open foreline valves 1 and 2 (the roughing pump is now pumping the diffusion pump as is the holding pump).
B.16. Open throttle valves 1 and 2. Open high vacuum valves 1 and 2, waiting about 1 min between the aperture of both valves in order to prevent oil backstreaming (the diffusion pumps are now pumping the chamber).
B.17. Close holding valves 1 and 2. TURN OFF holding pump.
B.18. TURN ON high vacuum gauges (if the cold cathode is dirty, it might takes a while before it starts reading). When chamber reaches 5x10⁻⁵ torrs, TURN ON nitrogen cylinder valve for Meisner trap and corresponding liquid level controller.
B.19. 1h45min: When chamber reaches 1x10⁻⁵ torrs, reverse the process to be able to do the GLOW DISCHARGE:
B.20. Turn off high vacuum gauges, close high vacuum valves 1 and 2 and throttle valves 1 and 2.
B.21. TURN ON holding pump, close foreline valves 1 and 2. Open holding valves 1 and 2 (the holding pump pumps the diffusion pump). Check pressure in diffusion pumps.
B.22. Open upper and lower roughing valves (the roughing pump pumps the chamber).
B.23. Open air inlet needle valve by 1.25 turn and use the inlet switch to set and maintain the chamber pressure at 35 microns, which is the appropriate pressure to run the glow discharge safely. Glow discharge provides outgassing of the substrate through heating, conversion of organic substances into their volatile components and desorption of films through electrons impact.
B.24. Turn on glow discharge controller. Slowly raise the current to 3 Amps in 2 minutes. Voltage will read about 3000 Volts (if the meter works!). A uniform purple color will be visible inside the chamber. If pink arcs or flashes show up (usually at 30mic), the pressure is too low, so open air inlet valve to raise the pressure back to about 35-40 microns. The ionized air will bombard the residual sticky hydrocarbons and, by transfer of kinetic energy, help to remove them from the surfaces (especially the mirror's). Monitor the discharge for 10 to 30 minutes. Reduce the current to 0 in 30 seconds. CLOSE the needle valve by hand.
 [14]
[14]
Figure 10
B.25. 2h20min: close upper and lower roughing valves. When the roughing line reads 10 microns, open foreline valves 1 and 2.
B.26. Open throttle valves 1 and 2. Open high vacuum valves 1 and 2 with the same 1-min waiting precaution (the diffusion pumps are now pumping the chamber again).
B.27. Close holding valves 1 and 2. Turn off holding pump.
B.28. TURN ON high vacuum gauges. They should read 1x10⁻⁵ torrs in a few minutes.
B.29. 2h45min: cold cathodes should read around 8x10⁻⁶ torrs.
B.30. 3h30min: cold cathodes should read at least around 6x10⁻⁶ torrs, which is just enough to aluminize (the higher the vacuum beyond that limit, the better):
B.31. Turn off all kinds of fans (Pump floor for example) to avoid vibrations in the floor.
B.32. 4h40min: Install the coating monitor [11] on top of the chamber near the window and check its parameters. With the 4 filament arrays, the chamber deposits an uneven film: 65% at r=20", 100% at r=45" and 50% at r=80". The tickness monitor is measuring at r=20", so in order to obtain 1000 Angstroms maximum thickness on the mirror, the firing should be stopped when the thickness monitor indicates 650 Ang. After you power off the filaments, the evaporation still goes on for about 70 Ang., so you should power off at about 580 Ang.
B.35. Let the filaments cool for 15 min.
B.36. TURN OFF all gauges control.
B.37. CLOSE high vacuum valves 1 and 2. CLOSE throttle valves 1 and 2. TURN OFF liquid level controllers.
B.38. CLOSE foreline valves 1 and 2. TURN OFF roughing pump. TURN ON holding pump.
B.39. When pressure in holding lines is below 20 microns, OPEN Holding valves 1 and 2. TURN OFF Diffusion pumps.
B.40. Release slowly for 1min air to the chamber (big manual valve in the back) then open it completely. Let air get in 20min.
B.41. UNPLUG the LN2 cylinders and clean the lines with compressed air.
B.42. When the chamber is at atmospheric pressure, disconnect the head of the roughing pump and open the chamber. Remove test plates and mirror. Close the chamber.
B.43. When the diffusion pumps are cool to touch, CLOSE holding valves 1 and 2. TURN OFF Holding pump. TURN OFF control power. TURN OFF key switch.
B.44. TURN OFF air and water to diffusion pumps. CLOSE big manual air release valve.
** The goal is to deposit a layer of Aluminium of 950 Angstroms (±5%) of thickness on the glass (the chamber is capable of ±10% thickness uniformity when using the outer array only). Above 1000 Ang. thick, the coating will start showing more and more surface roughgness which will increase scatter. A thickness of at least 500 Ang. is required to maintain the transmission through the coating below 0.1%. The faster the evaporation rate is better because the vapour of Aluminium doesn't get much time to be contaminated with oxygen or other residual gases in the chamber. A rapidly deposited coating is more compact and show less surface roughness. Once the Al coating enters in contact with air, a 30 to 40 Angstroms-thick layer of Aluminium oxide (Al2O3) will quickly form on the surface and protect the Aluminium from tarnishing. This layer also hardens tremendously the Al (Knoop hardness of 2100 kg.mm-2 compared to 140 kg.mm-2 for bulk Al). Final experiments to check quality of aluminizing: look for water marks; put some sticky tape on edge of mirror and watch for aluminium peeling off; look at bright incandescent bulb from the edge of the mirror through the glass: the bulb should barely be visible. Inside the chamber, check the status of all the filaments : broken ones, clips not melted, eventual short circuits,... which will give you a better idea of the thickness uniformity.
Note: chemical processes in the obtention of the vacuum
Schematic diagram of the diffusion pump
 [15]
[15]
Figure 11
Maxime Boccas, last revision on 2th of August 2000.
 [16] [16] |
The mirror is being washed before removing the coating. |
 [17] [17] |
The mirror is ready for a good wash after staying one year without any cleaning! |
 [18] [18] |
The mirror is being washed before removing the coating. |
|
[4] |
The old aluminium coating has been removed and shows the bare glass (Cervit). |
 [19] [19] |
The aluminizing chamber is opened, the new coating inspected and the mirror is going to be moved back to its cell. |
 [2] [2] |
The TCDT (Tololo Coating Dream Team) celebrating with champagne (no pisco). Standing up from left to right: Oscar Saa, Jorge Briones, Gale Brehmer, Mario Gonzalez, Eduardo Huanchicay (in the back) and Eduardo Aguirre (in front), Maxime Boccas, Gabriel Perez (at the bottom). |
Max Boccas, last revision on February 1st, 2001
This operation is conducted every 6 months. This is a 5 people job: 2 persons are needed for the washing and at least 3 assistants (one near the mirror to pass on the goods and change the hose connections, one near the buckets to change the water pump from one to the other, and one on the M floor to open water and check water exhaust). Here follows a list of materials used, a description of the process and some images:
 [20] [20] |
For our first in-situ washing test (august 00), we had not yet received the exterior inflatable seal so we used duct tape and plastic sheet. |
 [21] [21] |
Detail of how the balcony is attached to the chimney with a special bracket. |
 [22] [22] |
Detail of the interior inflatable seal (between mirror center hole and chimney) and its valve. |
 [23] [23] |
Water is being sprayed on the mirror. |
 [24] [24] |
A small pool is forming at the bottom and being sucked up immediately by a water pump. |
 [25] [25] |
Detail of spraying water. |
 [26] [26] |
Detail of drying the mirror with dry nitrogen. |
Last revised on February 2, 2001, Maxime Boccas
Al & W from (1975-2001)
W stands for washing; Al stands for aluminizing
| Date | 4.0-m | 1.5-m | 1.0-m | 0.9-m | Schmidt | instruments |
| 3-Oct-01 | W M1 | |||||
| 4-Aug-01 | W M1 | |||||
| 30-Apr-01 | W M1 | |||||
| 9-Apr-01 | W M1 | |||||
| 8-Mar-01 | W M3 (TT box) | |||||
| 1-Feb-01 | W M1 | |||||
| 30-Jan-01 | Al M2(F8) | |||||
| 3-Nov-00 | W M1 | |||||
| 2-Nov-00 | W M1 | |||||
| 9-Oct-00 | W M2(F8) | |||||
| 6-Sep-00 | W M1 | |||||
| Aug-00 | Al M1 | |||||
| 12-Apr-00 | W M1 | |||||
| 21-Mar-00 | W M1 | |||||
| 9-Nov-99 | Al mirror(?) Hydra 4m | |||||
| 24-Aug-99 | Al M2s | |||||
| 31-May-99 | Al M1+M2 | |||||
| 1-Dec-98 | Al M1+M2 | |||||
| 25-Sep-98 | Al col Hydra 4m | |||||
| 31-Aug-98 | Al M1 | |||||
| 5-Aug-98 | Al M1 | |||||
| 9-Dec-97 | Al M2 | |||||
| 16-Jun-97 | Al M1 | |||||
| 9-Apr-97 | Al M1 | |||||
| 17-Aug-96 | Al M2(F14) | |||||
| 28-Jun-96 | Al M1 | |||||
| 12-Jul-95 | Al M2s | |||||
| 25-Apr-95 | Al M1 | |||||
| 18-Oct-94 | Al M1 | |||||
| 10-Aug-94 | Al M1 | |||||
| 23-Jun-94 | Al M1 | |||||
| 29-Dec-93 | Al M2(F8) | |||||
| 14-Oct-92 | Al M1 | |||||
| 5-Oct-92 | Al M1 | |||||
| 8-Sep-92 | Al M2s | |||||
| 17-Jul-92 | Al M1 | |||||
| 23-Oct-91 | Al M1 | |||||
| 9-Sep-91 | Al Cam Echelle 4m | |||||
| 30-Aug-91 | A M2(F7.5) | |||||
| 27-May-91 | Al M1 | |||||
| 5-Aug-90 | Al M1+M2 | |||||
| 13-Aug-90 | Al M1+M2 | |||||
| 19-Jul-90 | Al M1 | |||||
| 15-Nov-89 | Al M1 | |||||
| 19-Dec-88 | Al M2(F7.5) | |||||
| 26-Aug-88 | Al col spectro 4m | |||||
| 30-Aug-88 | Al M1 | |||||
| 30-Jun-88 | Al M1 | |||||
| 31-May-88 | Al M1 | |||||
| Jan-88 | Al Newton | |||||
| 18-Aug-86 | Al M1 | |||||
| 21-Mar-86 | Al M1 | |||||
| 28-May-85 | Al M1 | |||||
| 7-May-85 | Al M1 | |||||
| 12-Jun-84 | Al M1+M2(F7.5) | |||||
| 23-Aug-83 | Al M1 | |||||
| 21-Jul-83 | Al M1 | |||||
| 24-May-83 | Al M1+M2(F13.5) | |||||
| 24-Nov-82 | Al M1 | |||||
| 3-Aug-82 | Al M2(F8) | |||||
| 13-Jul-82 | Al M2 | |||||
| 8-Jun-82 | Al M2 | |||||
| 13-Apr-82 | Al M1 | |||||
| 8-Sep-81 | Al M1 | |||||
| 15-Jul-81 | Al M1 | |||||
| 14-Apr-81 | Al M1 | |||||
| 25-Nov-80 | Al M1 | |||||
| 20-Nov-80 | Al 4m rotator mirror | |||||
| 28-May-80 | W M2(F13.5) | |||||
| 31-Aug-79 | Al M1 | |||||
| 21-Aug-79 | Al M2 | |||||
| 9-Jul-79 | Al M1 | |||||
| 14-Jun-79 | Al M1 | |||||
| 9-Apr-79 | Al M2s | |||||
| 13-Mar-79 | Al M1 | |||||
| 21-Aug-78 | Al M2 | |||||
| 14-Aug-78 | Al M1+M2 | |||||
| 18-Jul-78 | Al M1 | |||||
| 12-Jun-78 | Al M1 | |||||
| 29-Nov-77 | W corrector | |||||
| 22-Nov-77 | Al M1 | |||||
| 26-Oct-77 | Al M1 | |||||
| 7-Jul-77 | Al 4m rotator mirrors | |||||
| 29-Jun-77 | Al M1 | |||||
| 30-Mar-77 | Al Col. Spectro 4m | |||||
| 28-Sep-76 | Al M1 | |||||
| Jul-76 | Al M2s | |||||
| Jun-76 | Al M2 | |||||
| 18-Apr-76 | Al M1 | |||||
| 13-Nov-75 | Al M1 | |||||
| Aug-75 | Al M1 | |||||
| Date | 4.0-m | 1.5-m | 1.0-m | 0.9-m | Schmidt | instruments |
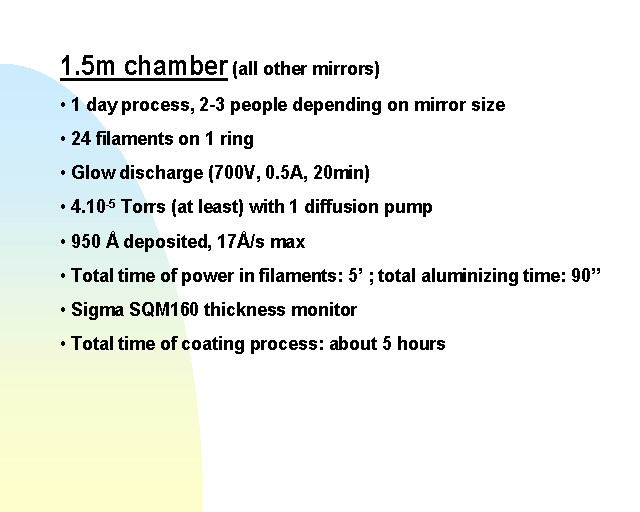
This aluminizing chamber accepts mirror up to 1.5m in diameter and is used for all CTIO mirrors but the 4m M1.
Mirror washing: see 4.0-m procedure [27].
Picture of the 0.9m tel M1 mirror [28] after sitting 2 years in the tube without any cleaning and a picture of the washing [29] (aluminium removal with acid).
Note: units used are : 1.3x10⁻⁶ atm = 1 micron (Hg) = 1 millitorr (=0.13 Pa)
Vacuum sensors and controllers: on the main panel, there is an analog controller NRC725 (Norton) for the Varian 524-2 cold cathode (1 input, reading from 10-3 to 10-7 torrs), and for Varian 531 thermocouples (2 inputs: not used not working anymore!). On top of the panel, there is an extra analog controller NRC721 fot 531 thermocouples (2 inputs: one for the diffusion pump and one for the tank, both reading from atm to 5 microns). There is also a thermocouple in the roughing line, which can be used to check good funcionning of the pump (turn off the meter, unplug the diffuser sensor and plug into the roughing line). Calibration of that dual thermocouple meter must be checked: when rough vacuum is reached in the roughing line (close diffuser and tank valves and plug the sensor in the roughing line), press the 'fil MA' button and turn the 'fil adj' knob until the needle reads 200 on the top red scale.
We indicate the elapsed time for the aluminizing (rather slow in this example, the entire process could last as little as 3h00).
A.1. Put a roll of paper on the bottom of the chamber to step inside without leaving dirt.
A.2. Replace all the damaged filaments (there are 24 of them on a single diameter): they must be straight when loose (i.e. unstressed), not covered with aluminium (drops). See picture [30] of this operation inside the chamber. Press gently the filaments with the fingers : if they are stressed, they break immediately. Filaments can usually be used for 2-3 aluminizings. Handling of the filaments must be done with gloves to avoid their contamination with grease.
A.3. Prepare 96 aluminium clips and wash them in acetone. Hang 4 clips per filament : one on each loop. Again use gloves to hung the clips.
A.4. Check thoroughly cleanliness of chamber, wash walls with acetone and all the surfaces touched by hands or tools, check the chamber Orings (clean and lubricate)
A.5. Use mouth mask from the moment the mirror is dried out until the chamber is closed. Wash with acetone the inside of the mirror holding ring and attach to the mirror. Bring the mirror into the aluminizing tank (picture [31]). Wash with acetone the outside of the mirror holding ring and any spots touched by tools.
A.6. Install the thickness monitor: it must face the center of the filament array and be at the same distance from the filaments as the mirror (otherwise you need to enter a 'Tooling' coefficient in the thickness monitor meter. Check that it is working (see instructions [11])
A.7. Blow off laterally dust with dry nitrogen. This is a critical step to ensure that the mirror is absolutely free of dust. Close tank and seal it by tightening the 4 bolts. Add at least 2 C-clamps near the top (original bolts are missing).
B.1. 0 min: Connect black and orange power cables (filaments and glow discharge) on the side of the main control panel. Connect 2nd black cable from glow discharge controler to valve at the rear of the tank (on the air inlet tube). Connect main thick black power cable to wall plug.
B.2. Take the extremity of the black flexible exhaust water pipe outside the building.
B.3. Open the water circuit valve (green pipe), the valve to the roughing pump and to the thickness monitor.
B.4. Close the copper tube valve (water to diffuser) on the right side of the control panel
B.5. See all following elements described on picture 1 [33]. Connect the tank vacuum gauge. Close both valves (diffuser and tank): the handle of the tank (top valve) should be on the left side and the handle of the diffuser (bottom valve) should be on the right side.
B.6. Picture 2 [34]. Turn on the air compressor: it must show 100 lbs to be able to open/close the diffuser valve. Make sure the voltage wheels for glow discharge and filaments are at 0 and their respective controllers off.
B.7 Turn on the roughing pump, plug a thermocouple into the line and check the meter calibration (as described above) once good vacuum is reached (5 um). Reconnect the sensor to the diffuser and open the diffuser valve.
B.8. When diffuser gets to 5 microns, close diffuser valve and open tank valve. Some smoke is generated by the compressor for a few minutes: close the doors and turn on the room air extractor.
B.9. 25 min: When tank vacuum reads 200 microns, turn on the power knob on the control panel to start the glow discharge. Turn control knob to raise current progressively up to 500mA (about 700V) (picture [35]) and check the ionization color in the tank (watch out for arcs). The vacuum should drop around 30 microns. Maintain glow discharge for 20min. Decrease slowly to zero the voltage, switch off the controller and turn off the glow discharge power knob on the main control panel.
B.10. 1h35min: When tank is at 5 microns, close the 2 valves (diffuser and tank) and open the poppet valve (diffuser-to-tank valve) by switching on the appropriate knob (this makes a loud noise, don't panic!). Turn on the diffuser, the refrigeration and open the copper tube water inlet. Turn off the vacuum gauge and turn on the cold cathode on the first scale (10-3 to 10-5 torr).
B.11. Open the diffuser valve (so that the roughing pump starts pumping the tank through the diffuser).
B.12. 3h50min: the tank reaches 4x10⁻⁵. Check the thickness monitor [11] is ready to use. Turn on the filaments power on the main panel (left 'low voltage' knob) and on the filament controller.
B.13. Always reading the values of the current on the wheel -not on the small meter- (picture [36]), raise slowly to 35A and check for 2-3 min until the filaments color is uniform.
B.14. Raise to 45A for 1 min, then to 55A for 2 min: you should see the aluminium melt on the filaments (the filaments darken, then redden again). The aluminizing process is initiated and you should see some activity on the thickness monitor display.
B.15. Raise to 65A for 30sec: all clips should be melted and the filaments of a uniform color with a deposition rate around 15A/sec. Raise to 80A for 30 sec then 90A until thickness reaches 890A (maximum rate should be around 17A/sec). Decrease the power down to 0 in 10 sec. Switch off the power on the controller and on the main panel. Real aluminizing time should be around 1min30sec and final thickness should be around 950A.
B.16. Close the poppet valve, and turn off the compressor. Switch off the diffusion pump. Turn off the cold cathode and disconnect it.
B.17. Open a little the air inlet valve to the tank (with a piece of cloth on the pipe entrance). When diffuser cooling water exhaust is cool again, close the diffuser valve, turn off the roughing pump, the refrigeration and close the main water valve on the wall (leave the copper tube opened).
B.18. It will take about 20 minutes for the tank to be at atmospheric pressure so that you can open it (listen when air leaking in stops).
B.19. Inspect carefully the coating and look for water marks with intense light shining on the coating. Check visually that there is no transmnission through the coating (ie. thickness is adequate) nor tiny 'dust' holes in it by shining a bright light from behind the mirror. Do the adhesive tape test on the edge of the mirror to check the quality(adhesion) of the coating. Measure the reflected and scattered light in 3 different places to compare with data before aluminizing.
Total: 4h30min.
Max Boccas, last revision on February 1st, 2001
Always check that you have plenty of pressure and reserve in the nitrogern gas cylinders before you start the washing process in order to make the drying fast and optimum.
Washing done in-situ. Remove chimney. Put telescope at ZD60deg to the south. Raise the platform as much as possible. Remove northern petal covering M1, install the pneumatic seal around M1 so that it protrudes about 20mm above the mirror edge, and inflate it. Seal VERY carefully the space between the chimney base and the inner hole of the mirror with duct tape. If you don't remove the instrument from the telescope, make very sure all the seal are effective! Prepare a warm and highly concentrated solution of orvus soap and water (lot of foam). Rinse with tap water and hose. Use the vacuum cleaner to suck water. Contact-wash with the natural sponge and the soapy solution, and try to maintain the glass wet and covered with foam for 5 minutes (the idea is to unstick the dust and also degrease). Rinse with tap water. As usual, observe how the water is flowing on the surface, any abnormal surface tension showing up will indicate a residual grease that has to be removed. Never let the mirror dry. Finally rinse with bidistilled water (about 6-8 liters needed in small 1 liter bottle) and dry with at least one high pressure nitrogen gas gun (check you have plenty of pressure in the nitrogen cylinder before you start). Dry carefully with KImwipes all the water drops remaining around the mirror. With lot of care to avoid trapped water jumping, remove the inflatable seal and unstick the adhesive tape.
Remove the cell from the tube, incline it by 5-10deg. Mirror stays in cell. Seal the inner hole by forming around it a 2"-high cylindrical wall with duct tape and seal the outer diameter with the special plastic round skirt and duct tape. Contact-wash with sponge and soapy solution. Suck the water from the lower side of the mirror with vacuum cleaner. Dry with 2 nitrogen gas guns. The entire process takes about 3-4 hours (the washing itself takes 30min at most) and can be done without engineering time as the telescope collimation is not affected once the cell is reinstalled.
Bring the telescope at D=30deg North (same position as M1 cleaning) and work inside the chimney with proper working light. First blow off dust with dry nitrogen. Only about 100ml of dichlorodimethylsilane (DDMS) is used in a goose-neck plastic bottle. A large plastic bag is taped on the lower half of the cell perimeter to force water to flow directly into it. Two Orings seal the top element with the cell and the cell itself so that no liquid can get inside the corrector assembly (see CH2903-E003) but you still need to take some care. Use some Kim-wipes towels placed at the bottom of the lens to suck liquid as it flows down the glass, and change the towels once they are too wet. Dry off with nitrogen gas. The entire process takes at most 1h.
IMPORTANT: solgel coatings are hygroscopic (they absorb water) and deteriorate over time. Waterproofing is achieved by rinsing the coating with a solution of DDMS with ethanol to a concentration of 5 parts per million. Alcohol is not good because it will wash off the DDMS and leave the solgel unprotected against humidity! Be careful, DDMS is very nasty stuff. Prepare the dilution in 2 steps: first 0.1ml of DDMS into 100ml of ethanol and then 0.5ml of this solution into 100ml of ethanol.
Remove cell from box, remove mirror from cell (it is pushed against a reference corner with 2 plungers), and wash in a soapy and warm bath, rinse and dry with nitrogen gas. Some minor tilt adjustment is needed when its cell returns into the box (do it with Osiris pupil imagery).
0.9-m Washing 5Feb09 [37]
1.0m Washing 5Feb09 [38]
April 11, 2001, Maxime Boccas
We are using the equipment sold by the R.Zito company. It consists of a 99.99% pure liquid CO2 tank (with syphon) connected to an adjustable valve and a long nozzle blowing CO2 snow at high speed. The liquid CO2 (-56.6ºC), when released out through a fine nozzle, will suddenly expands without exchanging heat (adiabatic expansion), thus becoming a mixture of gaseous CO2 and dry ice. Two principles govern the cleaning technique: 1/ When colliding with dust particles, the snow flakes transmit their momentum which makes the dust move away, and 2/the frozen dust particles contract and break free from the surface. Blowing gas is much less efficient because the dust particles are much heavier than the molecules of gas blown. In theory (and it has been demonstrated in practice by many experiments), the flakes don't scratch the coating because they slide over the surface on a cushion of CO2 gas which sublimes off the flakes.
Remember that when fresh Aluminium is exposed to air, a thin layer (about 30 Angstroms) of aluminium oxide Al2O3 will form on the surface. That layer is a tremendous protection as its Knoop hardness is 2100 kg.mm-2 (compared to only 140 kg.mm-2 for bulk Aluminium).
We also use a filter at the output of the tank to prevent oil residuals from contaminating the mirror (this oil could have been introduced accidentally in the tank when filling up at the factory). The filter is supposed to clean up to 100 tanks of CO2.
A copy of the Spanish instruction booklet ("Instrucciones para el aparato de limpieza que utiliza la nieve de dioxido de carbono", 1995) is kept in the old console room of the 4m telescope.
CALCULATE WHETHER THERE IS A RISK OF CONDENSATION ON THE MIRROR!! [63]
Zito R., Cleaning large optics with CO2 snow, SPIE vol. 1236, Advanced Technology Optical Telescopes IV (1990), p 952
Zito R., Removal of adsorbed gases with CO2 snow, SPIE vol. 1494, Space Astronomical Telescopes and Instruments (1991), p 427
Kimura W. and Kim G., Comparison of laser and CO2 snow cleaning of astronomical mirror samples, SPIE vol. 2199, Advanced Technology Optical Telescopes V (1994), p1165
Magrath B. and Nahrstedt D., A cleaning process for the CFHT primary mirror, PASP 108, July 1996, p620
Torii Y., Hayashi S. and Toda M., In-situ cleaning of the primary mirror of Subaru telescope, SPIE vol. 3352, Advanced Technology optical/IR telescopes VI (1998), p 808
The entire process (from taking over the telescope and cleaning the mirror to bringing it back to the zenith) takes about 25 minutes at the 4m. At the 4m, bring the telescope down toward the Cassegrain access stairs (North). Set up the ladder on the edge of the mirror cover petals, lay the wooden board between the ladder and the inside wall of the mirror cell. Don't forget to use shoe protectors when you enter the mirror area. Unroll the flexible high pressure line from the tank. Open the tank.
Before cleaning, take a measurement of the reflected light and scattered light of the surface in a few spots. Hang the ground cable of the nozzle to the hook on the chimney (to prevent static electricity discharge to the operator). Open gently the nozzle valve and let the CO2 snow blow away from the mirror for 15 seconds, the jet should be between 1 and 2 meters long. Then start flushing the mirror from the top to the bottom, successively on each side of the chimney. Try to maintain the nozzle extremity 30 to 40 cm above he mirror with the jet incidence angle at 45 degrees and move the nozzle in a regular pattern at a speed equivalent to 1m2 in 20 seconds. If ever the nozzle gets obstructed (by a "cork" of snow), close the nozzle valve, close the tank, open the nozzle valve to empty the line. Warm up the valve with your hands or wait a few minutes, shaking gently the nozzle.
Repeat the same steps to terminate the process (i.e. make sure the line is emptied). Don't forget to measure the reflectivity/scattering when you are done.
All the updated programs are stored in /ua76/boccas/4m/to_run_shap/
SETUP:
Maxime Boccas, 4Feb01
Revision of J.Baldwin's notes from 17Dec98
All the updated programs are stored in /ua76/boccas/4m/make_lookup/
| intable1= | "xgrid.out") | input files to fit to |
| intable2= | "outpos.in") | positions at which to evaluate fit |
| outtable= | "xinterp.out") | list of output tables |
| (xname= | "c1") | name of column for X values |
| (yname= | "c2") | name of column for Y values |
| (zname= | "c3") | name of column for Z values |
| (xorder= | 3) | number of coefficients in X |
| (yorder= | 3) | number of coefficients in Y |
| (x1= | INDEF) | minimum X value for fit |
| (x2= | INDEF) | maximum X value for fit |
| (y1= | INDEF) | minimum Y value for fit |
| (y2= | INDEF) | maximum Y value for fit |
| (cross_terms= | yes) | include cross-terms? |
| (function= | "chebyshev") | function to be fit |
| (verbose= | yes) | print file names? |
| (coefficients= | no) | print coefficients? |
| (Version= | "8February1994") | date of installation |
| (mode= | "al") |
| 0.0000 | 0.0170 | 0.0360 | 0.0568 | 0.0793 | 0 | 191 | 190 | 190 | 190 |
| 0.0000 | 0.0122 | 0.0253 | 0.0373 | 0.0455 | 0 | 181 | 182 | 183 | 185 |
| 0.0000 | 0.0056 | 0.0121 | 0.0167 | 0.0158 | 0 | 155 | 163 | 169 | 177 |
| 0.0000 | 0.0053 | 0.0074 | 0.0085 | 0.0084 | 0 | 90 | 90 | 102 | 119 |
| 0.0000 | 0.0117 | 0.0177 | 0.0172 | 0.0129 | 0 | 90 | 90 | 90 | 90 |
| 0.0000 | 0.0162 | 0.0291 | 0.0356 | 0.0263 | 0 | 90 | 90 | 90 | 90 |
| 0.0000 | 0.0156 | 0.0293 | 0.0412 | 0.0511 | 0 | 90 | 90 | 90 | 90 |
| 0.0000 | 0.0098 | 0.0141 | 0.0165 | 0.0457 | 0 | 356 | 343 | 288 | 240 |
| 0.0000 | 0.0042 | 0.0117 | 0.0271 | 0.0495 | 0 | 287 | 247 | 229 | 221 |
| 0.0000 | 0.0095 | 0.0237 | 0.0412 | 0.0604 | 0 | 220 | 217 | 216 | 217 |
| 0.0000 | 0.0154 | 0.0339 | 0.0538 | 0.0743 | 0 | 206 | 206 | 208 | 213 |
| 0.0000 | 0.0183 | 0.0389 | 0.0616 | 0.0857 | 0 | 198 | 198 | 199 | 202 |
| 0.0000 | 0.0170 | 0.0360 | 0.0568 | 0.0793 | 0 | 191 | 190 | 190 | 190 |
Maxime Boccas, 4Feb01
The collimation of this telescope is difficult mostly because the secondary mirror cells don't have position gauges (allowing control of what you are doing) and the f/13.5 cell is not kinematic at all but rather a complex puzzle where center and tilt are sometimes coupled on a single screw... So follow this guideline to avoid a nightmare. For your reference, the best images (FWHM) obtained for typical R-band 30sec exposures are: 0.60" at F/13.5 on-axis (classical Cassegrain) and 0.85" at F/7.5 over the FOV. (RC Cassegrain)
IN PRACTICE, start with F/13.5. Tweak the tilt of M1 to get proper collimation at F/13.5. Then flip to F/7.5 and if the collimation is not adequate, use ONLY the adjustment screws (center and tilt) of M2 to get it right. DO NOT modify the tilt of M1 anymore obviously. The reason of that strategy is that you can't re-tweak the F/13.5 M2 at night-time while you can with the F/7.5 M2. I repeat: DO NOT in any case use the adjustment screws of F/13.5 M2 at night time because you will mess up everything.
Maxime Boccas, 9sept00, last updated 19june01
Only option 1 is readily doable any time at the telescope. Options 2 and 3 require more delicate adjustment inside the PF cage (see CH2150.540-C030 for details) as it has to be done at zenith with someone standing in the cage.
A 'pure' focal plane tilt (revealed by a defocus slope across the field) can be corrected by tilting MOSAIC at its interface with the PFC with push-pull screws. Beware at the installation of Mosaic: these captured screws must normally be loose to avoid a non-intentional focal plane tilt (it happened once)!
The PFC is designed to deliver a 48 arcmin non-vignetted field with FWHM under 0.5arcsec at the edge of the field (see Tom Ingerson's paper [75]). The PFC optics include a field corrector for coma (paraboloidal M1) and spherical aberration (Ritchey-Chretien M1) and an Atmospheric Dispersion Corrector (2 pairs of rotating cemented prisms).
In terms of alignment requirements, the PFC optics have little optical power (1.076) thus are relatively insensitive to tilt, and behave like the M2 of a Cassegrain telescope where lateral centering is important to avoid misalignment coma. If decentering coma is present, the PFC optics must be translated laterally. In practice, for small corrections, we do tilt M1 instead. Zeroing the coma on-axis is not a sufficient condition. It is also important to check the field astigmatism off-axis (see simulations below). On-axis astigmatism doesn't reflect a misalignment problem but rather a problem with the cell of the primary mirror ("mirror pinched") and must be corrected via the active optics lookup table. If spherical aberration and/or field curvature are present, the longitudinal position of the PFC is not optimum and must be corrected by adjusting the back focal distance as Mosaic does not focus independently of the PFC (this was done once in Nov99 after the installation of MosaicII).
This can be done quickly by looking at a through-focus sequence for an on-axis star (9x100um steps is ideal, usually coma shows up nicely 200um away from best focus for a reasonnably bright star). Determine the cardinal direction of the coma (from the coma head to the tail): this side of M1 must be raised. The cardinal directions of the Mosaic field in the image display are: east is up, north is right. Alternatively, you can look for the minimum coma point in the entire field and consequently lower that part of the mirror. Iterate the adjusting tilts until the on-axis through-focus sequence is round and uniform. When wavefront errors are available from the Hartmann screen data, 1/1000 inches tilt is equivalent to an OPD of 230nm at the edge of the pupil, thus would correct about 230nm of coma measured on-axis. This is about the smallest correction that one can do with confidence and repeatability. Always keep a record of the tilt values of M1 (ie. values of the 3 hard points -south, northeast, northwest- dial gauges with air ON).
The following simulations are made at 650nm at zenith (ADC neutral). Only coma and astigmatism patterns do change; the trefoil pattern is not modified by misalignments. Reference field aberration maps for an aligned telescope are to be found in the PF imaging section of the main optics web page.
If astigmatism is present on-axis in a through-focus sequence, it is possible to correct for it with a TWEAK of the primary mirror (read first the TWEAK section of the 4m active optics on-line manual!). This is a 'quick-and-dirty' method but it can improve the images when the lookup table is not working well. On-axis astigmatism is caused by a non ideal support of M1 in the cell: that problem typically varies with telescope position, thus a TWEAK is valid only for a specific telescope position ±5deg (ie. about ±20min of exposure time). So if you follow the same object, you should actualize the TWEAK about every 40min.
Run the IRAF task mscexam on each out-of-focus image of a single star and look at the ellipticity angle (called 'pa') with the ',' option for example. To make sure that you are in presence of astigmatism, pa should flip by 90deg across best focus and be fairly stable on each side of the best focus. If the pa exhibits large variation and/or does not change roughly by 90deg across focus, don't even try that method!
Following is a list of measured pa for the IN-FOCUS image (called 'pa in') and the corresponding angle to enter in the tweak table of the tcp (called 'pa tweak'):
Examples:
What amplitude shall you enter in the tcp tweak table? This is even more empirical: in reasonnable seeing of 0.8", a 1um astigmatism will be visible at 100um off the best focus, but hardly visible at 50um... Once again, although this technique works, it is experimental and must be used with care until a better lookup table can be built. This method can actually also be used to update the astigmatism lookup table using the seeing images recorded every night (ie. not waiting for a dedicated engineering night).
Note: SCALE OF THE WAVEFRONT ERRORS (optical path difference at the edge of the pupil): at the 4m, 0.1" image degradation in d80 is produced by 0.70u of coma, 0.30um of astigmatism, 0.26um of trefoil, 0.24um of quadrafoil.
Maxime Boccas, 28March01
Presentation "Facts about coating and cleaning at CTIO" by Maxime Boccas. Mirror cleaning and coating conference. Palomar Observatory. 25-27 April 2001.
In one page [82]
Graphic version [83]
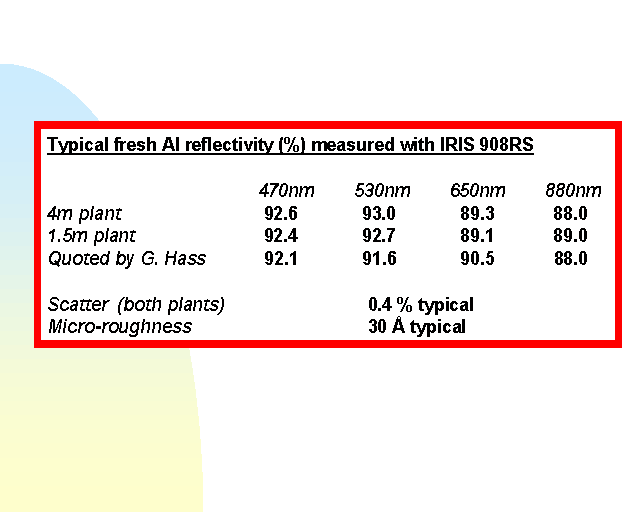
| 470nm | 530nm | 650nm | 880nm | |
| 4m plant | 92.6 | 93.0 | 89.3 | 88.0 |
| 1.5m plant | 92.4 | 92.7 | 89.1 | 89.0 |
| Quoted by G. Hass | 92.1 | 91.6 | 90.5 | 88.0 |
| Scatter (both plants) | 0.4% typical | |||
| Micro-roughnes | 30 Å typical | |||
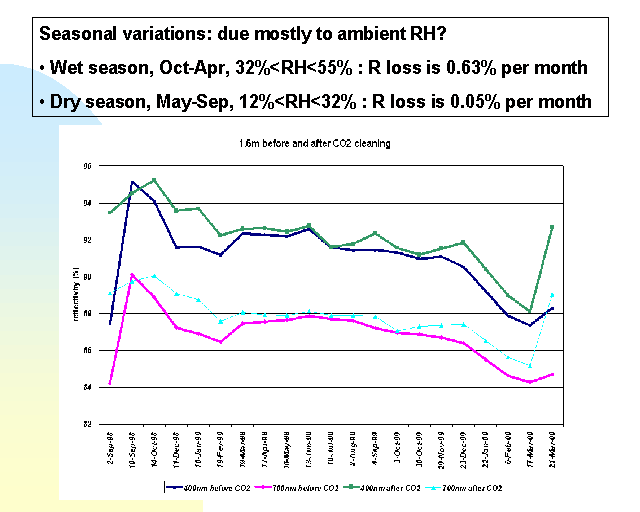
USUALLY NO WATER MARKS LEFT, EVEN IF WATER DRIES ON ITS OWN!
| R400nm | R700nm | SC400nm | SC700nm | |
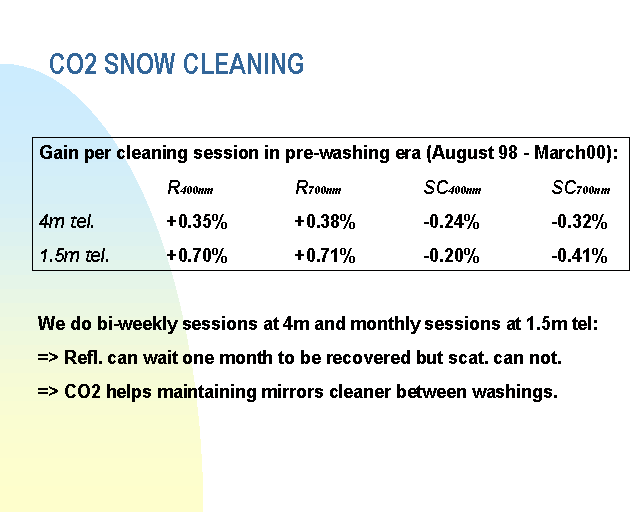
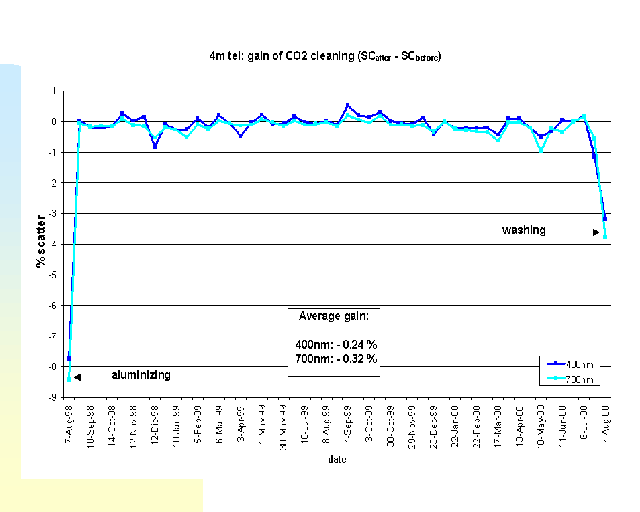
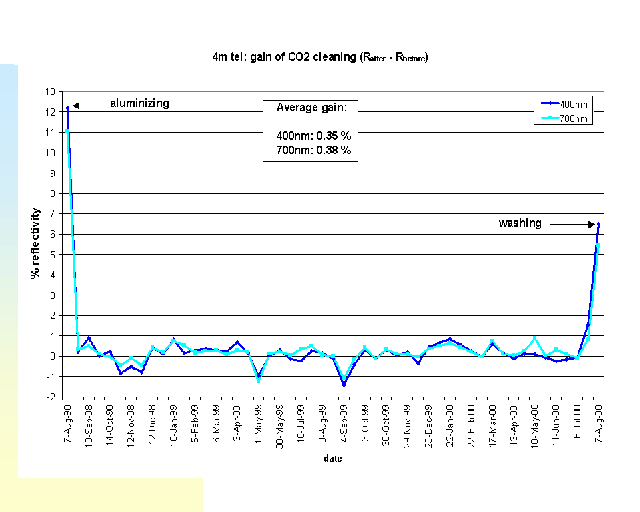
| 4m tel. | +0.35% | +0.38% | -0.24% | -0.32% |
| 1.5m tel. | +0.70% | +0.71% | -0.20% | -0.41% |
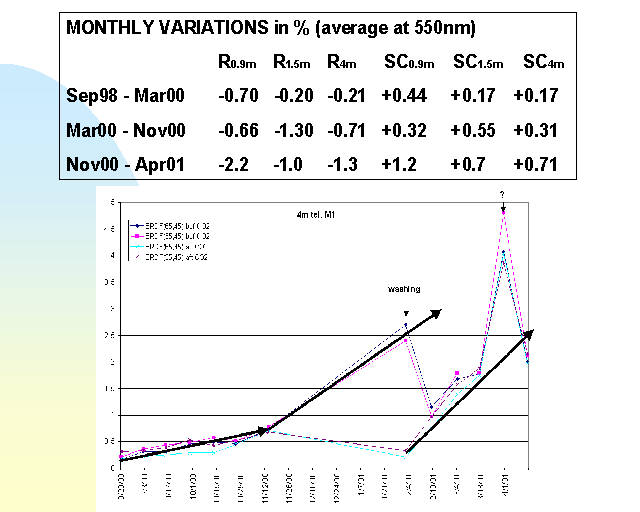
| R0.9m | R1.5m | R4m | SC0.9m | SC1.5m | SC4m | |
| Sep98 - Mar00 | -0.70 | -0.20 | -0.21 | +0.44 | +0.17 | +0.17 |
| Mar00 - Nov00 | -0.66 | -1.30 | -0.71 | +0.32 | +0.55 | +0.31 |
| Nov00 - Apr01 | -2.2 | -1.0 | -1.3 | +1.2 | +0.7 | +0.71 |
back to top [86]
Author: Maxime Boccas
Presentation given in the "Mirrror cleaning and coating conference"
Palomar Observatory
25-27 April 2001
graphic version [83]
Text version [82](one page)
Cleaning and coating 1 - TITLE [83]
Cleaning and coating 2 - COATING [87]
Cleaning and coating 7 - CLEANING [92]
Cleaning and coating 8 - CLEANING BEFORE ALUMINIZING [93]
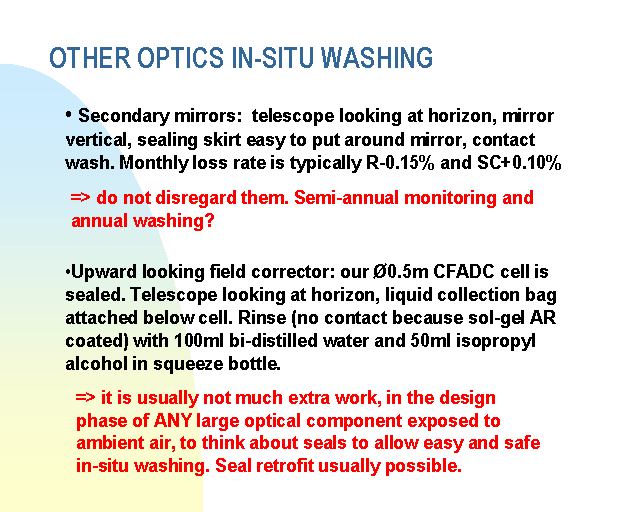
Cleaning and coating 10 - REGULAR IN-SITU WASHING [95]
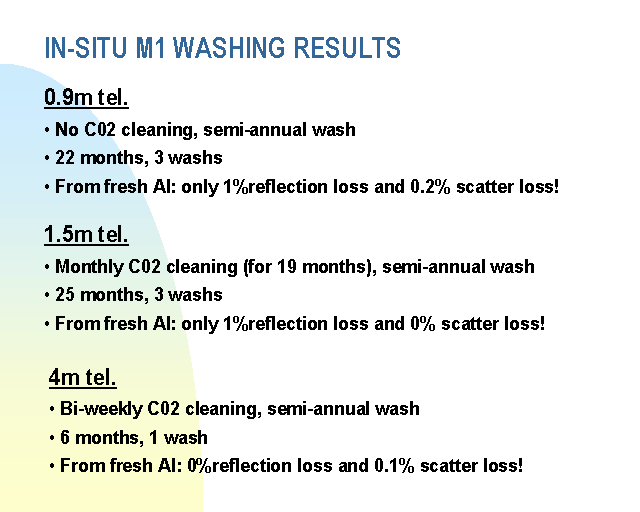
Cleaning and coating 12 - IN-SITU M1 WASHING RESULTS [97]
Cleaning and coating 13 - CONCLUSION [98]
Cleaning and coating 14 - OTHER OPTICS IN-SITU WASHING [99]
Cleaning and coating 15 - CO2 SNOW CLEANING [100]
Cleaning and coating 16 [101]
Cleaning and coating 17 [102]
Cleaning and coating 18 [103]
Cleaning and coating 19 [104]
Cleaning and coating 20 - CONCLUSION [105]
Cleaning and coating 21 [106]
Cleaning and coating 22 [107]
|
|
 |
Slide 1 of 22
|
|
 |
Slide 2 of 22
|
|
 |
Slide 3 of 22
|
|
 |
Slide 4 of 22
|
|
 |
Slide 5 of 22
|
|
 |
Slide 6 of 22
|
|
 |
Slide 7 of 22
|
|
 |
Slide 8 of 22
|
|
 |
Slide 9 of 22
|
|
 |
Slide 10 of 22
|
|
 |
Slide 11 of 22
|
|
 |
Slide 12 of 22
|
|
 |
Slide 14 of 22
|
|
 |
Slide 15 of 22
|
|
 |
Slide 16 of 22
|
|
 |
Slide 17 of 22
|
|
 |
Slide 18 of 22
|
|
 |
Slide 19 of 22
|
|
 |
Slide 20 of 22
|
|
 |
Slide 21 of 22
|
|
 |
Slide 22 of 22
from the conference "Mirror cleaning and coating conference"
Palomar Observatory 25-27 April 2001
This page is available only in Spanish
Resumen basado en notas personales, documentos entregados y notas de Bruce Gillespie (APO) circuladas posteriormente en el grupo de discusion TOG. Se esta preparando un proceeding de la conferencia. La conferencia fue organizada por Mark Klaene (APO) y Bob Thicksten (Palomar). Algunas fotos del evento preparadas por APO se ven aqui [110].
No hacen lavado en situ. Aluminizado se hace en un edificio a 2 km de las cupulas con sala limpia de clase 5000 y extraccion de aire (3.5m^3/s) durante el uso de quimicos (especialmente acido y alcohol). Paul mostro un video muy interesante de 15min sobre estas actividades. Paul mostro graficos con mediciones de reflectividad y diffusion. Entrego una copia del estudio de pre-factibilidad del sputtering de plata por Linde. La sabiduria de Paul es: el espejo mas limpio no es el que limpiamos lo mas frecuentemente, pero el que ensuciamos lo menos frecuentemente.
Gary hizo varias muy buenas presentaciones acerca de varios temas, mostrando muchas fotos y algunos graficos de sus mediciones con el Minolta CM2002 (que calibra cada vez con un espejo protegido de referencia).
Tim mostro un video muy interesante de 20min, comentando las actividades de limpieza CO2, lavado y aluminizado.
May 8th, 2001, Maxime Boccas
Links
[1] http://www.ctio.noao.edu/noao/sites/default/files/telescopes/blanco-al-tests-2009-summary.xls
[2] http://www.ctio.noao.edu/noao/sites/default/files/telescopes/alum60.jpg
[3] http://www.ctio.noao.edu/noao/content/materials
[4] http://www.ctio.noao.edu/noao/sites/default/files/telescopes/alum10.jpg
[5] http://www.ctio.noao.edu/noao/sites/default/files/telescopes/inchamb2.jpg
[6] http://www.ctio.noao.edu/noao/sites/default/files/telescopes/inchamb.jpg
[7] http://www.ctio.noao.edu/noao/sites/default/files/telescopes/glow.jpg
[8] http://www.ctio.noao.edu/noao/sites/default/files/telescopes/filament.jpg
[9] http://www.ctio.noao.edu/noao/sites/default/files/telescopes/4mpanelvac.jpg
[10] http://www.ctio.noao.edu/noao/sites/default/files/telescopes/panel0.jpg
[11] http://www.ctio.noao.edu/noao/content/thickness-monitor
[12] http://www.ctio.noao.edu/noao/sites/default/files/telescopes/vacback.jpg
[13] http://www.ctio.noao.edu/noao/sites/default/files/telescopes/vacback2.jpg
[14] http://www.ctio.noao.edu/noao/sites/default/files/telescopes/glowdis.jpg
[15] http://www.ctio.noao.edu/noao/sites/default/files/telescopes/pump0_0.jpg
[16] http://www.ctio.noao.edu/noao/sites/default/files/telescopes/alum50.jpg
[17] http://www.ctio.noao.edu/noao/sites/default/files/telescopes/alum20.jpg
[18] http://www.ctio.noao.edu/noao/sites/default/files/telescopes/alum40.jpg
[19] http://www.ctio.noao.edu/noao/sites/default/files/telescopes/alum30.jpg
[20] http://www.ctio.noao.edu/noao/sites/default/files/telescopes/wash1.jpg
[21] http://www.ctio.noao.edu/noao/sites/default/files/telescopes/wash2.jpg
[22] http://www.ctio.noao.edu/noao/sites/default/files/telescopes/wash3.jpg
[23] http://www.ctio.noao.edu/noao/sites/default/files/telescopes/wash4.jpg
[24] http://www.ctio.noao.edu/noao/sites/default/files/telescopes/wash5.jpg
[25] http://www.ctio.noao.edu/noao/sites/default/files/telescopes/wash6.jpg
[26] http://www.ctio.noao.edu/noao/sites/default/files/telescopes/wash7.jpg
[27] http://www.ctio.noao.edu/noao/content/40-m-aluminizing-procedure
[28] http://www.ctio.noao.edu/noao/sites/default/files/telescopes/dirty.jpg
[29] http://www.ctio.noao.edu/noao/sites/default/files/telescopes/cleaning.jpg
[30] http://www.ctio.noao.edu/noao/sites/default/files/telescopes/incam.jpg
[31] http://www.ctio.noao.edu/noao/sites/default/files/telescopes/mirincam.jpg
[32] http://www.ctio.noao.edu/noao/sites/default/files/telescopes/tabmain.jpg
[33] http://www.ctio.noao.edu/noao/sites/default/files/telescopes/chambert1.jpg
[34] http://www.ctio.noao.edu/noao/sites/default/files/telescopes/chambert.jpg
[35] http://www.ctio.noao.edu/noao/sites/default/files/telescopes/tabglow.jpg
[36] http://www.ctio.noao.edu/noao/sites/default/files/telescopes/tabfila.jpg
[37] http://www.ctio.noao.edu/noao/sites/default/files/telescopes/0.9m_washing_5Feb09.pdf
[38] http://www.ctio.noao.edu/noao/sites/default/files/telescopes/1.0m_washing_Feb09.pdf
[39] http://www.rdmathis.com/index.html
[40] http://www.rhcheney.com/index.html
[41] http://www.sig-inst.com/
[42] http://www.tungsten.com/mtsprod.html
[43] http://www.sylvania.com/
[44] http://www.newportlab.com/products.htm
[45] http://www.varianinc.com/cgi-bin/nav?/products/vacuum/
[46] http://www.thinfilmtech.net/
[47] http://www.dentonvacuum.com/
[48] http://www.uvmab.com/
[49] http://www.sspectra.com/index.html
[50] http://www.aip.org/avsguide/index.html
[51] http://www.targetmaterials.com/
[52] http://www.webelements.com/tungsten/
[53] http://www.vatran.com/index.html
[54] http://www.co2clean.com/
[55] http://www.dmo.be/
[56] http://www.schmitt-ind.com/
[57] http://www.konicaminolta.com/instruments/index.html
[58] http://www.photonicsonline.com/
[59] http://metals.about.com/od/sputteringtargets/Sputtering_Target_Suppliers.htm
[60] http://www.sputtercoat.com
[61] http://materion.com/Businesses/Barr%20Precision%20Optics%20and%20Thin%20Film%20Coatings.aspx
[62] http://setas-www.larc.nasa.gov/LDEF/MATERIALS/mat_databases.html
[63] http://www.ctio.noao.edu/noao/sites/default/files/telescopes/ctio/4m/Condensation%20risk%20calulation.pdf
[64] http://www.ctio.noao.edu/noao/content/shappzzhelp
[65] http://www.ctio.noao.edu/noao/content/how-make-lookup-tables
[66] http://www.ctio.noao.edu/noao/sites/default/files/telescopes/4map2f8.gif
[67] http://www.ctio.noao.edu/noao/sites/default/files/telescopes/4map3f8.gif
[68] http://www.ctio.noao.edu/noao/sites/default/files/telescopes/4map4f8.gif
[69] http://www.ctio.noao.edu/noao/content/Collimation-15-m
[70] http://www.ctio.noao.edu/noao/content/Collimation-40-m
[71] http://www.ctio.noao.edu/noao/content/calibrations-positions-4map-lookup-tables
[72] http://www.ctio.noao.edu/noao/content/iman-image-analizer
[73] http://www.ctio.noao.edu/noao/content/iman-image-analizer#4.1
[74] http://www.ctio.noao.edu/noao/sites/default/files/telescopes/focus60.gif
[75] http://www.ctio.noao.edu/noao/content/PFADC
[76] http://www.ctio.noao.edu/noao/sites/default/files/telescopes/zd0_650_x1m_coma.gif
[77] http://www.ctio.noao.edu/noao/sites/default/files/telescopes/zd0_650_x1m_astig.gif
[78] http://www.ctio.noao.edu/noao/sites/default/files/telescopes/zd0_650_x1m_0cast.gif
[79] http://www.ctio.noao.edu/noao/sites/default/files/telescopes/zd0_650_y30ast.gif
[80] http://www.ctio.noao.edu/noao/sites/default/files/telescopes/pfc720arcyas.gif
[81] http://www.ctio.noao.edu/noao/sites/default/files/telescopes/pfc720arcxas.gif
[82] http://www.ctio.noao.edu/noao/content/Facts-about-coating-and-cleaning-CTIO
[83] http://www.ctio.noao.edu/noao/content/Coating-and-Cleaning-1
[84] http://www.ctio.noao.edu/telescopes/opteng/optics.html
[85] http://www.ctio.noao.edu/noao/content/Coating-and-Cleaning-index
[86] http://www.ctio.noao.edu/noao
[87] http://www.ctio.noao.edu/noao/content/Coating-and-cleaning-2
[88] http://www.ctio.noao.edu/noao/content/Coating-and-cleaning-3
[89] http://www.ctio.noao.edu/noao/content/Coating-and-cleaning-4
[90] http://www.ctio.noao.edu/noao/content/Coating-and-cleaning-5
[91] http://www.ctio.noao.edu/noao/content/Coating-and-cleaning-6
[92] http://www.ctio.noao.edu/noao/content/Coating-and-cleaning-7
[93] http://www.ctio.noao.edu/noao/content/Coating-and-cleaning-8
[94] http://www.ctio.noao.edu/noao/content/Coating-and-cleaning-9
[95] http://www.ctio.noao.edu/noao/content/Coating-and-cleaning-10
[96] http://www.ctio.noao.edu/noao/content/Coating-and-cleaning-11
[97] http://www.ctio.noao.edu/noao/content/Coating-and-cleaning-12
[98] http://www.ctio.noao.edu/noao/content/Coating-and-cleaning-13
[99] http://www.ctio.noao.edu/noao/content/Coating-and-cleaning-14
[100] http://www.ctio.noao.edu/noao/content/Coating-and-cleaning-15
[101] http://www.ctio.noao.edu/noao/content/Coating-and-cleaning-16
[102] http://www.ctio.noao.edu/noao/content/Coating-and-cleaning-17
[103] http://www.ctio.noao.edu/noao/content/Coating-and-cleaning-18
[104] http://www.ctio.noao.edu/noao/content/Coating-and-cleaning-19
[105] http://www.ctio.noao.edu/noao/content/Coating-and-cleaning-20
[106] http://www.ctio.noao.edu/noao/content/Coating-and-cleaning-21
[107] http://www.ctio.noao.edu/noao/content/Coating-and-cleaning-22
[108] http://www.ctio.noao.edu/noao/content/facts-about-coating-and-cleaning-ctio
[109] http://www.ctio.noao.edu/noao/content/coating-and-cleaning-index
[110] http://www.apo.nmsu.edu/Telescopes/ARCprogress/041601palomar/default.htm
[111] http://www.apo.nmsu.edu/Telescopes/eng.papers/4010-24_spie.htm


