

| Contents: | |
| 1. | Software Code |
| 2. | Starting The Program |
| 3. | Hydra GUI |
| 3.1 Menu Bar | |
| 3.2 Status Panel | |
| 3.3 Control Panel | |
| 3.4 Status Bar | |
| 4. | GWC Status Variables |
| 5. | Trouble Shooting |
The Hydra Spectrograph GUI software lives in /usr/local/Bench4m. The structure of the directory tree is as follows:
The Hydra spectrograph GUI consists of an extended TCL/TK interpreter plus a set of TCL/TK scripts that build the functionality required by the application. The extended TCL/TK interpreter lives at sub directory "src". Support is provided for compiling the interpreter under Linux, SunOs and Solaris. The TCL/TK scripts live at sub directory lib/bench4m and lib/common.
Open an xterm window and type start_bench4m to start the program. This start up shell script will search your home directory for file .bench4mrc to set the environment before running. If not found it will look for the default version of that file at /usr/local/Bench4m/bin for bench4mrc.
Following is an example of that file:
#-------------------------------------------------------
#!/bin/csh
# Environment variables for the hydra spectrograph gui program
#
# modification history
# --------------------
# 01a 04apr2000, rcr - Created
# Bench 4m environment
setenv BENCH4MHOME /usr/local/Bench4m
# The TCL/TK package libraries
setenv TCL_LIBRARY $BENCH4MHOME/share/lib/tcl8.0
setenv TK_LIBRARY $BENCH4MHOME/share/lib/tk8.0
# The MPG_ROUTER variable designates the name of the host in which
# the router run. When not defined the the mpg router is supposed
# to be running in indus.tuc.noao.edu.
setenv MPG_ROUTER ctioa1
# The variable MPG_ROUTER_PORT designates the port in which the mpg
# router is listening for incoming connections. The default value
# for this variable is 1 plus the the wiyn router port (2345).
setenv MPG_ROUTER_PORT 2347
# Directory containing configuration files
setenv BENCH4MCONF $BENCH4MHOME/config
# Serial port to connect to
setenv BENCH4MSPORT /dev/ttya
# Others
#setenv PATH $PATH":/usr/local/bench4m/bin"
#setenv LD_LIBRARY_PATH /local/X11R5/lib:$LD_LIBRARY_PATH
#------------------------------------------------------
The program also use three configuration files that live at /usr/local/bench4m/config: gratings.conf, bench4m.ini and filters.ini.
gratings.conf - text file containing grating parameters. Following is an example of this file:
| -------------------------------------------------------------- | |||||||
| # CTIO Hydra Bench Spectrograph gratings parameters. | |||||||
| # Name | l/mm | Blaze | Wrange | Disp | gr_0 | gr_fdg | incl_0 |
| KPGL3 | 527 | 5500 | 3417 | 1.16 | -0.3 | 0.988 | 0.0 |
| KPGL1 | 632 | 4200 | 2872 | 1.02 | -0.491 | 0.988 | 0.0 |
| KPGLF | 632 | 8200 | 2872 | 1.01 | -0.30 | 0.988 | 0.0 |
| G450 | 632 | 11000 | 2872 | 0.47 | -0.33 | 0.988 | 0.0 |
| KPGLD | 790 | 8500 | 2290 | 0.79 | -0.27 | 0.988 | 0.0 |
| KPGLG | 860 | 11000 | 2101 | 0.68 | -0.3 | 0.988 | 0.0 |
| G380 | 1200 | 8000 | 1563 | 0.48 | -0.3 | 0.988 | 0.0 |
| Echelle | 316 | 56120 | 2888/ | 0.94/n | -0.1 | 0.988 | 0.0 |
| -------------------------------------------------------------- | |||||||
name - a label for the grating
l/mm - number of lines per millimeter
Blaze - self explanatory
Wrange - wavelength range
Disp -
gr_0 - grating angle value for order 0
gr_fdg -
incl_0 - fiber head assembly angle for
bench4m.ini - text file containing the last grating and grating order used. There is a user version of this file called ".bench4m.ini". When the user exits the application the grating and the grating order are saved to this file at the home directory.
filters.ini - text file containing the last filter labels used. There is a user version of this file called ".filters.ini". When the user exits the application the filter labels he defined are saved to this file at the home directory.
The Hydra Spectrograph GUI (shown below) is the front end which controls the motors on the Hydra Bench Spectrograph. The GUI connects to a "Smart Motor Controller" (SMC) which controls each of the motors via a serial line through which status information and movement commands are sent.
The GUI also connects to the so-called "GWC" router which publishes the status of the various motors and switches. This allows Arcon to build header information during image acquisition.
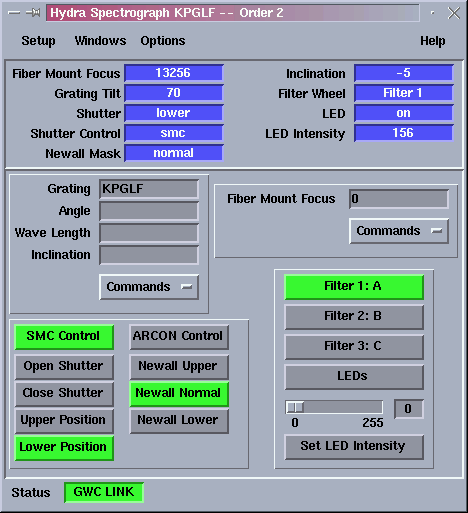
At the top of the GUI is a menu bar with four pop-up menus: Setup, Windows, Options and Help.
Clicking on "Setup" gives you three options:
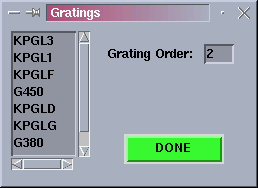
Use the "Load Grating" option to select the desired grating. The gratings database is loaded from a text file called "gratings.conf". This file can be manually edited to add new gratings. This file is loaded when the application starts and every time the "Gratings" dialog box is opened.
Use this option also to set the current grating order. The current grating and the current grating order appear in the GUI title bar.
This dialog box will also appear when you press the left mouse button over the "Grating" entry on the main GUI. The selected grating and the grating order will be saved in the initializstion file (bench4m.ini) whenever you exit the application.
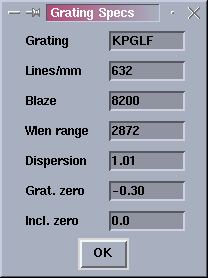
This option allows you to view the current grating specifications. The user must select a grating using "Load Grating" before using this option. The data presented in this box is read from the grating database each time "Load Grating" is used.
Note: Grating parameters may not be altered in this window. They can only be changed by manually editing the gratings.conf file.
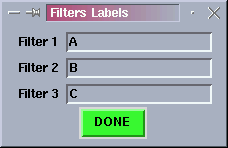
The "Filter" option permits the user to label the installed filters with names. Labeling the filters will allow the program to publish the filter names through the GWC router. The user names will also be used to label the filter control buttons on the GUI.
The filter labels you are saved every time the application is exited.
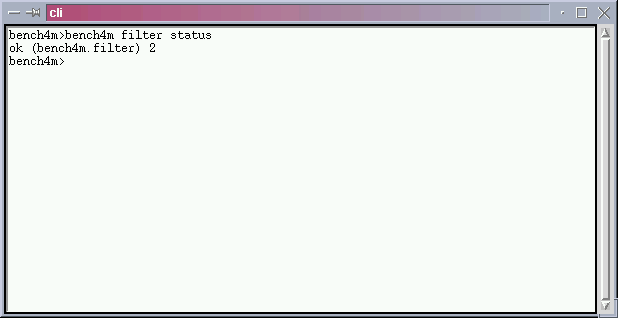
The "Windows Option on the GUI menu offers a single option: "Terminal". This opens a terminal window allowing one to manually send commands to the SMC. The user should not normally have any need to use this option.
If commands must be sent manually to the SMC, read the following document explaining the syntax and function of SMC commands [1]. This is usually only done for testing and diagnosing equipment failures.
The "Options" menu presents a single option: "Alarm Bell". Use this option to activate/deactivate a bell tone that warns the user that the link to the GWC router is not functioning.
The status panel consists of a set of labels that show the current status of the spectrographs motors and switches. When no motion is sensed, the status labels are blue and white. When a mechanism is active or moving the status labels blink and the background color goes yellow to reflect the new status. If no status information is available or an error condition is sensed the status labels blink and the background goes red.
The control panel consists of a set of widget clusters that group some common functionality.
Four clusters are present: grating control, fiber mount focus control, shutter/newall control and
filter wheel control.
Use the grating control panel to set the grating tilt angle the inclination of fibers angle. To set this values the user must load a grating with the "Load Grating" option first.
The user typically enters a wave length and press return to calculate the proper grating tilt angle and inclination angle. To actually move the mechanisms the user must select "Set Grating and Inclination Angles" from the "Commands" menu button.
Use the fiber mount focus control panel to set the focus distance. The user typically enters a focus value and press return to actually move the focus mechanism.
Use the shutter/newall control panel to set the shutter/newall position. The actions taken depend on whether control of the shutter comes from the SMC or Arcon.
When the SMC is in control, the actions taken are immediate and direct. The shutter is a large rotating disc. If you ask for it to be open or closed, it does exactly what you expect. When you ask for "upper" or "lower" position, it moves to a positions with the upper or lower half of the aperture covered.
When control over the shutter is transferred to Arcon, if "Newall normal" has been selected, Arcon will open the shutter fully when an exposure begins. If "Newall upper" or "lower" is selected, during the exposure the respective half the aperture is left covered. At all other times the shutter remains fully closed.
Use the filter control panel to set the filter wheel position and to set the LEDs intensity.
So far the status bar has a single widget that presents the status of the GWC link. When the GWC link brakes the widget goes blinking and if the "Alarm Bell" option is set, a tone will be heard.
The status information collected by the application is published by the GWC router to other applications that use it (i.e icsInfo). Following are the data streams that the application defines to publish its data. Client applications can subscribe to this data through the GWC router.
bench4m.main.grat - grating angle (degrees)
bench4m.main.fiber - fiber mount focus
bench4m.main.filter - filter position
bench4m.main.shutter - Shutter position
bench4m.main.newall - Newal mask position
bench4m.main.led - LED status (on/off)
bench4m.main.incli - fiber line inclination
Check that the GWC router is actually running on its host machine. If its running check that the machine in which the bench spectrograph GUI is running is an enabled machine. Check the /usr/local/gwc/config/routersetup.tcl file for your machine name. If not present add the name using the rest of the file as a template.
Check also that the environment variables MPG_ROUTER and MPG_ROUTER_PORT are set to the proper values in the bench4mrc file.
Check that environment variable BENCH4MSPORT is set to the right serial device in the bench4mrc file. Under SunOs and Solaris that variable is either /dev/ttya or /dev/ttyb. Under Linux that variable is either /dev/ttyS0 or /dev/ttyS1.
This error message signals that the serial device was opened successfully but no answer has been received to a sent command. Check you opened the right serial device and that the receptor of your commands is connected to that port and alive.
This warning message appear to warn the user he chose not to connect to the GWC router. Consequences are that no header information will be available when image acquisition with the Arcon system.
Last Modified:for manually operating the Comparison lamps and the Bench Spectrograph:
Both the comparison lamp system and the bench spectrograph have a GUI which should make their operation easy. However, if for some reason the GUI doesn't work or something is suspect, both systems can be moved manually with a lower level interface which is qcryptic and primitive but is not difficult to use.
To manually control the comparison lamp system you must use the telescope control system by opening a window in the "command mode" and typing your commands in it, preceeded by the word "local". To control the bench spectrograph you have to open a tif window in the Arcon computer and type your commands in there.
If these commands don't work and things don't seem to make sense, try resetting the corresponding "SMC" (Smart Motor Controller).
Both boxes function with the same command syntax:
boxname mechanism action value
Some actions (e.g. init) do not require a value
Some actions (e.g. move) must have a value
Some actions (e.g. status) return a value
Commands must be typed EXACTLY as written when entered manually. The software is not very forgiving. If you make a mistake, type amd start over.
There are three useful General commands, applicable to all boxes.
To reset the box:
[boxname] reset
To make sure the version of software in the box is right:
[boxname] set version
This should always be done after a reset.
To manually turn the motor power on or off and leave it there:
[boxname] (on/off}
The name of the box which controls the comparision lamps is cfadc
cfadc is a peripheral of the tcs. Commands must be passed to the tcs or typed into a command window of the TCS as "local" commands. All manually entered commands must be prefixed by the word "local", e.g.[ local cfadc lamps mov 700 ] .
The first 4 lamps are selected by putting a "lamp" mirror in a numerically identified position with:
COMMAND: [local] cfadc lamps (status/position/init/move) (value)
The best values for the lamp positions are:
etalon 64
tha 241
qua 754
hene 909
The lamps are then turned on or off with
COMMAND:
[local] cfadc lamps (etalon/tha/qua/hene/pen) (move/status) (on/off)
4. There is a television camera which when activated allows you to see what is going on inside the chimney.
This TV (which contains its own light source) is turned on and off with the command:
[local] cfadc outlet1 move on/off
With this camera, you can tell if the flat and spherical mirrors are in or out and if the quartz lamp is on. The other lamps aren't bright enough.
If you use this camera, be sure to turn it (and its light) off when you are through!
-----------------
Example 1:
To make a quartz lamp exposure:
Setup
[local] cfadc flat move in
[local] cfadc sphe move in
[local] cfadc lamps move 754
[local] cfadc lamps qua move on
[local] cfadc lamps qua status (check position-optional, but a good idea) (should be 754 ~+/-1)
Take exposure:
Turn off comparison system:
Turn off lights
[local] cfadc lamps qua move off
[local] cfadc flat move out
[local] cfadc sphe move out
Check status of everything, if desired
[local] cfadc lamps qua status (returns off)
[local] cfadc flat status (returns out)
[local] cfadc sphe status (returns out))
Example 2:
To make an exposure with the penray lamps:
Setup:
[local] cfadc flat move in
[local] cfadc sphe move in
[local] cfadc plamps move in
[local] cfadc lamps pen move on
Take exposure:
Turn off comparison system:
[local] cfadc plamps move out
[local] cfadc lamps pen move off
[local] cfadc flat move out
[local] cfadc sphe move out
Check status of everything, if desired
[local] cfadc plamps status (returns out)
[local] cfadc lamps pen status (returns off)
[local] cfadc flat status (returns out) [local] cfadc sphe status (returns out)
The Bench Spectrograph SMC is called bench4m. Commands can be sent manually to the bench4m SMC from the "Terminal" window which can be opened using the spectrograph GUI.
-----------
Emergency only! If for some reason the GUI doesn't work, the SMC can also be controlled directly from a tip window. The interface is rather primitive. You must type exactly what is written. Any mistakes will cause the command to be rejected and you have to start over. No back spaces or deletes allowed
Start the tip window from an xterm on the Arcon computer with the following command:
tip ttyb
~s
le=on
------------
In the Terminal or (in an emergency only) in a"tip" window, type commands using the following syntax (remember that backspace works in the terminal window, but not using tip)
The shutter is normally under Arcon control. In this mode, it remains closed until Arcon tells it to open and then stays open (or partially open according to the state of the Newall mask flag) until the exposure has ended and then rotates back to closed. The shutter disc can also be controlled directly from the smc.
bench4m shu control arcon [transfers open/closed control to Arcon]
(The box comes up in "smc" mode so this command must be issued after any reset before any exposures can be taken.)
bench4m shu control smc [transfers control to direct mode]
To move the shutter manually in direct mode, one must send it to specific numbered positions:
open = 100
close = 20600
upper = 2400
lower = 3100
using the command
bench4m shu (move/init/stop/status) #position
e.g.
bench4m shu control smc
bench4m shu move 100
manually opens the shutter.
If you move the shutter manually it should be manually closed before returning control to Arcon. Returning control does not automatically close it.
T. Ingerson
Last update:
22 June 1999-tei
13 August 1999 -tei
20 May 2000 - tei
2 August 2000 - tei
27 October 2000 - tei
Links
[1] http://www.ctio.noao.edu/noao/content/SMC-Commands