[Contents]
| |
The OSIRIS User's Manual [Contents] |
Observing Setup |
|
OSIRIS observers login to the main observing console using vncviewer at soaric2 (vncviewer :9, or
vncviewer soaric2: remotely). The SOAR support scientist will
provide you with the current password. This session should be served by
a vnc server started as user "observer."
[ Top of Page | Contents ]
When Prospero is started, you should be presented with two windows: an xterm labeled "Prospero Command", and a second window labeled "Prospero Status" located immediately above the command window. The status window will be blank until you have connected Prospero to the data-taking PCs and started an OSIRIS observing session (type "startup"). While you may make either an icon, closing either window will quit the Prospero program, requiring you restart as described above.
[ Top of Page | Contents ]
caliban is started automatically upon login to the workstation after completing the first-night initialization process described above. If caliban is not running (or has crashed), it needs to be restarted from the workstation menu (left mouse button) by selecting the option labeled:
The caliban setup at CTIO is also responsible for archiving all data taken with OSIRIS via the Save-the-Bits Archive.
Automatic observation logging is available via caliban using
the
AUTOLOG option. See the description of autologging in Appendix
D
(Observing Tools) of the manual.
tcs agent:
This program connects the OSIRIS data taking system to the SOAR TCS
so that information can be retrieved from the TCS and commands can be
sent to it (e.g. offsets, focus, guider control). Type help in the tcs
agent windo to see a summary of avaialble commands.
IRAF is custom configured especially to work with OSIRIS data. It assumes all data are in FITS format with the .fits file extension. You can start IRAF in an xGTerm from the workstation Programs menu.
Use DS9 for image display.
[ Top of Page | Contents ]
RUNINIT performs the following functions:
Save yourself potential trouble by checking the status of the data
disks at
the start of each night (in addition to keeping close tabs on things
throughout the night). Select as your starting data disk (see
RUNINIT above) the disk with the most free space
among
those you have access to. Type "df" at a unix prompt and see how much
space remains on /data/observer.
The internal optics can be focused by inserting one of the spectroscopic slits into the beam and then running the camera focus through a range of values. Steps of 50-100 in the camera focus are appropriate. Approximate values (Dec 1999) are "camfocus 400" for the f/2.8 camera, "camfocus 650" for the f/7 camera, and "camfocus 0" for the pupil viewing Silicon lens. These values can change approximately +/- 100 from run to run, but should be reliable once a best focus is determined on any particular run. Use the command focuscam from the Prospero command window to automatically take a set of camera focus data.
The telescope can then be focussed in the normal manner. We
generally
find a rough focus by starting "movie" mode on the array (which reads
out
the array continuously) and then running the telescope focus in and out
until the image looks good, then taking a series of images at different
focus settings. There is no analog to the CCD command that reads out a
single frame with multiple images of a star at various telescope foci.
See the observing notes bullet on the main page for more information
on focusing.
A short exposure against the night sky will produce a good image of
the pupil.
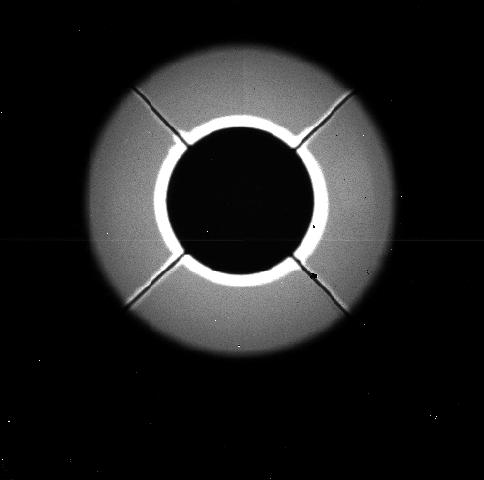
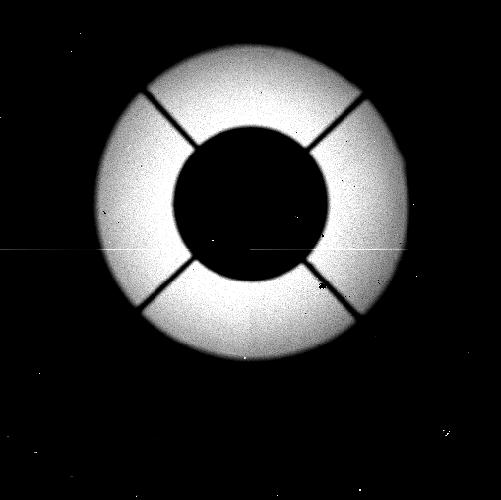
Here is an example of what a properly aligned
pupil mask should look like on the 1.5m
and 4m. The pupil mask is matched to the 4m
and does not cover the
entire central obstruction on the 1.5m.
Move "xpupil" and "ypupil"
around until the dark areas obscure as much of the bright as possible.
Default values are xpupil=??, ypupil=??.
Note that this procedure need only be done at most once per run, but it is a good idea to check that the pupil mask is correctly aligned before you start observing for the night.
[ Top of Page | Contents ]