
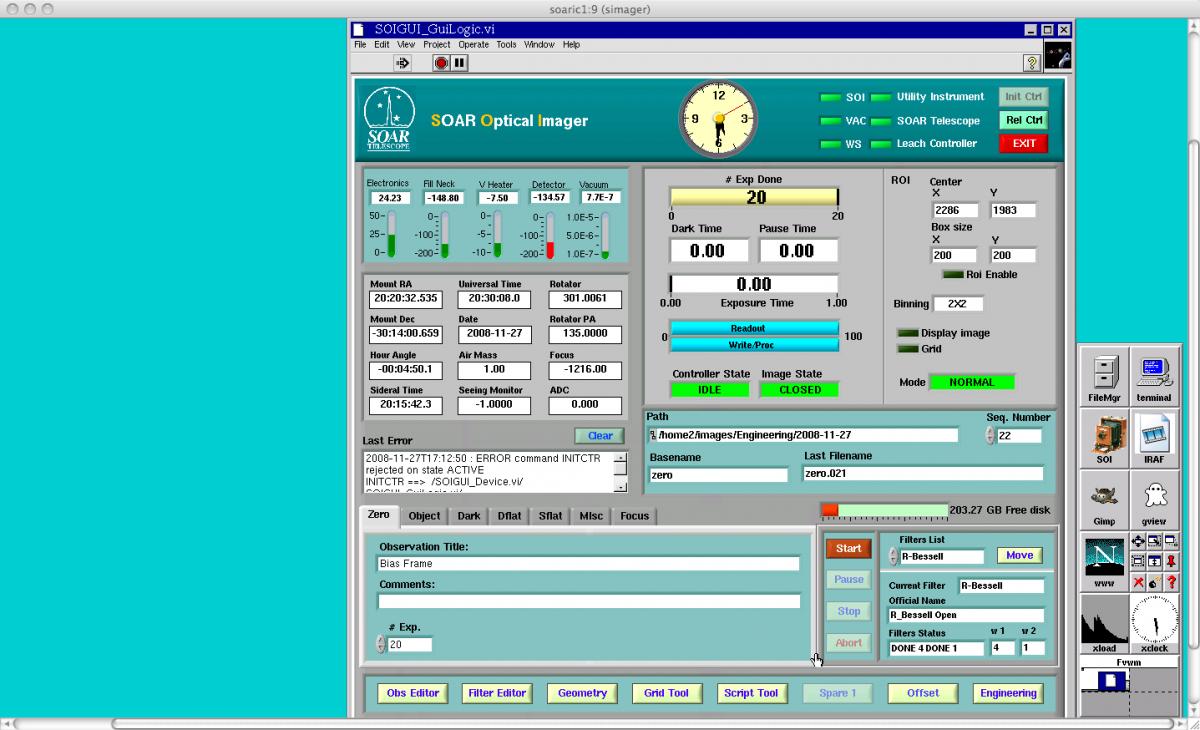
/soar/sites/default/files/SOI/soiobs1.jpg [1]Logging on to the Data Acquisition and Data Analysis Computer
The data acquisition and preliminary reduction computer is called soaric1. A number of different ways to logon to this machine exist, depending upon your preference. These methods are discussed below.
In most cases the GUIs should be started and you will be presented with a data acquisition screen and data analysis screen as shown in Figure 5.
 [1] [1] |
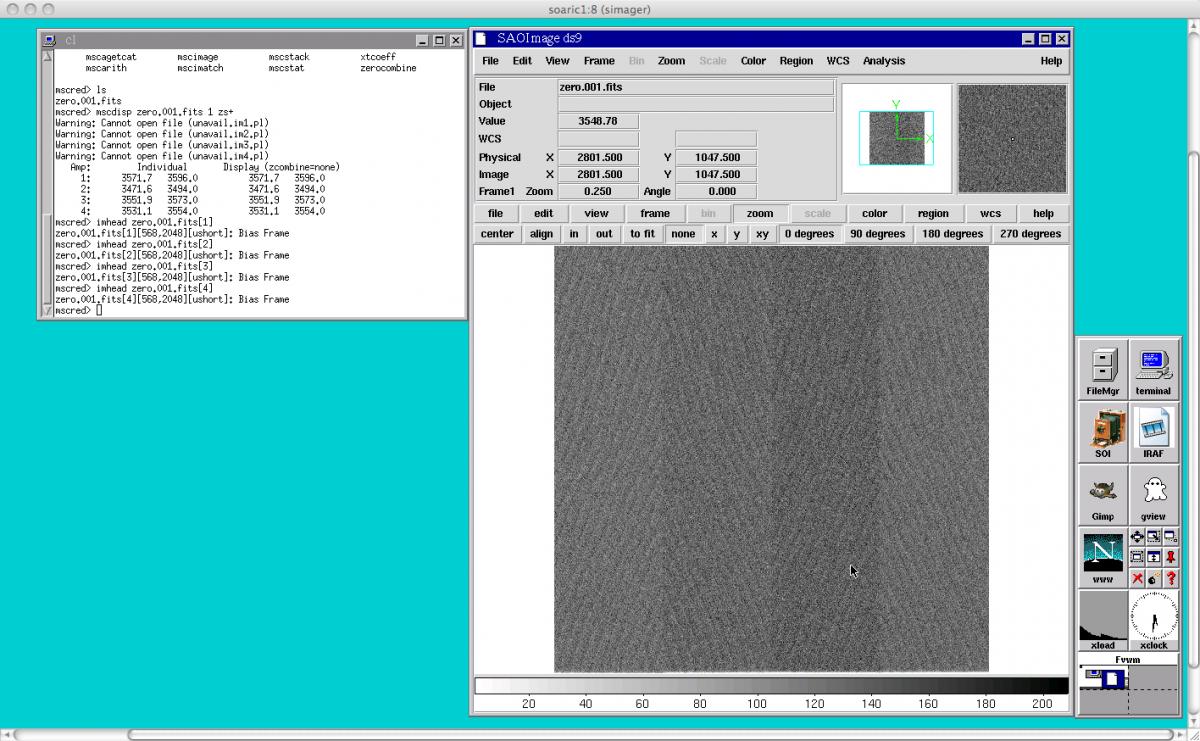 [5] [5] |
Figure 5: The SOI Data Acquisition and Data Analysis GUI windows.
Starting and Stopping the Data Acquisition GUI
If the data acquisition GUI has not been started, then one should see a light blue screen in the soaric1:9 VNC window with an xload and xclock window that has 8 buttons labeled FileMgr, terminal, SOI, IRAF, Gimp, gview, www, and some window manager utilities. To start the data acquisition software:
If the data acquisition GUI needs to be stopped:
Starting and Stopping the Data Analysis GUI
The SOI data analysis VNC window (soaric1:8) has the same base layout as the SOI data acquisition VNC window (soaric1:9). If the data analysis windows are not up, you will see the xload window and the accompanying buttons described in the data acquisition GUI startup section. Single click on the IRAF button and an IRAF window will open. You will want to open a DS9 window from within IRAF and load the mscred IRAF package.
All observing with the SOAR Optical Imager (SOI) is handled through the Data Acquisition GUI. Upon successful startup of the SOI data acquisition GUI on soaric1:9, one should see that the SOI data acquisition window looks something like that shown in Figure 5.
The SOI observing GUI can be divided into certain distinct regions as shown in Figure 6. These include the:
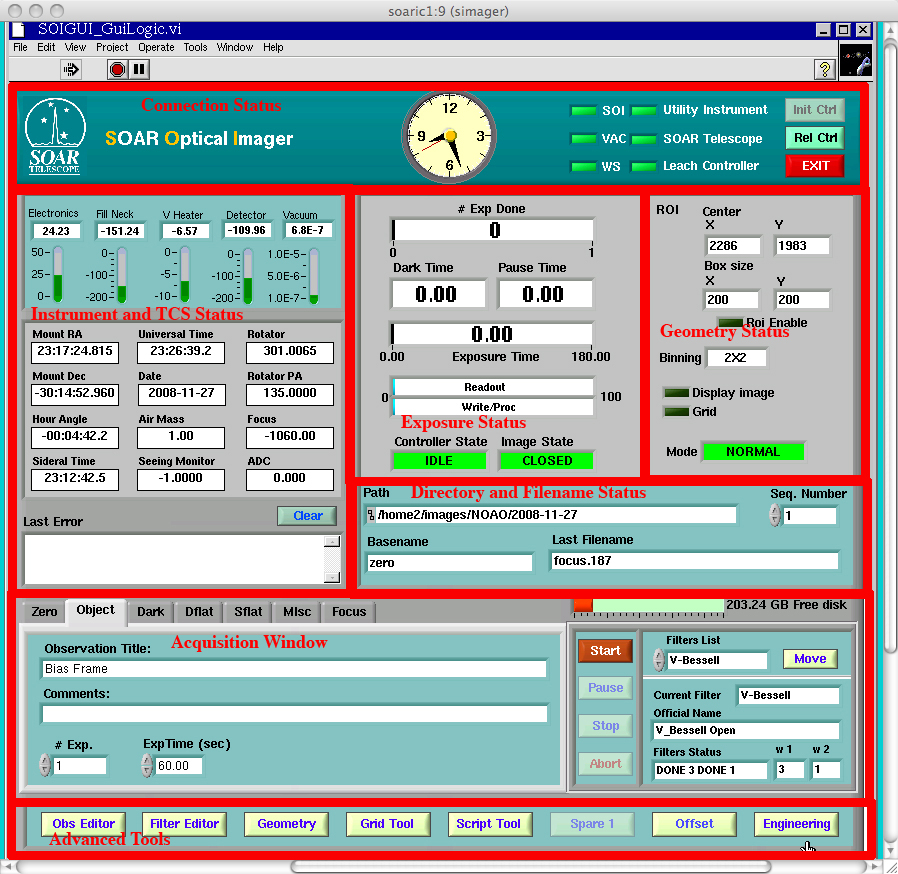 [6]
[6]
Figure 6: The SOI data acquisition GUI with regions demarcated and labeled.
These OBSTYPEs can be chosen by clicking on the appropriate tab in the upper left-hand side of this section of the GUI. In general, these tabs allow an observer to input the image title and an additional comment to the FITS header. All of the tabs that permit an observer to change the OBSTYPE of an image allow the observer to also change the exposure time of the image, except for a ZERO or Bias Frame observation. Furthermore, if the OBSTYPE is selected to be a DFLAT (Dome Flat), the observer is allowed to turn on and set the intensity of the White Spot Lamps. The Telescope Operators can provide you with the correct intensity values and exposure times for your Dome Flat observations. The "Misc" and "Focus" tabs in the Data Acquisition Region are not currently supported.
Also included in the Data Acquisition section of the SOI GUI are the Start, Pause, Stop, and Abort buttons. Pressing the "Start" button will begin the process of taking an exposure of the currently selected OBSTYPE. During an exposure, one may also click on the "Pause", "Stop", or "Abort" buttons. The "Pause" button will suspend an ongoing exposure until the "Resume" button is clicked. During this time, the shutter should close so that the detectors are no longer integrating on the sky, but the detectors will continue to accumulate cosmic ray hits and dark current. Upon clicking the "Resume" button, the shutter will open and the exposure will proceed as scheduled. Clicking the "Stop" button during an exposure will close the shutter, readout the CCDs, and write the data to the disk. Clicking the "Abort" button will close the shutter and discard the current image. The "Abort" button does not write data to the disk.
Finally, on the right-hand side of the Data Acquisition Region, the observer can select the filter to used during the current observation. To change a filter:
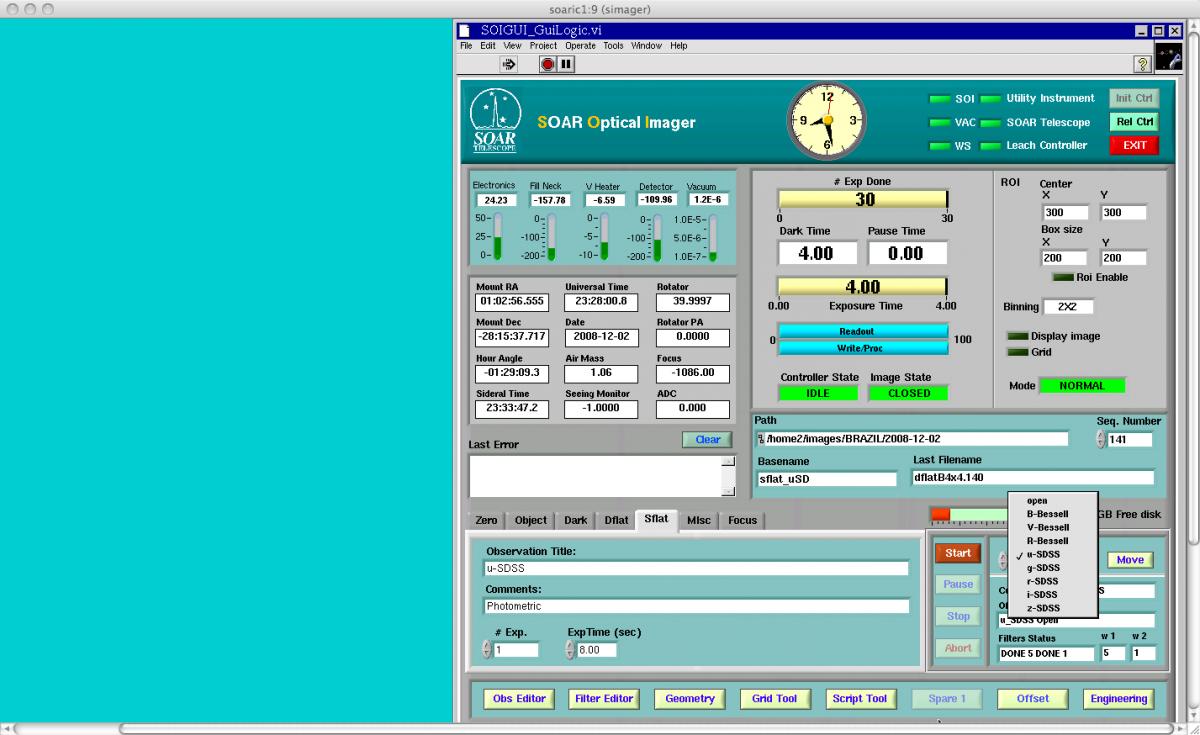 [7]
[7]
Figure 7: The SOI filter select interface.
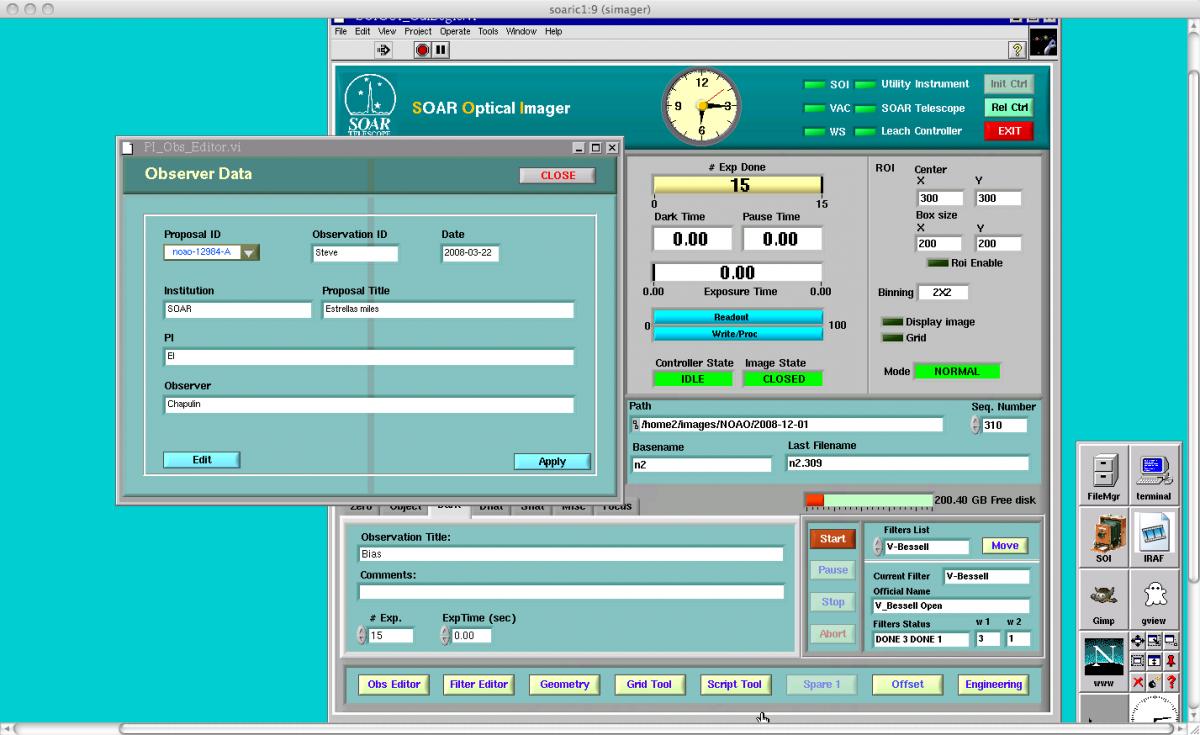 [8]
[8]
Figure 8: The SOI Observer Information interface.
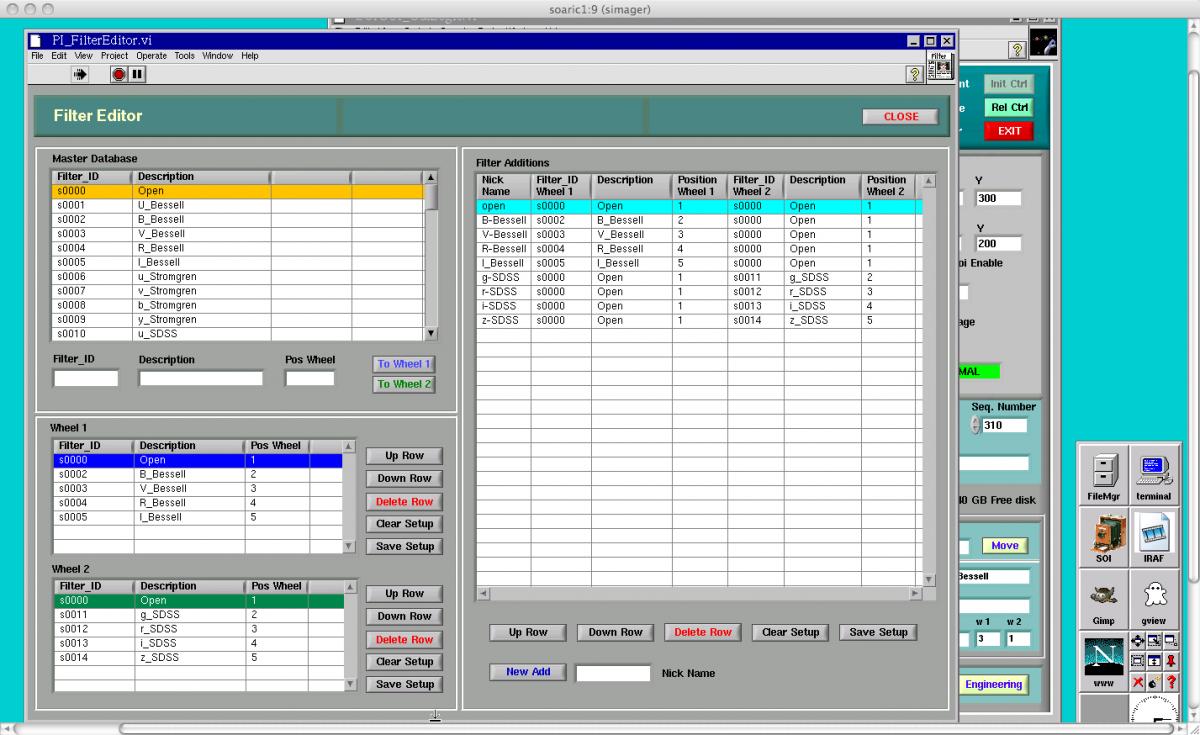 [9]
[9]
Figure 9: The SOI Filter Editor interface.
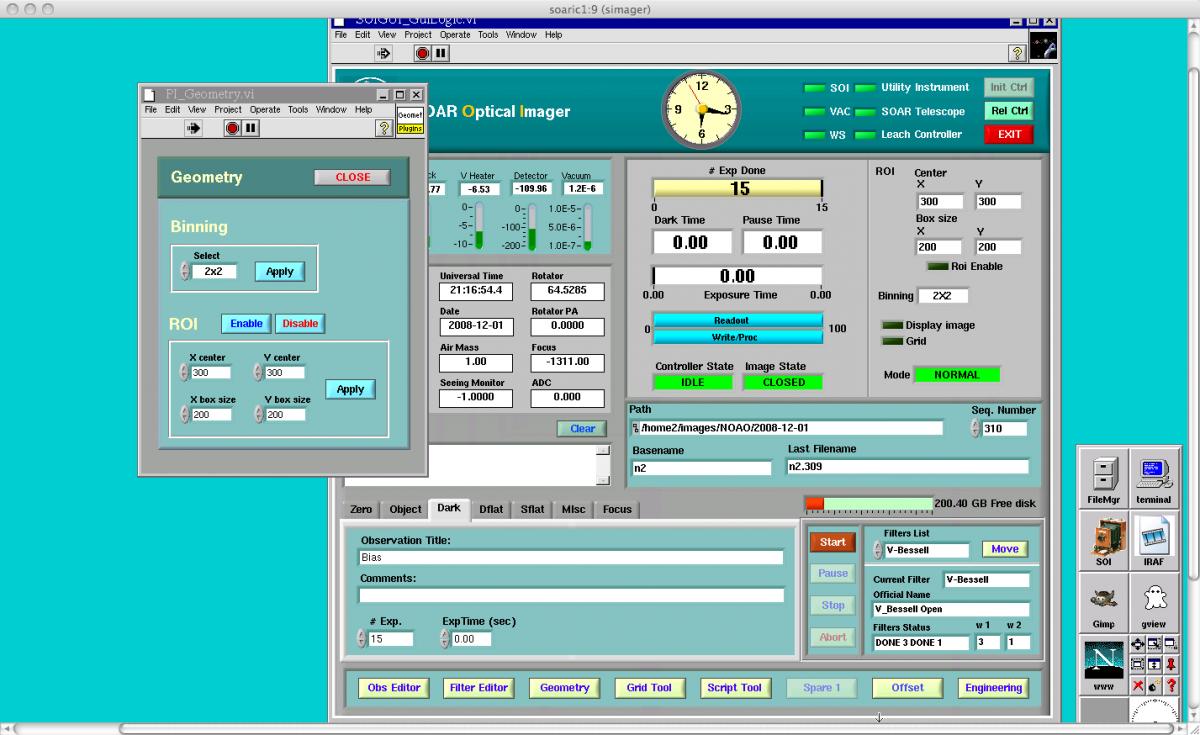 [10]
[10]
Figure 10: The SOI Geometry Editor interface.
To change the binning, click on the Binning "Select" Box. The available options will be shown to you. To finalize your binning selection, click the "Apply" button to the right of the selection box. You should notice that Binning indicator in the Geometry Status section of the GUI flashes from yellow to red during this change. The background of the Binning indicator will remain white after the binning has successfully changed.
To change the Region-of-Interest (ROI) readout of the CCDs, one must first enable the ROI dialog by clicking on the "ROI Enable" button on the Geometry Editor screen. After pressing the ROI button, you can enter the detector coordinates (x,y) and the size in (x,y) of the ROI. The detector coordinates are related to the current binning. Thus, for a 2x2 binned observation, the center of the detector is at (x,y) = (1024,1024).
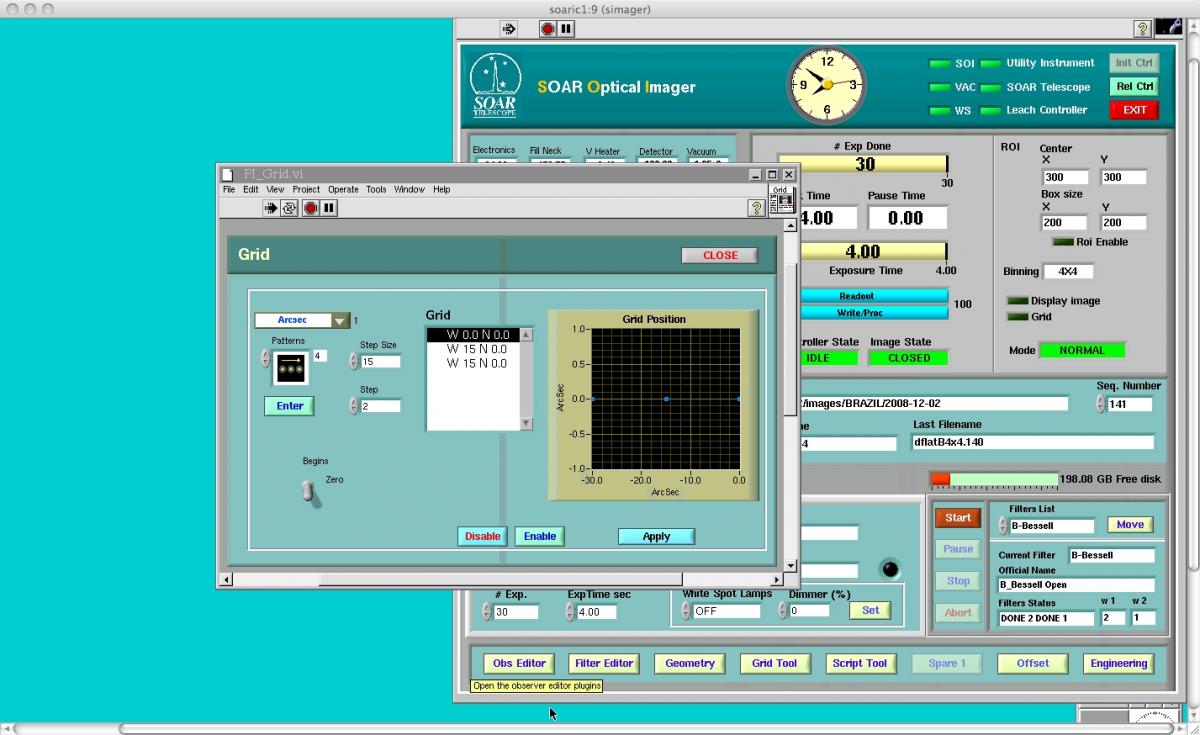 [11] [11] |
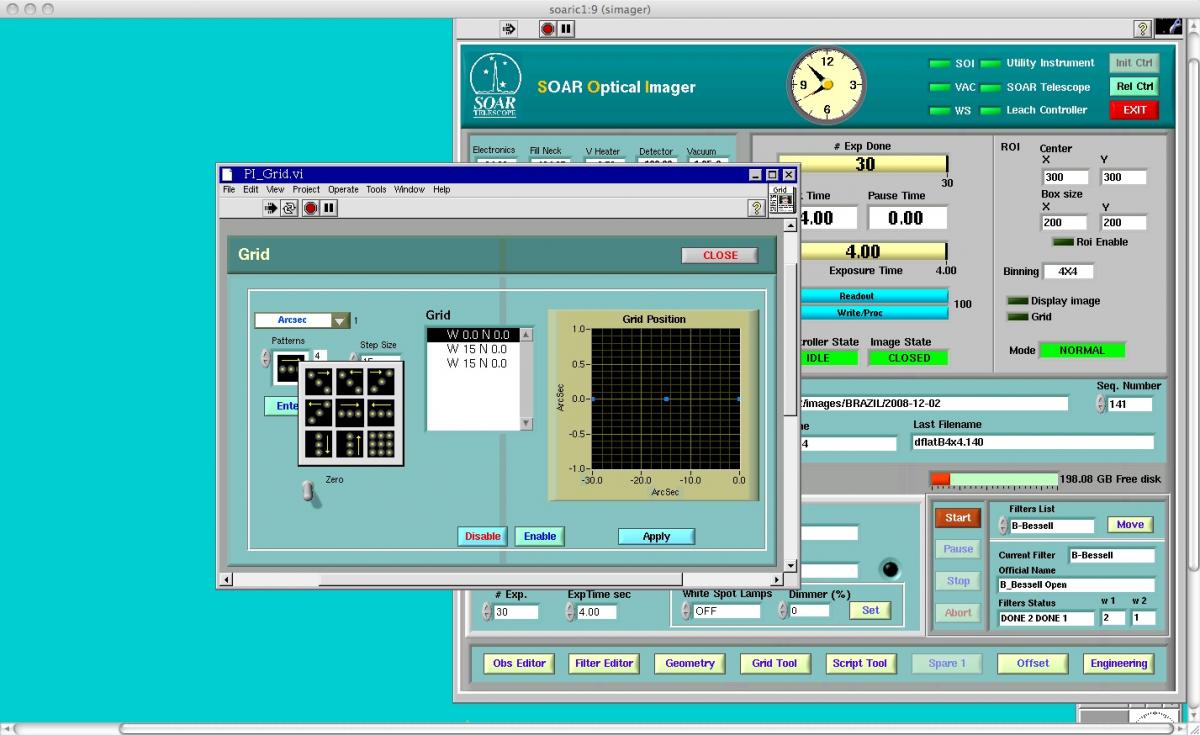 [12] [12] |
Figure 11 : The SOI Grid Tool Interface.
In order to apply a a dither pattern to the Grid Tool, one should
Prior to your run at SOAR with the Optical Imager, you should have completed the Instrument Setup Form [13]. When using SOI, it is important to send in this form well ahead of time so the proper filters [14] can be installed before your run. In the instrument setup form you can also specify what binning you will use during your run. The default readout is for 2x2 binning with fast readout. Information on the gain settings and readout noise for various binning options under fast readout can be found in the SOI Overview.
In addition to filling out the Instrument Setup Form [13], visiting observers should read the SOAR Visiting Astronomer´s webpage [15] for general information about traveling to and within Chile. Furthermore, visiting investigators should fill out the Travel Information Questionaire [16] so that your transportation and lodgings can be arranged.
Observing logs for your run can be downloaded here [17].
Setting Up for the Start of Your Night/Run
Before you begin observing with SOI, you should first make sure that the data acquisition GUI and the data analysis GUI are running as shown above in Figure 5. If these GUIs are not running, please refer to the sections of this manual about Starting and Stopping the Data Acquisition GUI [3] and Starting and Stopping the Data Analysis GUI [4]. If you have problems with starting either of these, please contact the Telescope Operators or the SOI instrument scientist (Sean Points). They will be able to help you with this task.
After the GUIs are running, you should check that:
You are now ready to use the SOAR Optical Imager. Information on how to takes exposures can be found in Basic GUI Layout [2] section.
You can also look at the step-by-step SOI Observer's Cookbook [18]for help on observing with SOI
At the end of your observing night, please fill out the End-of-Night [19] report for the telescope. Please make note of any problems that were encountered during the night so that they may be resolved before the next night's observing.
Also, at the end of your night observing with SOI, you may want to transfer your data back to your home institution. To do so, open a Terminal window in either the Data Acquisition GUI or the Data Analysis GUI. Once the Terminal window is open, change directories to where your data are located on soaric1. You may then use scp at the shell prompt to copy the data to your home institution.
After your run is complete, please fill out the End-of-Run [20] report.
Links
[1] http://www.ctio.noirlab.edu/soar/sites/default/files/SOI/soiobs1.jpg
[2] http://www.ctio.noirlab.edu/soar/content/soi-software#S4
[3] http://www.ctio.noirlab.edu/soar/content/soi-software#S2
[4] http://www.ctio.noirlab.edu/soar/content/soi-software#S3
[5] http://www.ctio.noirlab.edu/soar/sites/default/files/SOI/soiiraf1.jpg
[6] http://www.ctio.noirlab.edu/soar/sites/default/files/SOI/soiobs3.jpg
[7] http://www.ctio.noirlab.edu/soar/sites/default/files/SOI/filtermove1.jpg
[8] http://www.ctio.noirlab.edu/soar/sites/default/files/SOI/obsdata1.jpg
[9] http://www.ctio.noirlab.edu/soar/sites/default/files/SOI/filtereditor1.jpg
[10] http://www.ctio.noirlab.edu/soar/sites/default/files/SOI/geometry1.jpg
[11] http://www.ctio.noirlab.edu/soar/sites/default/files/SOI/grid3.jpg
[12] http://www.ctio.noirlab.edu/soar/sites/default/files/SOI/grid5.jpg
[13] http://www.ctio.noao.edu/SOAR/Forms/INST/setup.php
[14] http://www.ctio.noirlab.edu/soar/content/filters-available-soar
[15] http://www.ctio.noirlab.edu/soar/content/visiting-astronomers-guide
[16] http://www.ctio.noao.edu/travel/itinerary.php
[17] http://www.ctio.noirlab.edu/soar/content/soar-observing-logs
[18] http://www.ctio.noirlab.edu/soar/sites/default/files/SOI/soi_tutorial_Oct2015.pdf
[19] http://www.ctio.noao.edu/SOAR/Forms/EON/Form.php?telescope=SOAR
[20] http://www.ctio.noao.edu/new/Tools/Forms/EOR/Form.php?telescope=SOAR